Civitai is a platform that hosts a variety of machine learning models.
In this article, we will walk you through the process of taking a model from Civitai and creating an API for it.
This will allow you to integrate the model into your applications and make predictions using a simple HTTP request.
Prerequisites
Before we begin, make sure you have the following installed and prepared:
- Node.js and npm installed
- Postman, Insomnia or cURL to test our API
- Civitai account created
- Buzz balance to generate images
If everything is in its place, let's start working on the project.
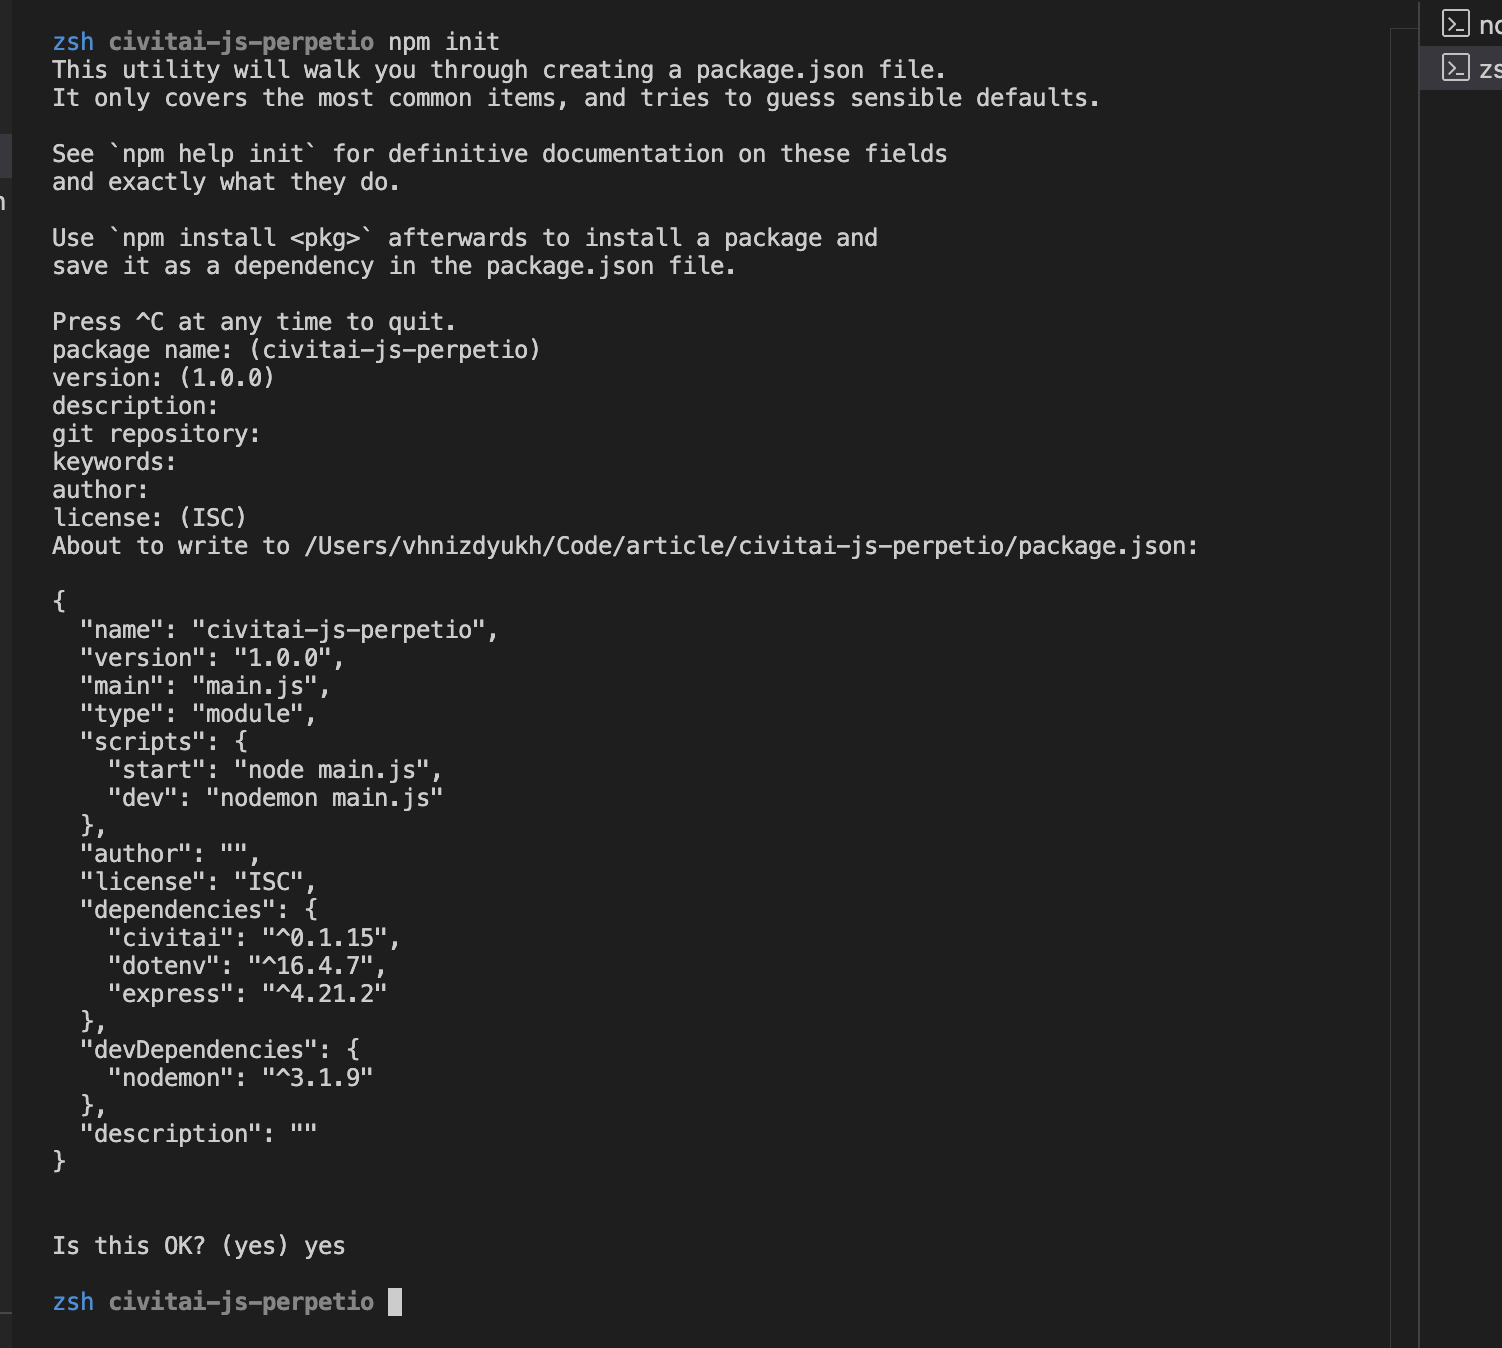
Step 1: Initialize the project
First, navigate to your project directory and run the npm init command in the terminal and enter the prompts or skip each prompt by pressing Enter.
The npm init command is used to create a new package.json file for your Node.js project. This file contains metadata about your project and its dependencies.
Step 2: Set up backend with dependencies
For this demo, we will be using the Express framework, but you can select any framework you are comfortable with. Also, we need to install dotenv and civitai packages. Dotenv is a module that loads environment variables from a .env file into process.env.
Civitai has a JavaScript SDK to easily run Civitai models from your Node.js code. Install the necessary packages:
npm install express dotenv civitai
Step 3: Set up environment variables
Let's now set up our environment variables.
- Go to the Civitai website.
- If you don't have an account, sign up for a new account.
- If you already have an account, log in.
- Navigate to API Settings:
- Once logged in, go to your account settings.
- Look for an API Keys section.
- Generate API Token:
- In the API Keys section, you should find an Add API key button.
- Copy the API Token:
- After generating the token, copy it to your clipboard.
- Create a .env file in the root directory if it doesn't exist.
- Add the following content to the .env file:CIVITAI_API_TOKEN=your_token
All done! Now, we can choose a model for our API.
Step 4: Choose a Model from Civitai

Visit Civitai and browse through the available models. For this tutorial, we will use a pre-trained image classification model. Once you have selected a model, copy the model's AIR (AI Resource) to the clipboard.
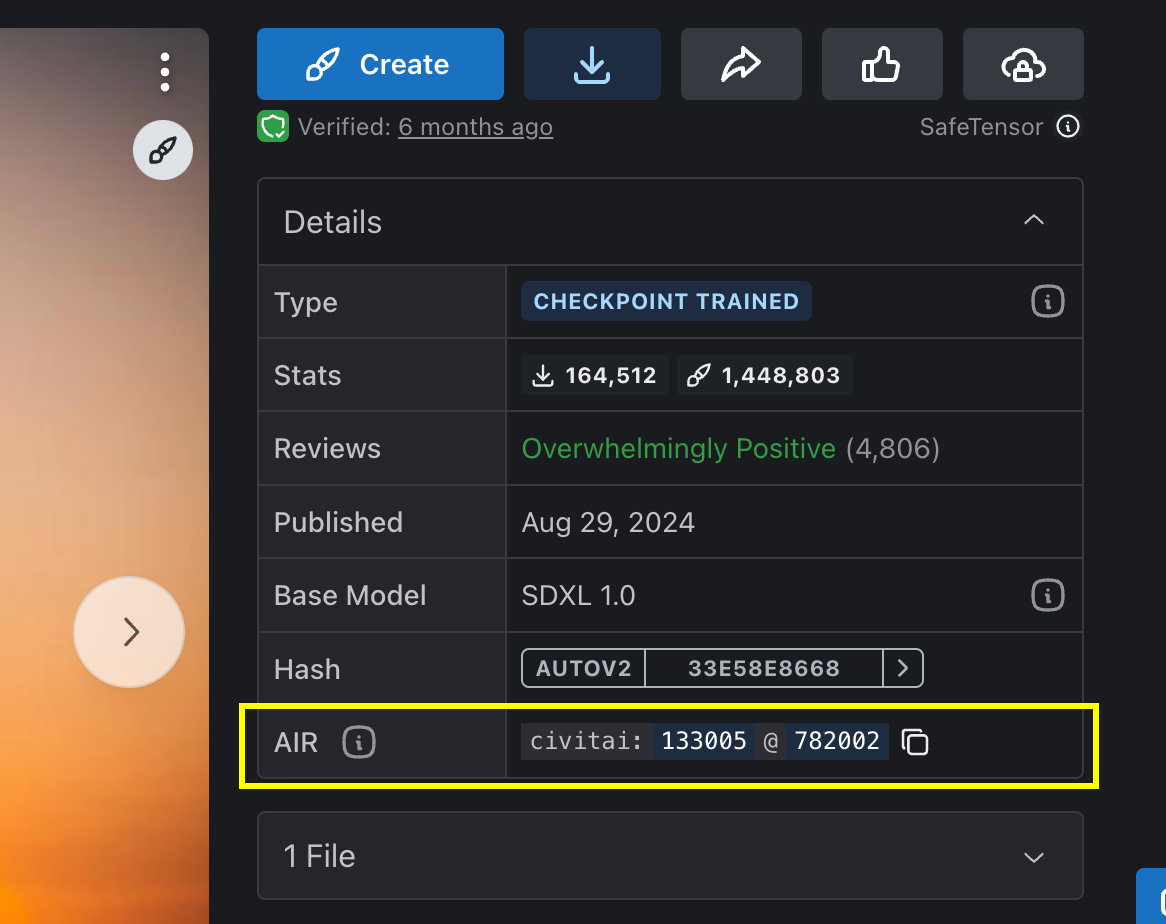
The copied AIR should look like this:
urn:air:sdxl:checkpoint:civitai:133005@348913
For this tutorial, we selected the Juggernaut XL model.
Step 5: Set Up API Endpoints
Create an entry JavaScript file main.js and write a code to start an Express app:
import pkg from 'civitai';
import express from 'express';
import dotenv from 'dotenv';


dotenv.config();


const { Civitai, Scheduler } = pkg;
const app = express();
const port = 5000;


app.listen(port, () => {
 console.log(`App is listening on port ${port}`);
});


// Middleware to parse JSON request bodies
app.use(express.json());
Initialize Civitai client:
const CIVITAI_API_TOKEN = process.env.CIVITAI_API_TOKEN;


const civitai = new Civitai({
 auth: CIVITAI_API_TOKEN,
});
Declare the model you want to use into a variable:
const MODEL = 'urn:air:sdxl:checkpoint:civitai:133005@348913';
Add endpoint to generate image:
app.post('/image', async (req, res) => {
 const input = {
   model: MODEL,
   params: {
     prompt: req.body.prompt,
     negativePrompt:
       '(deformed iris, deformed pupils, semi-realistic, cgi, 3d, render, sketch, cartoon, drawing, anime, mutated hands and fingers:1.4), (deformed, distorted, disfigured:1.3)',
     scheduler: Scheduler.EULER_A,
     steps: 20,
     cfgScale: 7,
     width: 512,
     height: 512,
     clipSkip: 1,
   },
   quantity: 1,
   priority: 0,
 };


 try {
   const response = await civitai.image.fromText(input);
   res.send(response);
 } catch (error) {
   console.error(error);
   res.status(400).send({ message: error.message });
 }
});
Add an endpoint to retrieve job by the token received in previous request:
app.get('/jobs/:token', async (req, res) => {
 const token = req.params.token;


 try {
   const response = await civitai.jobs.getByToken(token);
   res.send(response);
 } catch (error) {
   console.error(error);
   res.status(400).send({ message: error.message });
 }
});
Step 6: Test the API
NOTE: You should add a start script into package.json, but we will simplify it.
Start the Express application by running the following command in your terminal ():
node main.js
The application will start a local server on port 5000. You can now test the API using a tool like Postman, Insomnia or cURL.
Here is an example of how to test the API using cURL, you can paste this code into Postman:
Replace prompt with desired image prompt.
curl --location --request POST 'http://127.0.0.1:5000/image' \
--header 'Content-Type: application/json' \
--data '{
   "prompt": "RAW photo, face portrait photo of 26 y.o woman, wearing black dress, happy face, hard shadows, cinematic shot, dramatic lighting"
}'
You should receive a JSON response with a token that can be used to get a status update on all the jobs in the collection and jobs field with a list of individual statuses for each generated job.
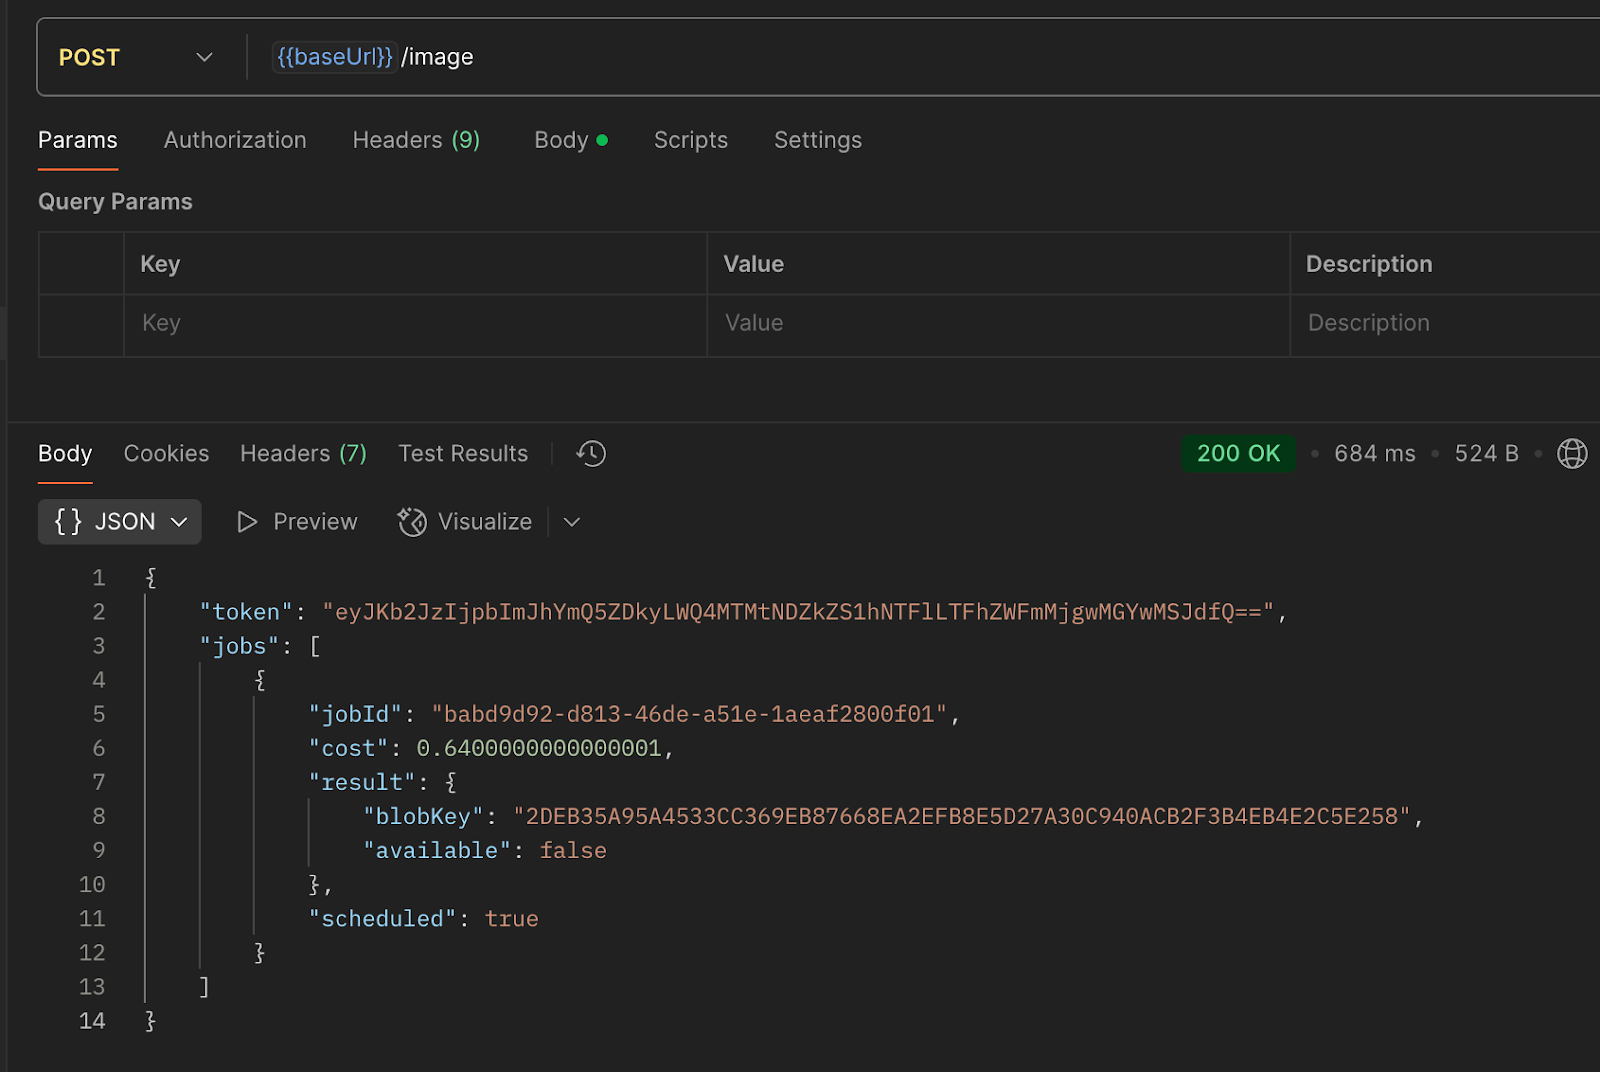
To retrieve job update, you can make this request, replacing :token with your token:
curl --location --request GET 'http://127.0.0.1:5000/jobs/:token'
Response JSON should contain job results with a blobUrl field, which contains a link to our image.

Here are our generated images using Juggernaut XL model:


Step 7: Deploy the API
To make your API accessible to others, you can deploy it to a cloud service like Heroku, AWS, or Google Cloud. Each platform has its own deployment process, so refer to their documentation for detailed instructions.
Conclusion
In this article, we have shown you how to take a model from Civitai and create an API for it using Express. This allows you to integrate the model into your applications and make predictions using a simple HTTP request.
We hope you found this tutorial helpful and encourage you to explore more models on Civitai and create your own APIs.
Additional Resources
- Civitai documentation - https://developer.civitai.com/docs/intro
- Express Documentation - https://expressjs.com/
- Civitai - https://civitai.green/