
Today facial recognition technology has emerged as a revolutionary tool with its ability to identify and authenticate users based on their unique facial features. Face recognition has found its way into various applications from unlocking smartphones to different entertainment and social network apps.
As an example, dozens of social network apps out there feature face mask filters: users can put on different masks while recording themselves with a front-facing camera and the mask will be attached to their face and even mimic facial expressions.
In this blog post, we explain how facial recognition technology works, which benefits it can introduce for your business, and how to build a facial recognition AR mask feature from scratch based on our project.
The State of Facial Recognition Technology Adoption Today
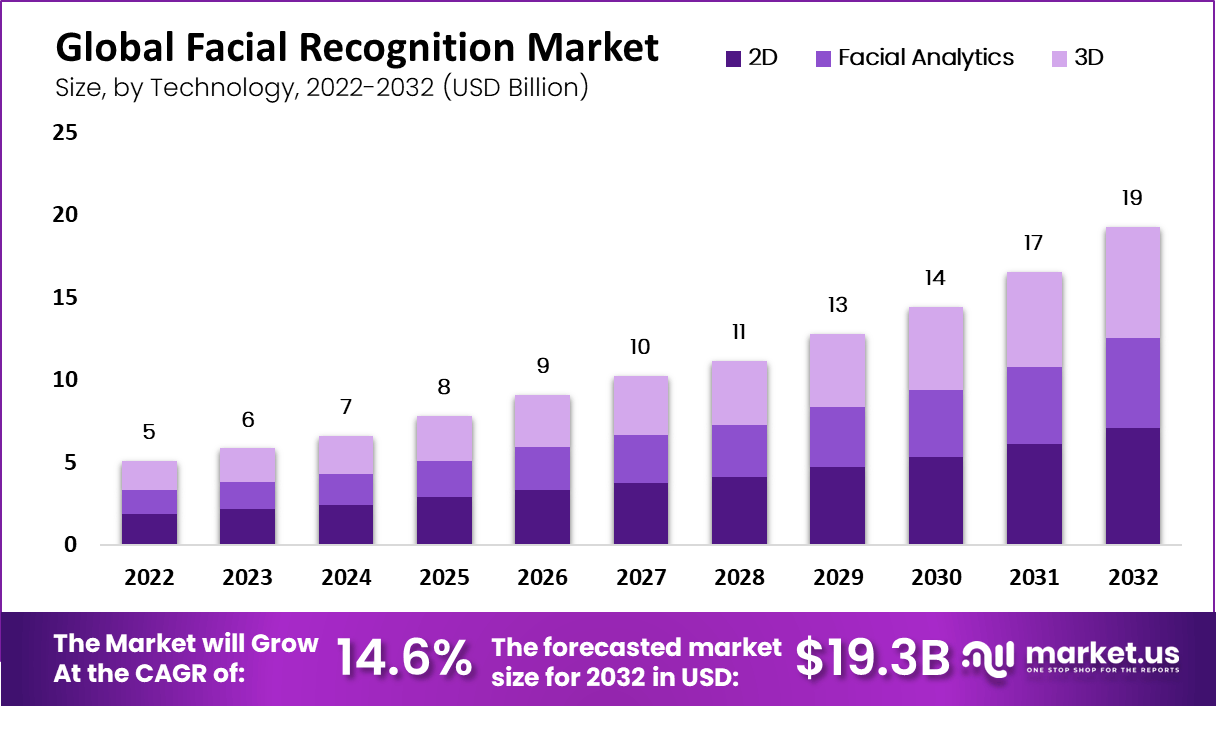
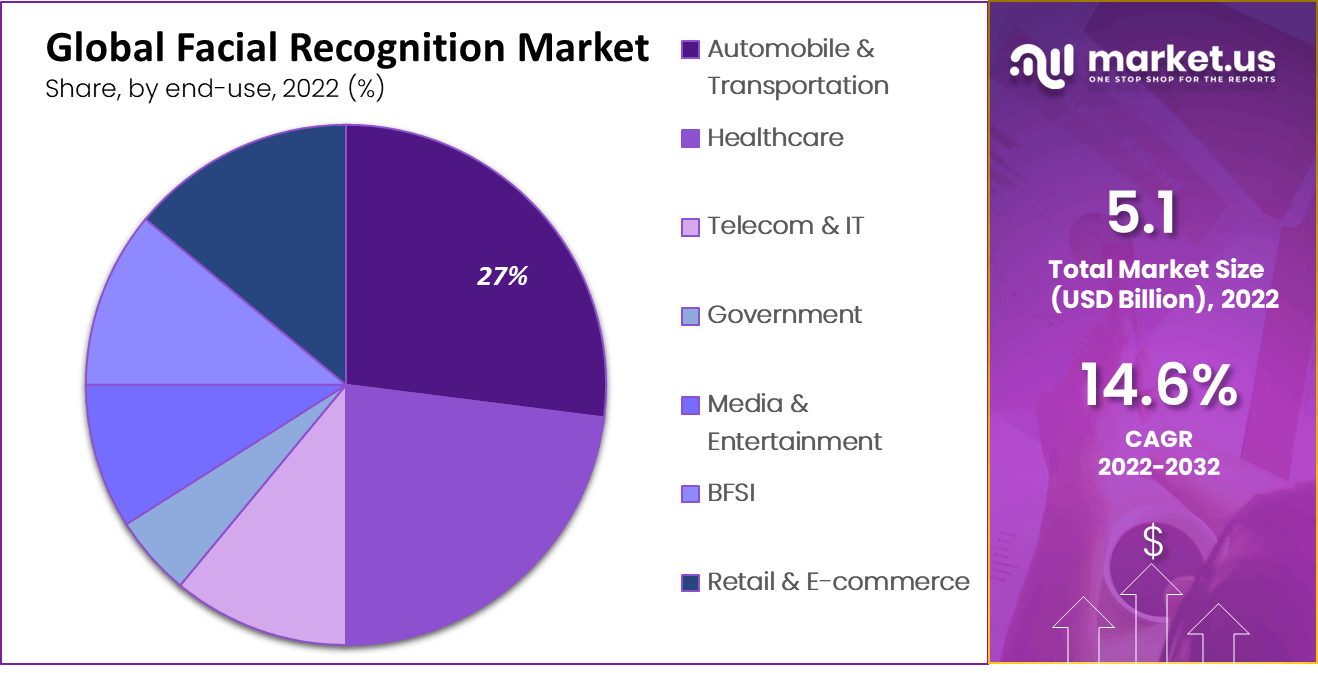
Facial recognition has already shifted from being a straight-out-of-spy-movies technology to an everyday tool every smartphone owner interacts with. The prevalence of facial recognition is growing year to year: the global facial recognition market size was predicted to increase from $5.1 billion in 2022 to $19.3 billion in 2032, with a CAGR of 14.6% between 2023 and 2032.
Such numbers are not surprising at all: facial recognition brings uncountable benefits to businesses of all kinds, from small online retailers wanting to ease up the processes for their customers to enterprises investing in enhanced security.
As for the most active facial recognition adopters, the top two segments in the market were e-commerce and retail with 22.1% of all global revenue. These industries use facial recognition for better customer service and process automation.
Let’s take a closer look at the advantages that motivate companies to implement facial recognition.
How Your Business Can Benefit From Facial Recognition Technology
Many entrepreneurs tend to think about facial recognition’s role as limited to security only. It is partly true: facial recognition brings your mobile app’s security to the next level with biometric logins. At the same time, there is much more this technology can offer.

Enhanced app security
Most smartphone owners don’t bother entering their passcodes anymore – Face ID is a much more practical and reliable method of accessing a device. While anyone can learn someone else’s passcode and get unauthorized access to the device, the Face ID feature eliminated such a possibility and protects user’s data from intruders.
Various mobile apps, especially those operating sensitive data, rely on eKYC (electronic Know Your Customer) technology. eKYC allows identifying users based on scanning their documents and biometric data, like fingerprints or, more commonly, facial features. Banking apps often use eKYC to grant or deny access to the app, confirm transactions, or sign documents.
eKYC does not only comes on par with traditional KYC technology but takes it a step further as it is a data-driven method of verifying one’s identity, without a human error possibility.
Automated processes
Speaking of eKYC and similar facial recognition-based technologies, these are not only effective for enhanced security measures but make many business processes quicker and simpler. For example, introducing eKYC in financial organizations can improve operational efficiencies in KYC processes by up to 50%.
Of course, automation through facial recognition doesn’t only include the fintech industry. Some other applications of this tool for process automation can be log-ins into apps and other systems, recognizing people of the photos and videos, in-app payment confirmation, and more.
Improved customer service
Facial recognition can be your key to better personalization too. The one-fits-all approach hasn’t been effective for years as users are expecting tailored suggestions and offers instead of scrolling through options for hours.
There are two main ways to introduce facial recognition for better personalization:
- Identify customers and assign them to a target group (e.g. based on eye color for a makeup marketplace or skin condition for a skincare brand’s app) and suggest goods based on their group
- Let users try on items through dedicated augmented reality filters
Such strategies can help increase the quality of the online services of e-commerce platforms and engage users with the goods they have to offer.
Stand-out marketing strategy
Facial recognition and AR face masks in particular can be a great way to attract some attention to your brand and develop an out-of-box marketing strategy. For example, you can create a set of virtual items, like hats, to celebrate a new product and, thus, let users engage with the application and promote your brand outside the app.
Your AR filter campaign doesn’t have to come down to digital accessories: you can make a fun little game for users to engage them in an in-app experience. For example, there is an Instagram AR mask filter that lets users play a legendary Flappy Bird by blinking.

Which Tool to Use for Facial Recognition Technology?

Now that it’s clear that facial recognition is becoming more and more of a must-have for app security and optimization, you might wonder how this technology can be implemented.
There are several tools mobile app developers can use for building facial recognition apps, such as DeepAR, OpenCV, Amazon Rekognition, Kairos, and Apple’s ARKit.
As we are to develop an iOS app, choosing Apple’s framework created specifically for iPhone apps seems like a logical decision. Plus, ARKit is a feature-rich tool that can be used to complete virtually any AR or facial recognition-related task for iOS apps.
A few words about ARKit

In simple words, ARKit is a framework introduced by Apple alongside iOS 11 to give third-party developers an opportunity to make their own apps featuring augmented reality.
ARKit uses the device's camera and depth sensor to determine the distance to an object. This will come in handy for our project, so we can track the user's face and apply a mask to it.
ARKit offers a wide range of features and capabilities for building immersive AR experiences on iOS devices. Here are some key features of ARKit:
- World Tracking: ARKit provides robust and accurate motion tracking, enabling the detection of the device's position and orientation in real-world space. World tracking allows virtual content to be placed and anchored in the real world with high precision.
- Scene Understanding: ARKit can analyze and understand the scene's geometry and spatial mapping, enabling virtual objects to interact with the real world realistically.
- Face Tracking: ARKit supports real-time face tracking, allowing developers to track and analyze facial expressions and movements.
It can detect and track facial features such as eyes, eyebrows, nose, mouth, and tongue.
- Image Tracking: ARKit allows for the tracking of 2D images, enabling the recognition and placement of virtual content based on specific target images. It can track images from the device's camera feed, identifying predefined images and triggering AR experiences accordingly.
- Object Tracking: With ARKit, developers can track and place virtual content onto specific 3D objects or physical objects in the real world.
- Light Estimation: ARKit provides real-time light estimation, allowing virtual objects to be illuminated realistically based on the surrounding environment's lighting conditions.
- Collaborative Sessions: ARKit supports collaborative sessions, enabling multiple users to share and experience the same augmented reality environment simultaneously.
- Integration with Other Technologies: ARKit seamlessly integrates with other iOS frameworks, such as SceneKit, SpriteKit, and Metal, enabling developers to leverage their capabilities for rendering, animation, and physics simulation in AR applications.
These features of ARKit empower developers to create immersive, interactive, and realistic augmented reality experiences on iOS devices. By combining the power of device motion tracking, scene understanding, face tracking, image tracking, and object tracking, ARKit opens up endless possibilities for building innovative AR applications.
How does Facial Recognition Technology Work?
Any iOS device with a true depth camera (take all the recent iPhone models out there) can project infrared dots matrix and create a depth map of an image. Basically, iPhone is projecting thousands of dots into your face to analyze it and create a digital image of it. With machine learning and face recognition algorithms, it can recognize a face in front of a camera.
How to Build an Image Recognition App with AI and Machine Learning
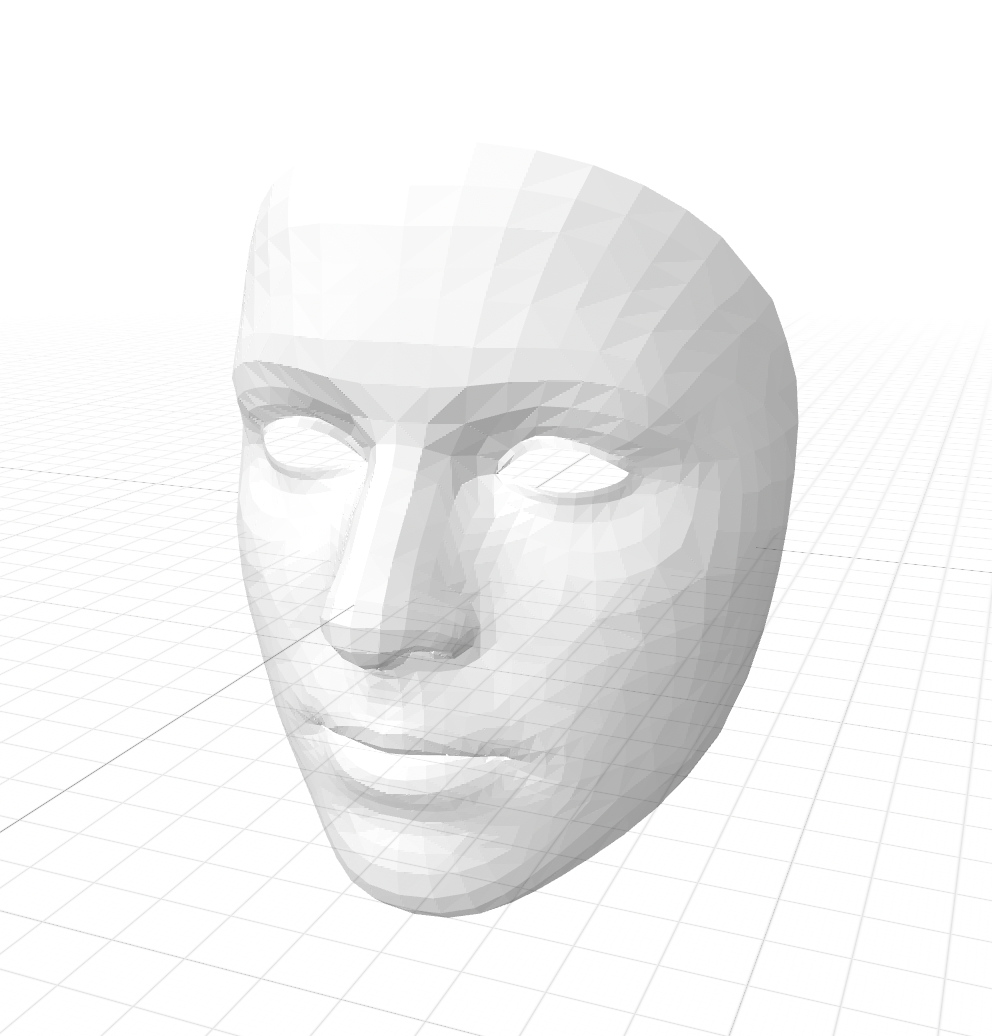
After the camera detects a face, ARKit creates a face anchor, which represents the position, orientation, and topology of the tracked face. The face anchor acts as a reference point for placing virtual content accurately on the user's face in augmented reality. With face detected we can create ARSCNFaceGeometry: a 3D model of the face (check the picture above). Based on this 3D model, developers can apply a face mask image as a texture and create a content node to later update its position relative to the face.
How do Digital Masks Work?
After we’ve discovered how ARKit detects faces and what a face 3D model looks like, let's talk about how 2D textures are applied to a 3D object. When applying an image to a 3D object, such as an ARFaceGeometry, we typically use texture mapping. Texture mapping involves mapping a 2D image onto the surface of a 3D object, giving it a more realistic and detailed appearance.
So how can we create a mask for this project? Fortunately using materials provided by Apple in their Tracking and Visualizing Faces demo project we can observe how 3D mask texture would appear in 2D.
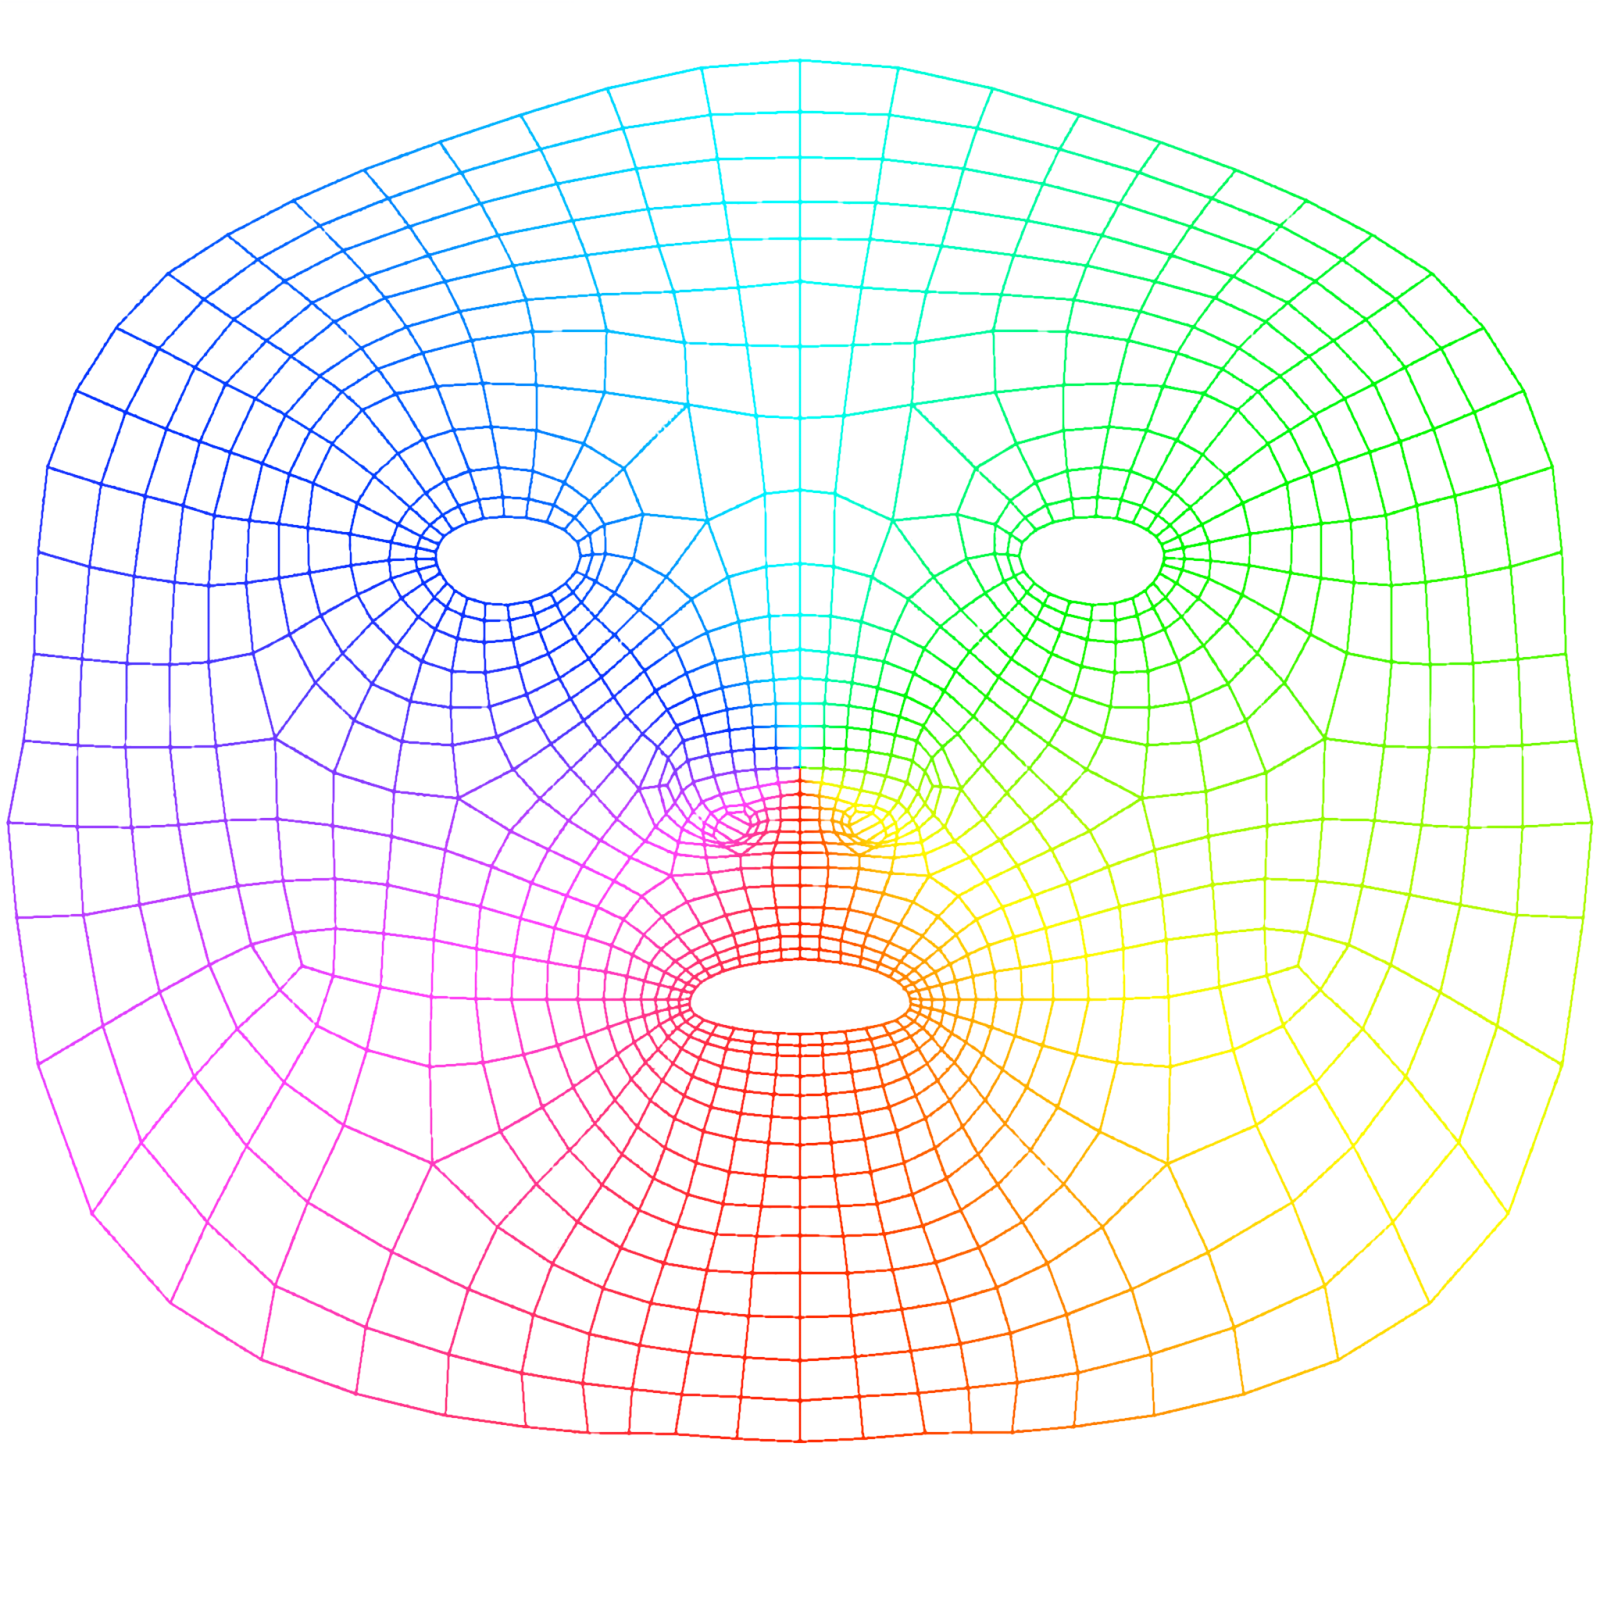
We can import this texture to the image editor as a separate layer to use as a reference to create our own masks by drawing those by hand or adjusting existing images (arranging mouth and eyes with wireframe texture so cutouts would match).
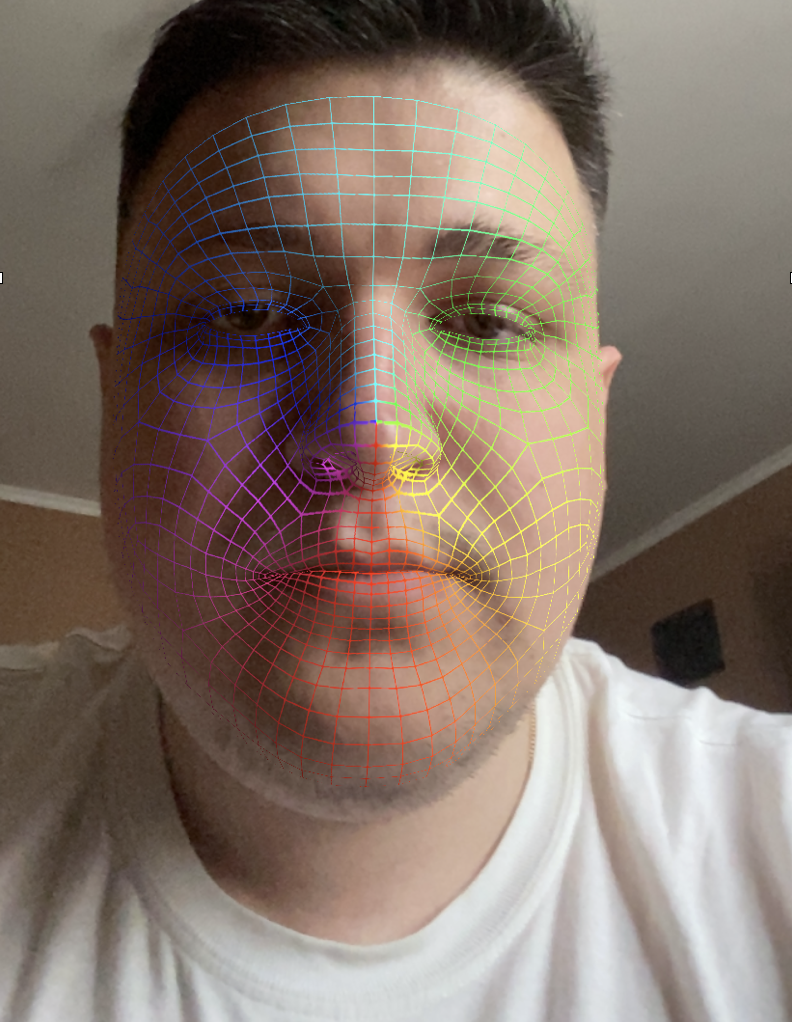

Pay attention to how a wireframe texture mask is being stretched on the image but maps perfectly on the face geometry object.
Let's now use this approach to create our own mask with a GIMP image editor.
First, we will open GIMP or any other editor and import wireframe texture as a bottom layer.

Now, we can add a mask or an image we want to use as a mask.
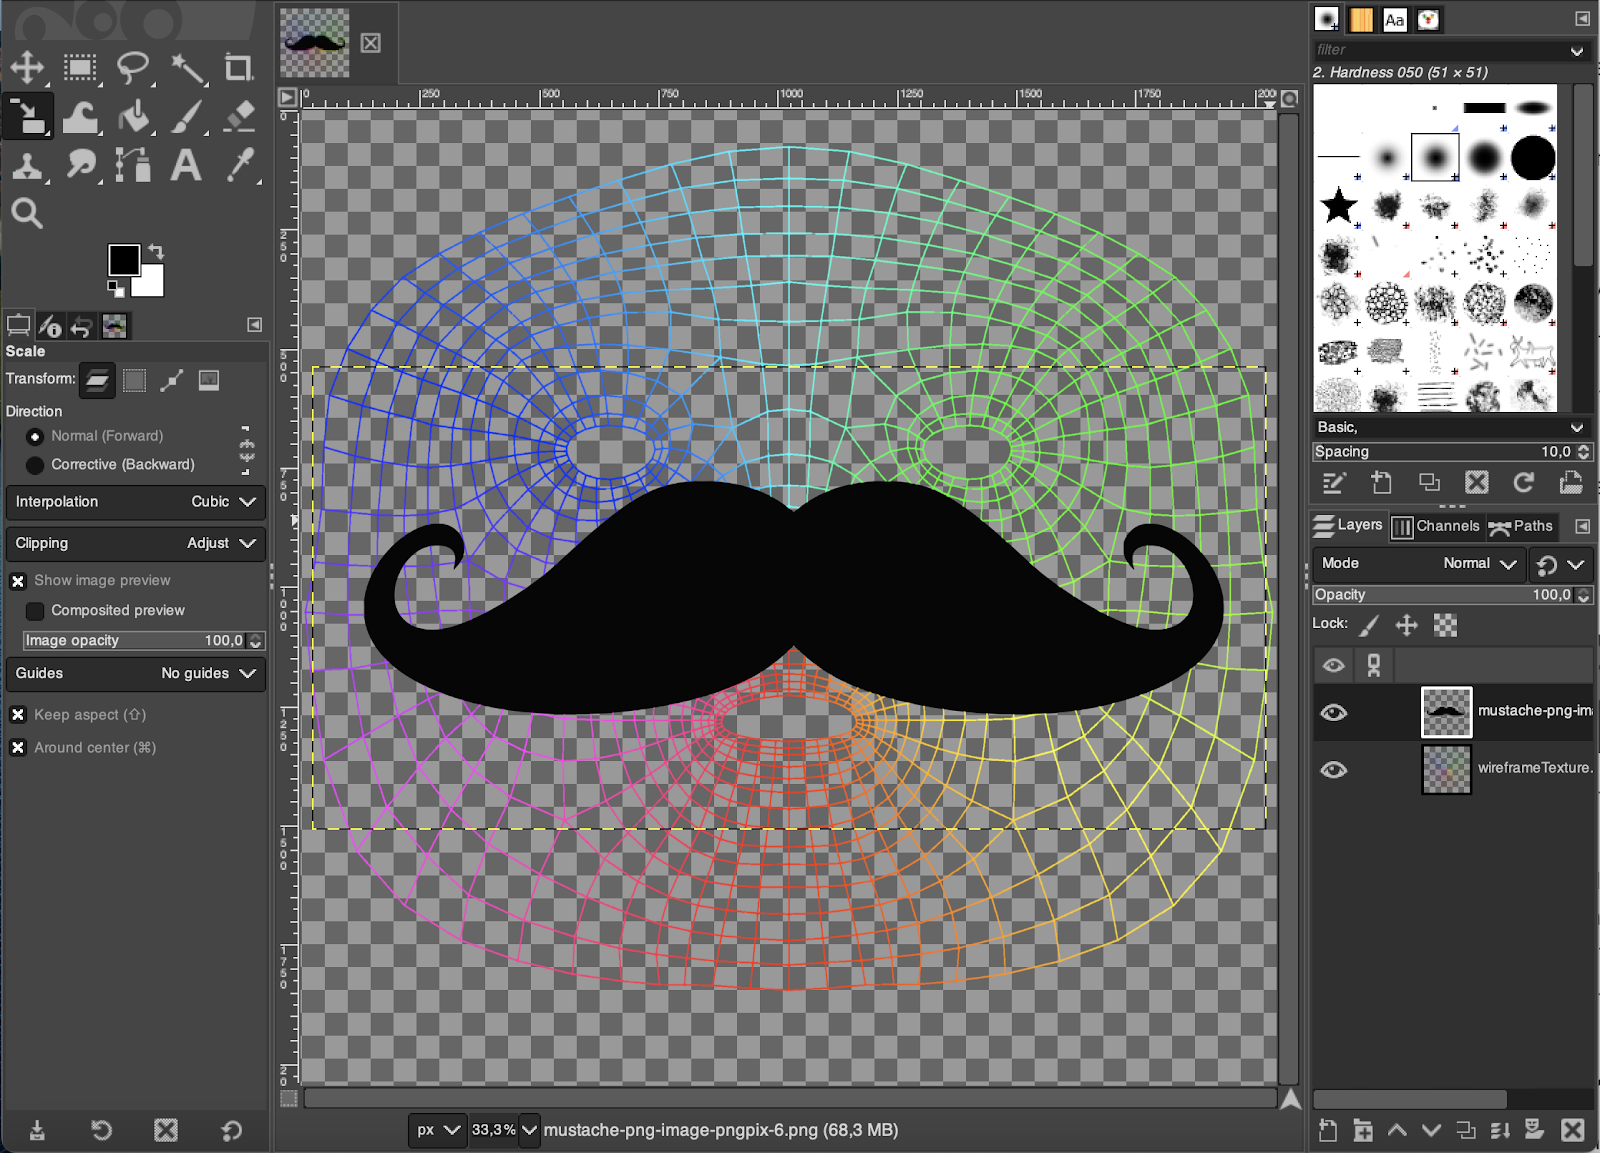
We now have our image on top of the wireframe texture and can adjust it to face geometry, so it matches the face proportions perfectly.
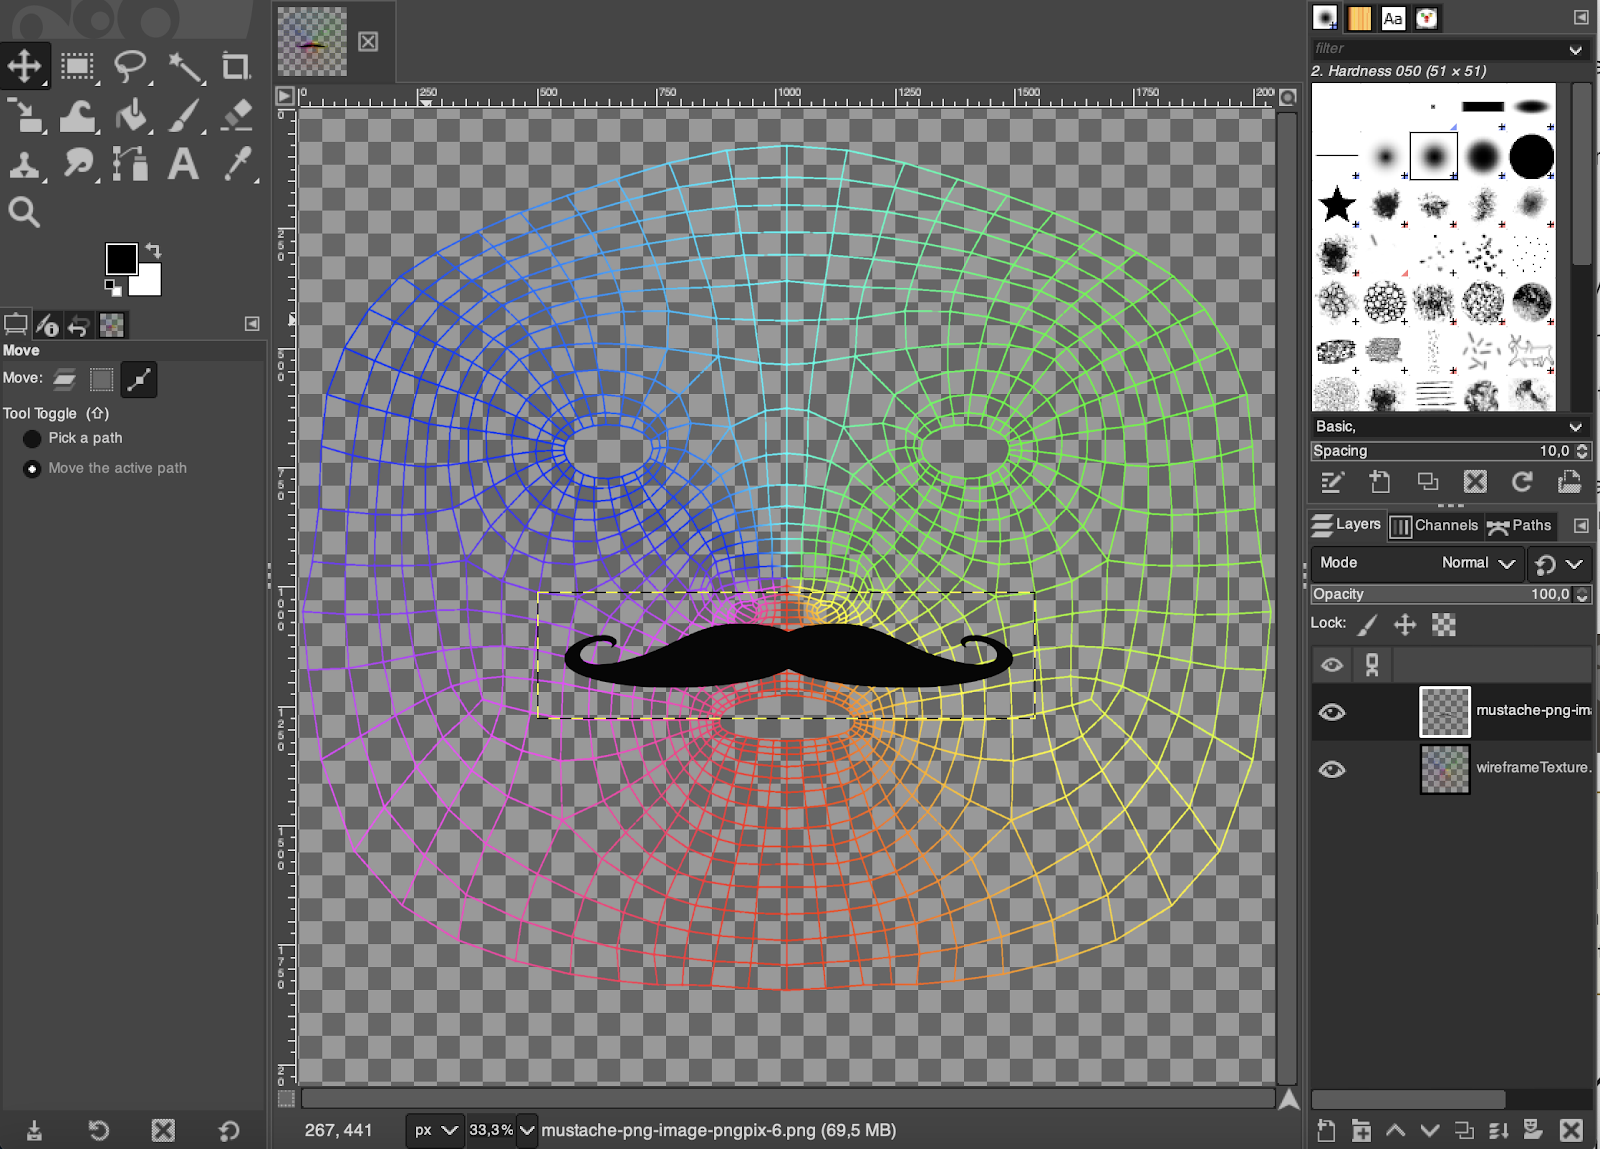
After all the adjustments are done, we can export the image as a mask but, first, let’s hide the bottom wireframe layer.
To export the mask, let’s click File>Export As and save this mask to later add it to the project.
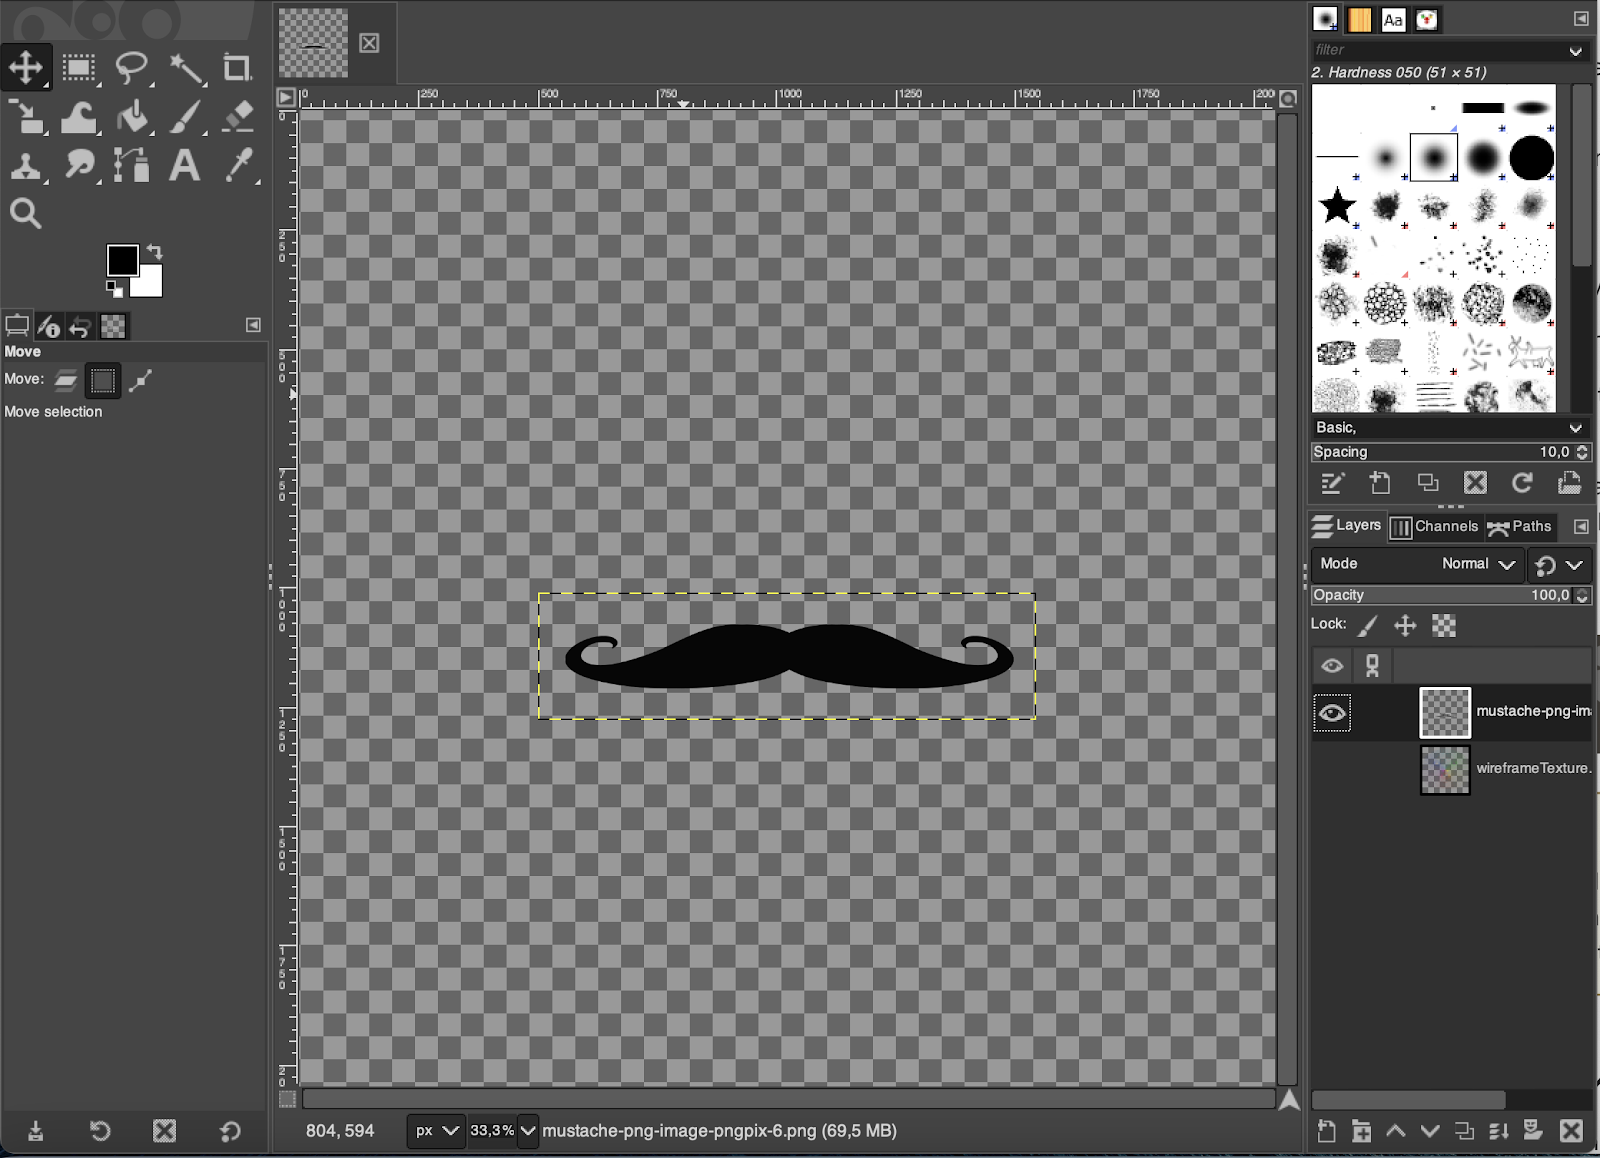
And here’s the final result of a mustache mask that we have just created. Just like this, developers can build any face mask: by importing a png image and adjusting its size over a template or by simply drawing a new layer over the same template.
How to Build a Facial Recognition System Step by Step
Now that we have walked you through creating a mask, let us show you how it can be integrated into an iOS mobile app. With this introduction to how a facial recognition app building works, you will easily navigate the app development process and understand what to expect from your collaboration with a development team.
An iOS developer who will work on a facial recognition app will have to complete several processes to create a well-functioning solution. Let us show what are these steps in our project’s example.
We start by creating an empty project with storyboards. Since we won’t use scene delegate we can delete it by removing UIApplicationSceneManifest from the info.plist file and scene delegate methods from AppDelegate.
Because we are already editing the info.plist file, let's add the camera usage description property and enter the usage description, so the app can open the camera for face tracking and the user will get a prompt to allow camera usage and an explanation of why we are requesting such permissions.

Now, let’s go to AppDelegate and add a test of whether our device supports AR face recognition. Older iPhone models do not have a true depth camera and, as a result, cannot support the facial recognition feature.
import UIKit
import ARKit

@UIApplicationMain
class AppDelegate: UIResponder, UIApplicationDelegate {
    var window: UIWindow?

    func application(_ application: UIApplication, didFinishLaunchingWithOptions launchOptions: [UIApplication.LaunchOptionsKey: Any]?) -> Bool {
        guard let windowScene = UIApplication.shared.connectedScenes.first?.session.scene as? UIWindowScene else {
            fatalError("Cannot initialize UIWindow because no connected scenes found!")
        }

        let window = UIWindow(windowScene: windowScene)
        self.window = window

        if !ARFaceTrackingConfiguration.isSupported {
            window.rootViewController = NotSupportedViewController()
        } else {
            window.rootViewController = FaceTrackingViewController()
        }

        window.makeKeyAndVisible()

        return true
    }
}
Creating an unsupported device screen
After we made sure that the user’s device supports the facial recognition function, we set our root view controller to FaceTrackingViewController, which will be our main controller for this project.
If this feature isn’t supported, we can set another view controller as root and create an alternative version for devices that don’t have a true depth camera. For now, let's not bother with that and just make an information screen that tells the user that the device isn’t supported.
Now, when launching our app on the iPhone simulator that doesn’t support face tracking, we can see our screen with a notification about an unsupported device.
Launching the app in a simulator environment
Create face tracking controller
When our project is all set up and we made sure that the device is compatible, let’s proceed to create our main controller which is FaceTrackingViewController.
class FaceTrackingViewController: UIViewController {}Here’s how the main view that is responsible for face tracking is ARSCNView looks like:
private lazy var sceneView: ARSCNView = {
     let sceneView = ARSCNView()
     sceneView.delegate = self
     sceneView.session.delegate = self
     sceneView.automaticallyUpdatesLighting = true

     return sceneView
}()
Next, the developer has to create a content node where we would store the face geometry node.
private var contentNode: SCNNode?The next step is to create a face geometry object and attach it to the face anchor in the ARSCNViewDelegate extension:
func renderer(_ renderer: SCNSceneRenderer, nodeFor anchor: ARAnchor) -> SCNNode? {
        guard let sceneView = renderer as? ARSCNView,
            anchor is ARFaceAnchor else { return nil }

        let faceGeometry = ARSCNFaceGeometry(device: sceneView.device!)!
        let material = faceGeometry.firstMaterial!

        material.diffuse.contents = UIImage(named: currentFaceMaskItem.maskImageName)
        material.lightingModel = .physicallyBased

        contentNode = SCNNode(geometry: faceGeometry)
        return contentNode
}
Here we are checking if the renderer is ARSCNView and the anchor is face anchor. We created a face geometry object and got its material, so we can apply the image as a texture.
Then, let’s handle node updates:
func renderer(_ renderer: SCNSceneRenderer, didUpdate node: SCNNode, for anchor: ARAnchor) {
        guard let faceGeometry = node.geometry as? ARSCNFaceGeometry,
            let faceAnchor = anchor as? ARFaceAnchor
            else { return }

        faceGeometry.update(from: faceAnchor.geometry)
}
Here we updated the face geometry objects' position and rotation relative to the change in face anchor.
Now, let’s add a method to start and reset scene view session face tracking:
private func resetTracking() {
        guard ARFaceTrackingConfiguration.isSupported else { return }
        let configuration = ARFaceTrackingConfiguration()
        configuration.maximumNumberOfTrackedFaces = ARFaceTrackingConfiguration.supportedNumberOfTrackedFaces
        configuration.isLightEstimationEnabled = true
        sceneView.session.run(configuration, options: [.resetTracking, .removeExistingAnchors])
}

Also, we will add a method to display an error message if something goes wrong during the tracking:

private func displayErrorMessage(title: String, message: String) {
        let alertController = UIAlertController(title: title, message: message, preferredStyle: .alert)
        let restartAction = UIAlertAction(title: "Restart Session", style: .default) { _ in
            alertController.dismiss(animated: true, completion: nil)
            self.resetTracking()
        }
        alertController.addAction(restartAction)
        present(alertController, animated: true, completion: nil)
}
Also, we will add a method to display an error message if something goes wrong during the tracking:
private func displayErrorMessage(title: String, message: String) {
        let alertController = UIAlertController(title: title, message: message, preferredStyle: .alert)
        let restartAction = UIAlertAction(title: "Restart Session", style: .default) { _ in
            alertController.dismiss(animated: true, completion: nil)
            self.resetTracking()
        }
        alertController.addAction(restartAction)
        present(alertController, animated: true, completion: nil)
}
Let’s implement a didFailWithError method in the ARSessionDelegate:
extension FaceTrackingViewController: ARSessionDelegate {
    func session(_ session: ARSession, didFailWithError error: Error) {
        guard error is ARError else { return }

        let errorWithInfo = error as NSError
        let messages = [
            errorWithInfo.localizedDescription,
            errorWithInfo.localizedFailureReason,
            errorWithInfo.localizedRecoverySuggestion
        ]
        let errorMessage = messages.compactMap({ $0 }).joined(separator: "\n")

        DispatchQueue.main.async {
            self.displayErrorMessage(title: "The AR session failed.", message: errorMessage)
        }
    }
}
With error handling all set, the developer will set up face tracking on the app launch by calling the resetTracking() method on viewDidAppear:
override func viewDidAppear(_ animated: Bool) {
        super.viewDidAppear(animated)
        UIApplication.shared.isIdleTimerDisabled = true
        resetTracking()
}
To prevent the app from time out and screen locking while face tracking, we can add UIApplication.shared.isIdleTimeDisabled and set it to true.
Building a user interface
Now, let's add masks to assets and proceed to the final steps, which include creating a user interface for selecting a mask.
We will start by creating FaceMaskItem for adding mask data source:
struct FaceMaskItem {
    let maskImageName: String
    let maskName: String
}
Then, we will make a data source and a current face mask item:
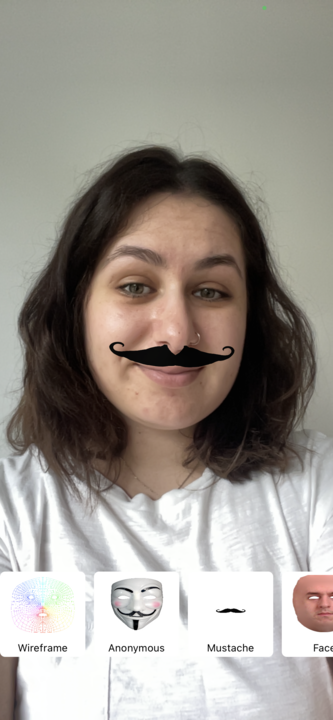
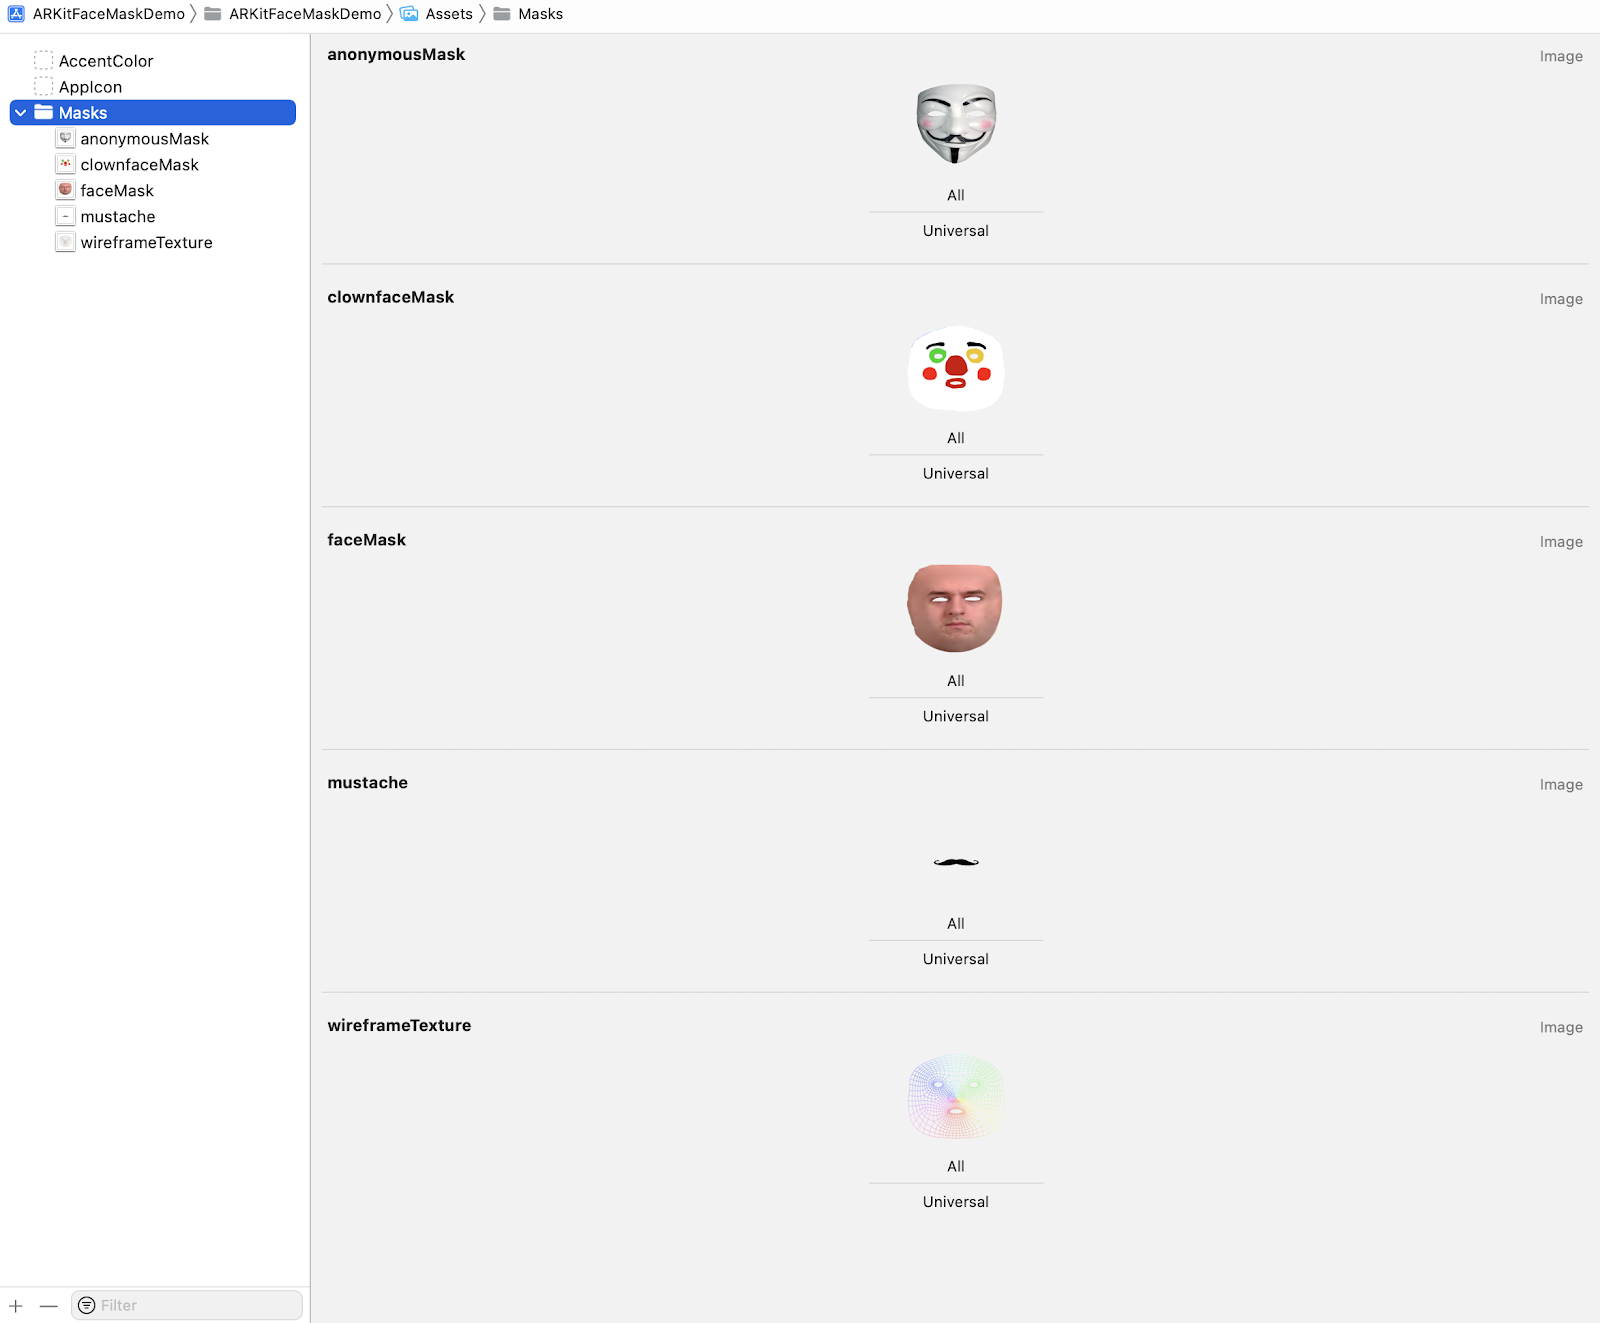
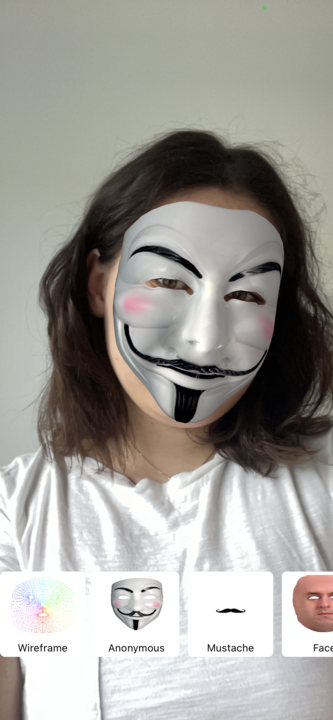
private var dataSource: [FaceMaskItem] = [
        FaceMaskItem(maskImageName: "wireframeTexture", maskName: "Wireframe"),
        FaceMaskItem(maskImageName: "anonymousMask", maskName: "Anonymous"),
        FaceMaskItem(maskImageName: "mustache", maskName: "Mustache"),
        FaceMaskItem(maskImageName: "faceMask", maskName: "Face"),
        FaceMaskItem(maskImageName: "clownfaceMask", maskName: "Clown")
    ]

private var currentFaceMaskItem: FaceMaskItem = FaceMaskItem(maskImageName: "wireframeTexture", maskName: "Wireframe") {
        didSet {
            resetTracking()
        }
}
After creating a data source, we can add a collection view to display our mask from a data source and choose between masks.
The final result
And here are the final results of our exploration of how to build an app with masks with ARKit:
A professional developer can make a single mask for your existing app or build a brand-new facial recognition product from scratch – you can see for yourself that the process is not that complex if you trust a reliable and experienced development team.
Consider Perpetio Your Trusted Partner
Speaking of experienced mobile app development teams, Perpetio is one of them! We specialize in mobile app design and development, so knowing all the newest technologies and recent trends is our job – you can see it in our portfolio.
Perpetio offers app UI/UX design and development services, plus app redesign and modernization. Be it a brand-new cross-platform app or transferring your Android app to iOS – we can do it professionally, fast, and bump-free. We offer a flexible payment system, consult you along the way, and advocate for a transparent work process.