An image recognition app is a game-changer for basically any online or offline business. Do you agree?
It is quite a bold statement to make but we have some facts to back it up and encourage you to make an image recognition app. From small-scale retail businesses to large online platforms, image recognition app development helps achieve quite a few tasks:
- Automate business processes by sorting and tracking goods
- Provide better quality control by scanning the products for deformities
- Improve security by analyzing documents and recognizing faces
- Enhance health safety by checking whether customers are wearing face masks and keeping social distance
- Offer better online customer service by introducing IR filters and image search
And that’s only a few examples of how companies can benefit from image recognition and machine learning technologies. By the way, as we speak about those, what IR and ML actually are and how do they work? And, more importantly, how to make an image recognition app?
What is image recognition?
Image recognition technology helps recognize objects using a special recognition algorithm and artificial intelligence. What kind of objects? Any, from simple geometric figures and vegetables to people, places, handwriting, or even complex actions, like pushups. (By the way, the last AI photo recognition we mentioned is called human pose estimation and we will show how to create such an artificial intelligence image recognition algorithm a bit later. That’s a little spoiler for you.)
How to build an image recognition app? To benefit from the IR technology, all you need is a device with a camera (or just online images) and a pre-modeled algorithm to interpret the data. That’s it.
What is machine learning?
In the previous paragraph, we mentioned an algorithm needed to interpret the visual data. That’s what machine learning is. You basically train the system to tell the difference between good and bad examples of what it needs to detect.
After seeing 200 photos of rabbits and 200 photos of cats, your system will start understanding what makes a rabbit a rabbit and filtering away the animals that don’t have long ears (sorry, cats). This method is called supervised learning.
You might have heard about the most popular machine learning approach — deep learning. It can be both supervised and unsupervised. This technology might ask for no more than 100 samples to learn to classify them. Isn’t that impressive?

How to build an image recognition app for Android
After learning the theoretical basics of image recognition technology, let’s now see it in action. There is no better way to explain how to build an image recognition app than doing it yourself, so today we will show you how we created an Android image recognition app from scratch.
To be more precise, our app is a human pose estimation one. We used this technology to build an Android image recognition app that helps users with counting their exercises.
At Perpetio we specialize in fitness apps and love a good activity ourselves. And that’s why we know that when doing a series of the same exercise, like squats or pushups, it might be hard to keep count.
That’s how we got the new fitness app idea — let image recognition do all the counting for the user, and decided to build an image recognition app for Android. With a one-minute timer, all the user has to do is as many exercises as they can in this time limit. Add the sprinkle of gamification in the form of a leaderboard, and here we go: a new fun way to commit to that everyday fitness challenge you are about to take up on Monday.
Let’s now focus on the technical side and review how this app came to life step by step.
The tech stack we used
First off, we will list which architecture, tools, and libraries helped us achieve the desired result and make an image recognition app for Android.
- MVVM architecture
MVVM stands for model-view-view model. The advantage of this architecture is that the code layers (here, those are model, view, and view model) are not too dependent on each other, and the user interface is separated from business logic. In such a way, it is easy to maintain and update the app when necessary.
How does this architecture work? The view informs the view model about the user's actions. The view is also responsible for the layout structure displayed on the screen, so you can execute UI logic through it.
The view model executes the data and commands connected to the view and notifies the view of state changes via change notification events.
The model is a non-visual class that has the data to use. Examples include DTO (Data Transfer Objects), POJO (Plain Old Java Objects), and entity objects.

- PoseNet Model
We have already mentioned that our fitness app is based on human pose estimation technology. Pose estimation is a computer vision technology that can recognize human figures in pictures and videos. For example, the system can detect if someone’s arm is up or if a person crossed their legs.
Pose estimation technology analyzes key body joints’ X and Y coordinates to make a conclusion about the pose, so it doesn’t matter who the person in the photo is or what they are wearing.
The pose estimation model uses images with people as the input, analyzes them, and produces information about key body joints as the output. The key points detected are indexed by the part IDs (for example, BodyPart.LEFT_ELBOW ), with a confidence score between 0.0 and 1.0. The confidence score indicates the probability that a key joint is in a particular position.
- Firebase Realtime Database
As you can see, such an app uses a lot of data connected with analyzing the key body joints for image recognition models. To store and sync all this data, we will be using a NoSQL cloud database. In such a way, the information is synced across all clients in real time and remains available even if our app goes offline.
- Android Jetpack's Navigation
This navigation architecture component is used to simplify implementing navigation, while also helping with visualizing the app's navigation flow.
- View Binding
View binding is an instrument that helps us write the code to interact with views. Once view binding is enabled in a module, it generates a binding class for each XML layout file present in that module.
View binding is a faster and easier alternative to finding and configuring views via findViewById() or Kotlin synthetic properties. No reasons to use the harder ways, right?
- Dependency injection with Hilt
Hilt provides a standard way to use DI in your application by offering containers for every Android class in your project and managing their life cycles automatically.
These are all the tools we needed to create our image recognition app. Now, let’s explore how we utilized them in the work process and build an image recognition application step by step.
How to create an image recognition app step by step
- Workspace preparation
We are starting to create an image recognition app with the very first step: making a project in Android Studio and setting up our workspace. We will be using the Kotlin programming language to write the code.
1.1. Let’s add Android Jetpack's Navigation and Firebase Realtime Database to the project. We will show you how to set up the database a few steps later.
dependencies {
    implementation project(":posenet")
    implementation "org.jetbrains.kotlin:kotlin-stdlib:$kotlin_version"
    implementation 'androidx.core:core-ktx:1.3.2'
    implementation 'androidx.appcompat:appcompat:1.3.1'
    implementation 'com.google.android.material:material:1.4.0'
    implementation 'androidx.constraintlayout:constraintlayout:2.1.1'
    testImplementation 'junit:junit:4.+'
    androidTestImplementation 'androidx.test.ext:junit:1.1.2'
    androidTestImplementation 'androidx.test.espresso:espresso-core:3.4.0'
    implementation platform('com.google.firebase:firebase-bom:28.4.2')
    implementation 'com.google.firebase:firebase-database-ktx'
    implementation("androidx.navigation:navigation-fragment-ktx:$nav_version")
    implementation("androidx.navigation:navigation-ui-ktx:$nav_version")
    implementation 'androidx.lifecycle:lifecycle-extensions:2.2.0'
    implementation "com.google.dagger:hilt-android:$hilt_version"
    kapt "com.google.dagger:hilt-compiler:$hilt_version"
}
1.2. Our next action is to set viewBinding true in the buildFeature in Gradle Android.
 buildFeatures {
        viewBinding true
    }
1.3. Now, to add the Firebase Realtime Database, we have to create a project on the Firebase console. Open Firebase’s website and click on Add project. Then, you have to choose a suitable name and click on Create project.

As suggested by Firebase itself, now it’s time to add the tool to your iOS or Android app. As our app is an Android one, we click on this icon.

Next, we enter the app’s Android package name and click on Register App.
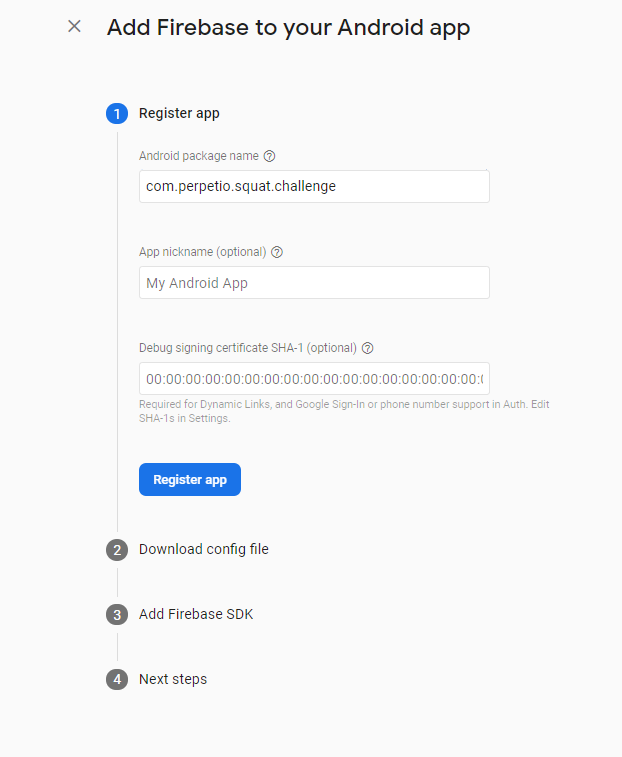
Firebase offers us to download a file: just follow the instructions on the screen.

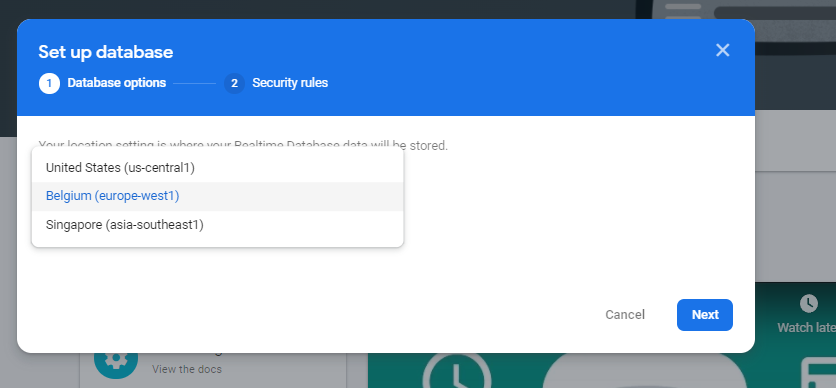
To set up the database, we choose a European location and a test mode.

And here’s how the database’s code looks like:

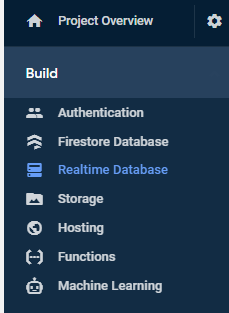
That’s how the database should appear in the project’s structure:
1.4. Time to add the Posenet model to our project. It includes the Posenet class and the model trained to recognize the body parts we need for the app.
As we discussed earlier, Posenet is needed for activating our human pose recognition functionality that we will be using for counting the exercises.
You can find this model in Google samples or borrow it from our Github repository.
2. Developing the architecture and package structure
2.1. As you might remember from the previous chapter, we will be using MVVM architecture. Additionally, we combine MVVM with the Clean Architecture pattern.
Clean Architecture is a way to separate the three layers of code even more and organize their interaction better.
Why can’t we just use MVVM without Clean Architecture? There are several reasons:
- Code is easier to test with Clean Architecture rather than with plain MVVM
- Code is even further decoupled
- The app structure is easier to navigate
- The project is simpler to maintain
- Adding new features takes less time
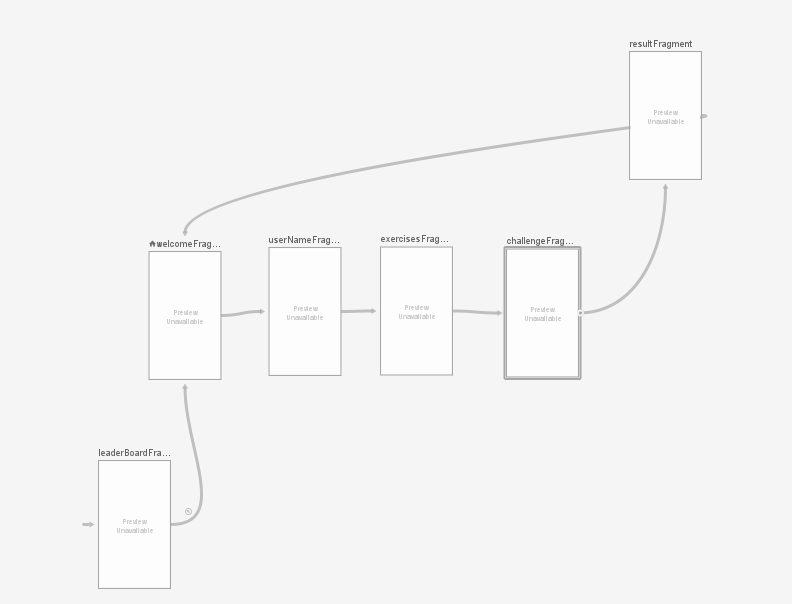
2.2. Take a look at our app’s structure:

In total, we have 6 screens. It is easy to handle the navigation between them thanks to Android Jetpack's Navigation.
2.3. Let’s take a closer look at the navigation to the Leaderboard fragment. We made this fragment a global action. Global action is a common action that multiple destinations can use. Basically, it means that a user can get to the same Leaderboard screen from multiple other screens.
<action android:id="@+id/action_global_leaderBoardFragment" app:destination="@id/leaderBoardFragment" />
As a result, we can open the Leaderboard fragment from any other fragments of our app.
binding?.leaderboardBtn?.setOnClickListener { findNavController().navigate(R.id.action_global_leaderBoardFragment) }

2.4. Finally, let’s not forget to add uses-permission and uses-feature for the camera. Uses-feature checks whether the device’s camera has the auto-focus feature because we need this one for the pose recognition to work.
And with uses-permission, we ask our users to open their cameras, because we can’t just spy on them, right?
<uses-permission android:name="android.permission.CAMERA" />
    <uses-feature android:name="android.hardware.camera" />
    <uses-feature android:name="android.hardware.camera.autofocus" />
3. Establishing the app’s flow
After our architecture is well-defined and all the tools are integrated, we can work on the app’s flow, fragment by fragment.
3.1. When first opening the app, we have the Welcome fragment. The fragment has a simple building: it’s either logic or XML.
This fragment is a good illustration of the advantages of view binding. It is way easier for us to find view elements and use them in further actions.
Pay attention to one thing: when using view binding in this fragment, you need to set binding = null at onDestroyView() to avoid memory leaks.
class WelcomeFragment : Fragment() {

    private var binding: FragmentWelcomeBinding? = null

    override fun onCreateView(
        inflater: LayoutInflater,
        container: ViewGroup?,
        savedInstanceState: Bundle?
    ): View {
        val fragmentBinding = FragmentWelcomeBinding.inflate(inflater, container, false)
        binding = fragmentBinding
        return fragmentBinding.root
    }

    override fun onViewCreated(view: View, savedInstanceState: Bundle?) {
        super.onViewCreated(view, savedInstanceState)
        binding?.startBtn?.setOnClickListener { findNavController().navigate(R.id.action_welcomeFragment_to_userNameFragment) }
        binding?.leaderboardBtn?.setOnClickListener { findNavController().navigate(R.id.action_global_leaderBoardFragment) }
    }

    override fun onDestroyView() {
        super.onDestroyView()
        binding = null
    }
}
And here we go — we have our Welcome fragment ready.

3.2. Our next fragment is called the User Name fragment and has the same simple logic as the Welcome fragment.
On this screen, we will be using the shared view model. It was automatically created by the Hilt library with the injection of a leaderboard repository. Hilt is a dependency injection library that allows us not to do this process manually. It helps us separate the construction and business logic. As a result, we created a module that can provide dependency to the view model.
@InstallIn(ViewModelComponent::class)
@Module
abstract class ChallengeModule {

    @Binds
    abstract fun getLeaderBoardSource(repo: LeaderBoardFirebaseRepoImpl): LeaderBoardRepo
}
View models can ask Hilt to provide dependencies. A simple way to ask for dependencies is to mark the view model with the @HiltViewModel annotation.
@HiltViewModel
class ChallengeViewModel @Inject constructor(private val leaderBoardUseCase: LeaderBoardUseCase) : ViewModel() {
....
Doing the same without Hilt requires a Factory to pass on the dependencies to the constructor.
val challengeViewModelFactory = ChallengeViewModelFactory(LeaderBoardUseCase(LeaderBoardFirebaseRepoImpl()))
ViewModelProvider(this, challengeViewModelFactory)
     .get(ChallengeViewModel::class.java)
The Welcome screen is the first one the users see after opening the app and it provokes all the following activities.
Our view model contains the user name, the user exercise score, and the current challenge type.
private val _name = MutableLiveData<String?>()
    val name: LiveData<String?>
        get() = _name

    private val _score = MutableLiveData<Int>()
    val score: LiveData<Int>
        get() = _score

    private val _type = MutableLiveData<String?>()
    val type: LiveData<String?>
        get() = _type

    fun setName(userName: String) {
        _name.value = userName
    }

    fun setScore(score: Int) {
        _score.value = score
    }

    fun setType(type: String) {
        _type.value = type
    }
Clicking the Next button saves the user name to the view model and takes us to the Exercises fragment.
3.3. This fragment contains a simple spinner listing types of activities. We can add or remove activities in the ChallengeEnum class. As you can see in the screenshot, we decided to have two activities: squatting and jumping.
enum class ChallengeEnum(val challengeName: String) {
    SQUAT("Squatting"),
    JUMP("Jumping");
}
We have created a custom adapter for the spinner. In such a way, we get a nice-looking header when showing the list of items in a dropdown state.
package com.perpetio.squat.challenge.view.adapter.spinnerview

import android.content.Context
import android.view.KeyEvent
import android.view.LayoutInflater
import android.view.View
import android.view.ViewGroup
import android.widget.ArrayAdapter
import android.widget.TextView
import com.perpetio.squat.challenge.R
import com.perpetio.squat.challenge.util.ChallengeEnum.Companion.getAllExercises

class ExercisesAdapter(context: Context, private val customAdapterRes: CustomAdapterRes) :
    ArrayAdapter<String>(context, 0, getAllExercises()) {

    private val layoutInflater: LayoutInflater = LayoutInflater.from(context)

    override fun getView(position: Int, convertView: View?, parent: ViewGroup): View {
        val view: View
        if (convertView == null) {
            view = layoutInflater.inflate(customAdapterRes.mainItemRes, parent, false)
        } else {
            view = convertView
        }
        getItem(position)?.let { country ->
            setItemForExercises(view, country)
        }
        return view
    }

    override fun getDropDownView(position: Int, convertView: View?, parent: ViewGroup): View {
        val view: View
        if (position == 0) {
            view = layoutInflater.inflate(customAdapterRes.headerItemRes, parent, false)
            view.setOnClickListener {
                val root = parent.rootView
                root.dispatchKeyEvent(KeyEvent(KeyEvent.ACTION_DOWN, KeyEvent.KEYCODE_BACK))
                root.dispatchKeyEvent(KeyEvent(KeyEvent.ACTION_UP, KeyEvent.KEYCODE_BACK))
            }
        } else {
            view = layoutInflater.inflate(customAdapterRes.dropDownItemRes, parent, false)
            getItem(position)?.let { exercises ->
                setItemForExercises(view, exercises)
            }
        }
        return view
    }

    override fun getItem(position: Int): String? {
        if (position == 0) {
            return null
        }
        return super.getItem(position - 1)
    }

    override fun getCount() = super.getCount() + 1
    override fun isEnabled(position: Int) = position != 0

    private fun setItemForExercises(view: View, exercises: String) {
        val tvExercises = view.findViewById<TextView>(R.id.tvExercise)
        tvExercises?.text = exercises
    }

}
When clicking the Next button, we save the selected challenge type to the view model and move on to the Challenge fragment.

3.4. When it comes to the Challenge fragment, we need to deal with three important tasks:
- Work with the timer
- Set up the camera (let’s not forget to check the camera permissions before showing the UI)
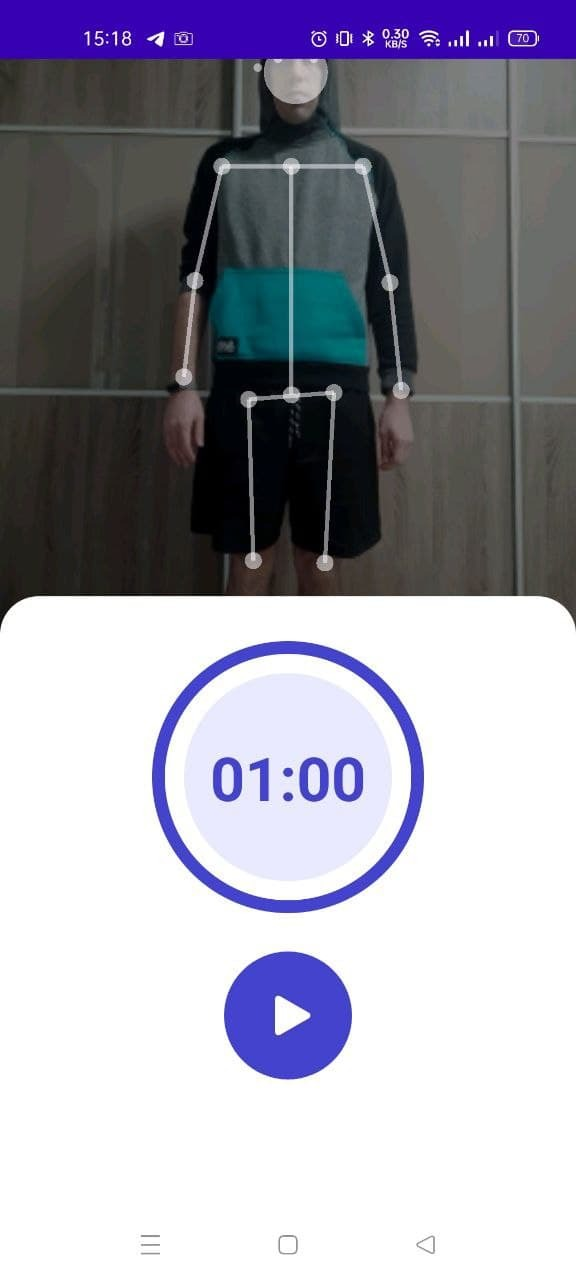
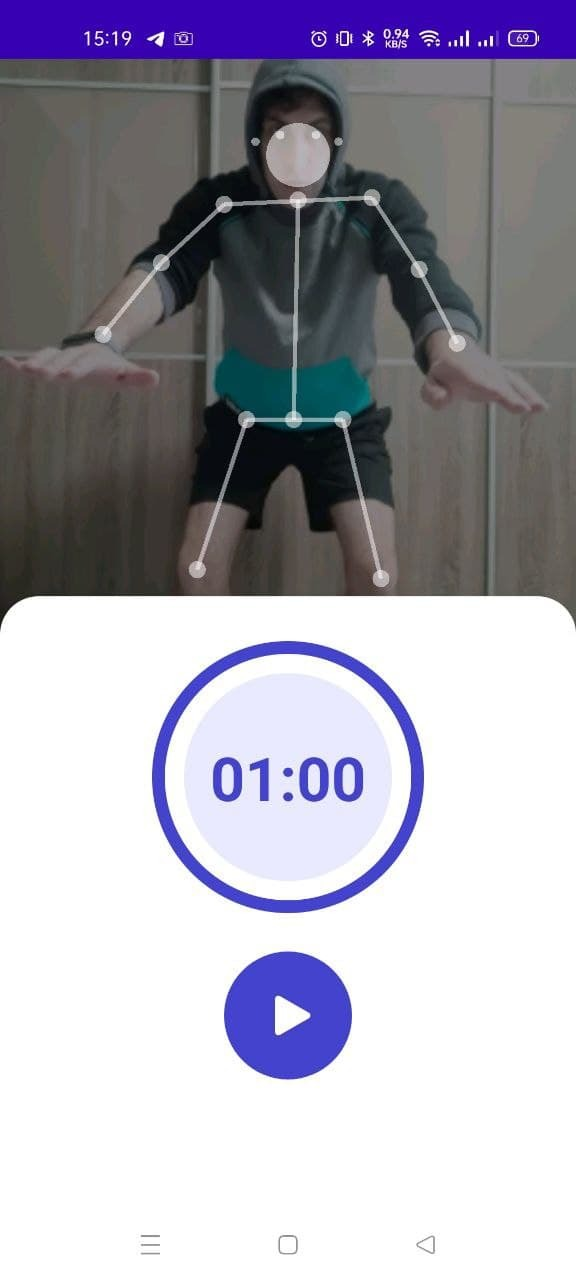
- And configure our pose recognition model (using the module which we have added earlier)
As for the timer, we can change the exercise time (which is one minute in our case) or the countdown before the exercise in these fields:
class ChallengeFragment : Fragment() {
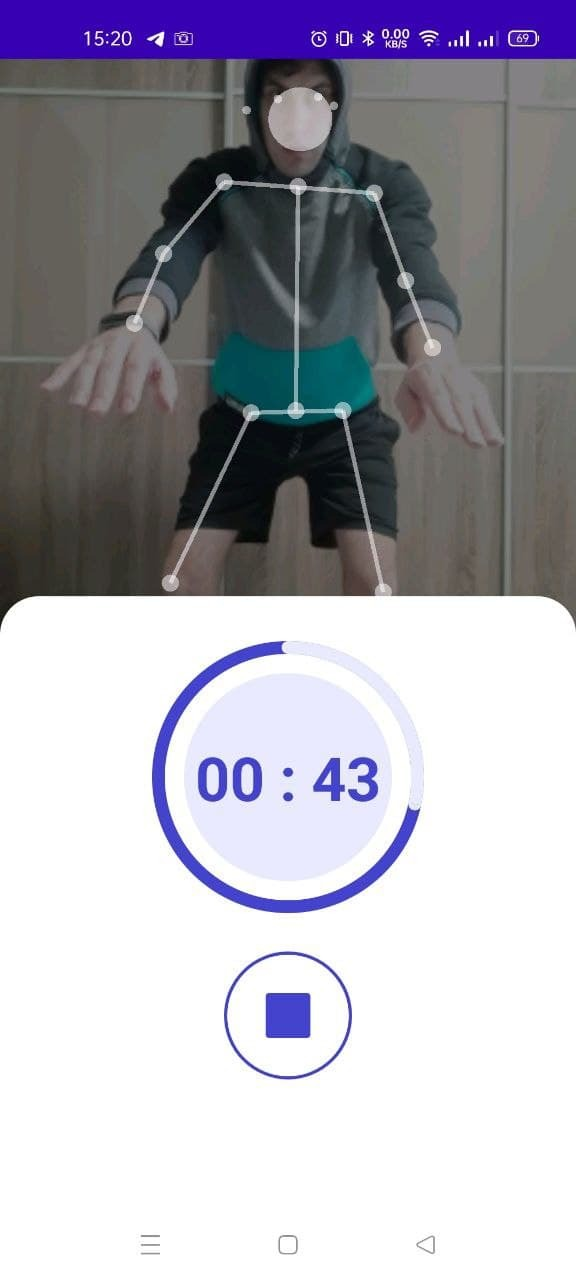
private val countingToStartInMilliseconds: Long = 3000
private val exercisesTimeInMilliseconds: Long = 60000Then, we create the CameraSource object and bind its life cycle to the fragment’s lifecycle to avoid memory leaks.
If we did this step correctly, we will get a camera view on our surface view. Now, we need to set the listener to the frame changing (in general, each 200 ms) and draw the lines connecting the user’s body parts. When each frame change happens, we send our image to the Posenet library, and then it returns the Person object.
camera = CameraSource(surfaceView!!, object : CameraSource.CameraSourceListener {
            override fun onCalculate(bitmap: Bitmap) {
                var person = posenet.estimateSinglePose(bitmap)
                person = swapBodyParts(person)
                val canvas: Canvas = surfaceView?.holder?.lockCanvas()!!
                draw(canvas, person, bitmap)
                val count = counter!!.onCalculateData(person)
                activity?.runOnUiThread { sharedViewModel.setScore(count) }
            }

            override fun onConfigureCameraError() {
                activity?.runOnUiThread {
                    Toast.makeText(
                        requireContext(), "Camera on configure failed", Toast.LENGTH_SHORT
                    ).show()
                }
            }
        })
To prevent horizontal miscategorization of body parts, we need to do some calculations with this object and set the minimum confidence of each body part to 0.5.
private fun swapBodyParts(person: Person): Person {
        swap(person, BodyPart.LEFT_SHOULDER, BodyPart.RIGHT_SHOULDER);
        swap(person, BodyPart.LEFT_ANKLE, BodyPart.RIGHT_ANKLE);
        swap(person, BodyPart.LEFT_EAR, BodyPart.RIGHT_EAR);
        swap(person, BodyPart.LEFT_ELBOW, BodyPart.RIGHT_ELBOW);
        swap(person, BodyPart.LEFT_EYE, BodyPart.RIGHT_EYE);
        swap(person, BodyPart.LEFT_HIP, BodyPart.RIGHT_HIP);
        swap(person, BodyPart.LEFT_KNEE, BodyPart.RIGHT_KNEE);
        swap(person, BodyPart.LEFT_WRIST, BodyPart.RIGHT_WRIST);
        return person
    }

    private fun swap(person: Person, left: BodyPart, right: BodyPart) {
        if (person.keyPoints[right.ordinal].score >= minConfidence
            && person.keyPoints[left.ordinal].score >= minConfidence
            && person.keyPoints[right.ordinal].position.x > person.keyPoints[left.ordinal].position.x
        ) {
            val temp = person.keyPoints[right.ordinal]
            person.keyPoints[right.ordinal] = person.keyPoints[left.ordinal]
            person.keyPoints[left.ordinal] = temp
        }
    }
After our Person object is fitted, we can draw the body lines on the canvas.
private fun draw(canvas: Canvas, person: Person, bitmap: Bitmap) {
        canvas.drawColor(Color.TRANSPARENT, PorterDuff.Mode.CLEAR)
        val screenWidth: Int
        val screenHeight: Int
        val left: Int
        val top: Int
        if (canvas.height > canvas.width) {
            screenWidth = canvas.width
            screenHeight = canvas.width
            left = 0
            top = (canvas.height - canvas.width) / 2
        } else {
            screenWidth = canvas.height
            screenHeight = canvas.height
            left = (canvas.width - canvas.height) / 2
            top = 0
        }
        val right: Int = left + screenWidth
        val bottom: Int = top + screenHeight

        setPaint()
        if (previewMode == 0 || previewMode == 2) {
            canvas.drawBitmap(
                bitmap,
                Rect(0, 0, bitmap.width, bitmap.height),
                Rect(left, top, right, bottom),
                paint
            )
        }

        val widthRatio = screenWidth.toFloat() / MODEL_WIDTH
        val heightRatio = screenHeight.toFloat() / MODEL_HEIGHT

        if (previewMode == 0 || previewMode == 1) {
            for (keyPoint in person.keyPoints) {
                if (keyPoint.score > minConfidence) {
                    val position = keyPoint.position
                    val adjustedX: Float = position.x.toFloat() * widthRatio + left
                    val adjustedY: Float = position.y.toFloat() * heightRatio + top
                    var radius =
                        if (keyPoint.bodyPart.ordinal < 5) smallCircleRadius else circleRadius // nose, eyes, ears
                    if (keyPoint.bodyPart == BodyPart.NOSE) {
                        radius = 60.0f
                    }
                    canvas.drawCircle(adjustedX, adjustedY, radius, paint)
                }
            }

            for (line in bodyJoints) {
                if (
                    (person.keyPoints[line.first.ordinal].score > minConfidence) and
                    (person.keyPoints[line.second.ordinal].score > minConfidence)
                ) {
                    canvas.drawLine(
                        person.keyPoints[line.first.ordinal].position.x.toFloat() * widthRatio + left,
                        person.keyPoints[line.first.ordinal].position.y.toFloat() * heightRatio + top,
                        person.keyPoints[line.second.ordinal].position.x.toFloat() * widthRatio + left,
                        person.keyPoints[line.second.ordinal].position.y.toFloat() * heightRatio + top,
                        paint
                    )
                }
            }
        }

        surfaceView?.holder!!.unlockCanvasAndPost(canvas)
    }
We iterate the list of the body parts and if the confidence rate is high enough, we can draw the line of the key body joints connection and the position of each joint for the valid connection.
At the same time, we are sending our Posenet person object to the ChallengeRepetitionCounter for evaluating the try. For example, if our challenge is squatting, the positions of the left and right hips are evaluated based on the y coordinate. If all the requirements are passed, such as a minimum of 50% confidence, we can calculate how the coordinate of the hip changed as related to the previous coordinates, and if these changes satisfy the MIN_AMPLITUDE for the y coordinate we can interpret it as a successful try.
private fun onCalculateSquatsData(person: Person): Int {
        if (person.keyPoints[BodyPart.LEFT_HIP.ordinal].score >= MIN_CONFIDENCE && person.keyPoints[BodyPart.RIGHT_HIP.ordinal].score >= MIN_CONFIDENCE) {
            val y1 = person.keyPoints[BodyPart.LEFT_HIP.ordinal].position.y
            val y = 1000 - y1
            val dy = y - previousY
            if (!first) {
                if (bottom != 0 && top != 0) {
                    if (goal == 1 && dy > 0 && (y - bottom) > (top - bottom) * REP_THRESHOLD) {
                        if (top - bottom > MIN_AMPLITUDE) {
                            count++
                            goal = -1
                            listener.onCounterVoice(count)
                        }
                    } else if (goal == -1 && dy < 0 && (top - y) > (top - bottom) * REP_THRESHOLD) {
                        goal = 1
                    }
                }

                if (dy < 0 && previousDeltaY >= 0 && previousY - bottom > MIN_AMPLITUDE) {
                    top = previousY
                } else if (dy > 0 && previousDeltaY <= 0 && top - previousY > MIN_AMPLITUDE) {
                    bottom = previousY
                }
            }
            first = false
            previousY = y
            previousDeltaY = dy
        }
        return count
    }
Each successful try will be voiced by the TextToSpeech class for our users to understand their progress without having to look at the screen.
  private fun voiceTheNumber(quantity: Int) {
        textToSpeech?.speak(quantity.toString(), TextToSpeech.QUEUE_FLUSH, null, null)
    }
We can use the same algorithm for different types of exercises, the only thing needed is to determine a working formula for our new event in the ChallengeRepetitionCounter.
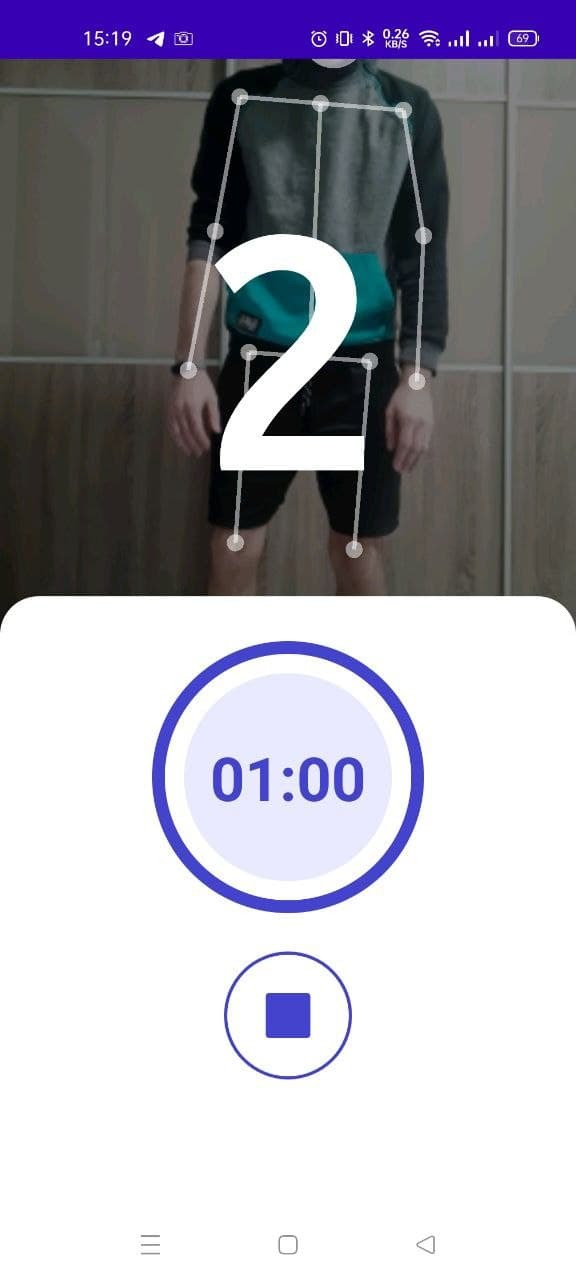
When the time for the challenge is out, we need to send our score to the view model and then navigate to the Result fragment to show the score to the user.
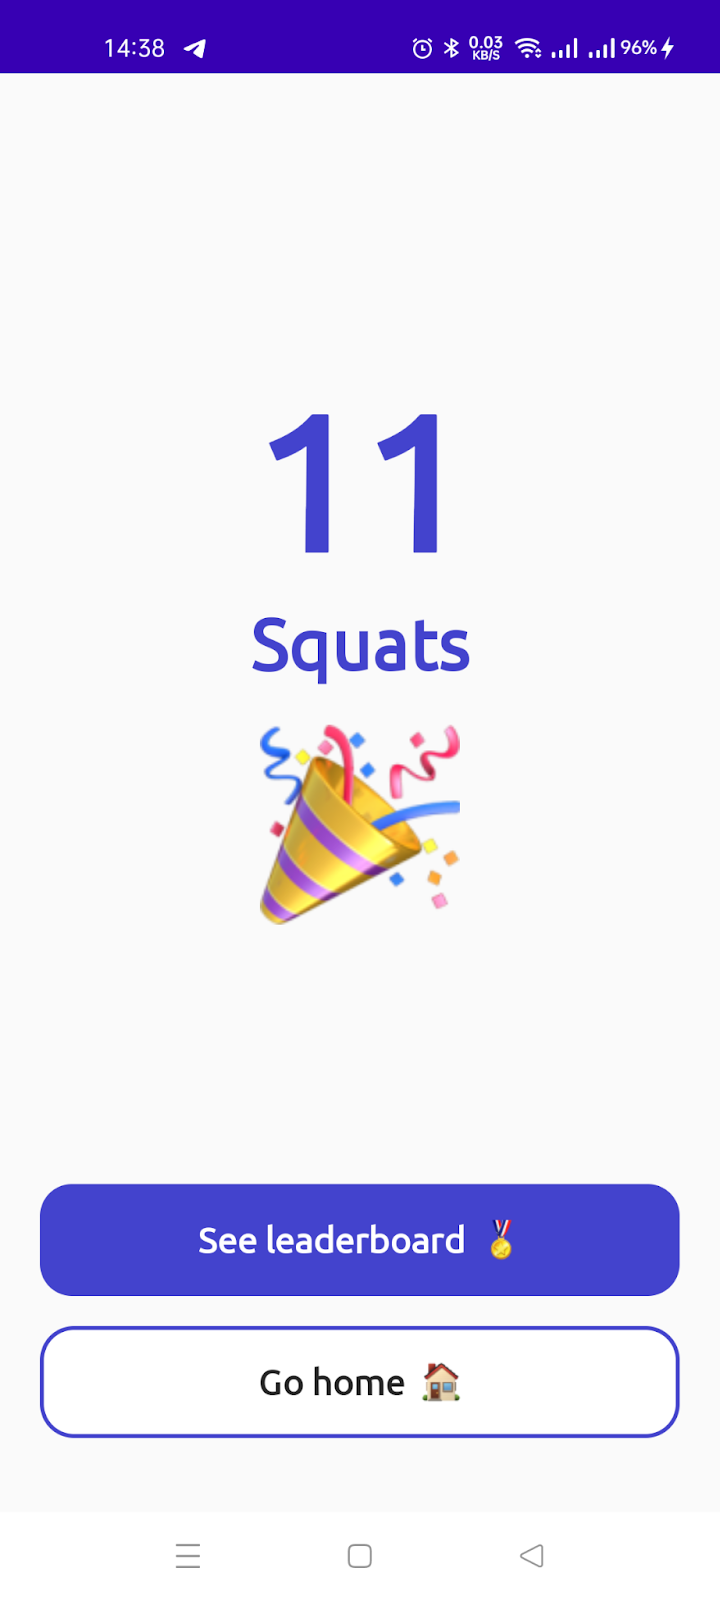
On the condition that the score is more than a zero, we send this record to the leaderboard. As you might remember, we are utilizing the Firebase Realtime Database for saving the records.
As we have mentioned, thanks to MVVM and Clean Architecture we can easily change our leaderboard logic and use another service, because all we need to do is just utilize a different implementation of our leaderboard repository interface.
interface LeaderBoardRepo {

    fun addScoreToLeaderBoardList(player: PlayerModel)

    fun getLeaderBoardList(): LiveData<List<PlayerModel>>

}
That’s how we can change it while creating the view model in the main activity:
val sportViewModelFactory = SportViewModelFactory(LeaderBoardUseCase(LeaderBoardFirebaseRepoImpl()))
By the way, we are using Firebase and the LeaderBoardFirebaseRepoImpl where we create a database instance. We also employ the override methods for manipulating our data.
override fun addScoreToLeaderBoardList(player: PlayerModel) {
        myRef?.child(leaderBoardDbChild)?.push()?.setValue(player)
    }

    override fun getLeaderBoardList(): LiveData<List<PlayerModel>> {
        return leaderBoardPlayer
    }
3.5. Let’s now take a look at the Leaderboard fragment. It contains two separate boards for each of the fitness challenges: squatting and jumping. The Firebase Realtime Database sends updates when someone finishes the challenge. Thanks to LiveData, we immediately get this data on our Fragment and update our recycler view.
sharedViewModel.getLeaderBoardList.observe(viewLifecycleOwner) { item ->
            leaderBoardAdapter.submitList(item)
        }
We use the same custom adapter for spinners as in the Challenge fragment only with a different item layout.

And that’s it: we just showed you how to work on a full cycle software development concept of an image recognition application for Android. With all the right tools and a planned-out strategy, it is not as hard as it seems, right?
We didn’t focus on how to build an image recognition app for iPhone today but might create a dedicated tutorial in the future. Would you be interested in how to build an iPhone image recognition app?
How to use image recognition apps in business?
So how can businesses use image recognition apps to their benefit? Let’s discuss some examples of how to build an image recognition software app for smartphones that help both optimize the inside processes and reach new customers.
Fitness and wellness
The first industry is somewhat obvious taking into account our application. Yes, fitness and wellness is a perfect match for image recognition and pose estimation systems.
Image recognition fitness apps can give a user some tips on how to improve their yoga asanas, watch the user’s posture during the exercises, and even minimize the possibility of injury for elderly fitness lovers.
While Youtube tutorials can only show how to perform an exercise, human pose recognition apps go way further and help users with improving their performance. How many of us went to an offline training just to get some feedback and know whether we are exercising not in vain?

Retail
Offline retail is probably the industry that can benefit from image recognition software in the most possible ways. From logistics to customer care, there are dozens of image recognition implementations that can make business life easier.
- You can offer a scanning app to provide your customers with additional information about the item. A user can scan a product or its barcode and find out the product’s category, delivery date and lot, origin, and so on. Image recognition tools can be also used for self-checkout systems.
- The same type of app can be used by employees. Imagine finding out that a certain batch of milk or vitamin supply has to be withdrawn from sale because of the manufacturer’s quality control issues. Will your employees manually check every single item? No, they can just scan their labels or barcodes with an image recognizer app.
- If your employees need to check in when entering the workplace each time, how about making their lives easier with face IDs via image and face recognition?
- Finally, you can build an image recognition app for iPhone or Android to navigate the post-pandemic environment. Why? An application can tell whether the client is wearing a mask or not, so you don’t need a person taking care of it at the entrance. What is more, the same goes for social distancing monitoring.

E-commerce
All of that sounds cool, but my business is online, so I don’t need an IR app, you might say. What about search by image technology? If you have a clothing shop, let your users upload a picture of a sweater or a pair of shoes they want to buy and show them similar ones you have in stock.
If you run a booking platform or a real estate company, IR technology can help you automate photo descriptions. For example, a real estate platform Trulia uses image recognition to automatically annotate millions of photos every day. The system can recognize room types (e.g. living room or kitchen) and attributes (like a wooden floor or a fireplace). Later on, users can use these characteristics to filter the search results.

Manufacturing
Image recognition works well for manufacturers and B2B retailers too. Remember our example with a milk batch that had to be recalled? That could be avoided with a better quality assurance system aided with image recognition.
For example, an IR algorithm can visually evaluate the quality of fruit and vegetables. Those that do not look fresh anymore won’t be shipped to the retailers. Producers can also use IR in the packaging process to locate damaged or deformed items. What is more, it is easy to count the number of items inside a package. For example, a pharmaceutical company needs to know how many tables are in each bottle.
The use of IR in manufacturing doesn’t come down to quality control only. If you have a warehouse or just a small storage space, it will be way easier to keep it all organized with an image recognition system. For instance, it is possible to scan products and pallets via drones to locate misplaced items.

Medicine
What about med tech? Image recognition can be applied to dermatology images, X-rays, tomography, and ultrasound scans. Such classification can significantly improve telemedicine and monitoring the treatment outcomes resulting in lower hospital readmission rates and simply better patient care.
For example, IR technology can help with cancer screenings. Medical image analysis is now used to monitor tumors throughout the course of treatment.

Gaming
You can make mobile gaming way more engaging for your users with image recognition. How?
- Gesture detector to base your game on hand gestures
- Human pose estimation for a dancing or exercise game
- Object detection to create a treasure hunt game
These are only a few ideas for a fun IR-based mobile game. With a portion of creativity and a professional mobile development team, you can easily create a game like never seen before.
Social media
Image recognition, or more precisely, face recognition is widely used on social media too. Have you ever noticed how Facebook can tell who that person in the photo with you is and link it to their profile? Good or bad news for some, but with the raising concerns over privacy and rebranding into Meta, this functionality won’t be available anymore.
Still, IR is incredibly valuable for keeping social platforms safe. This technology is utilized for detecting inappropriate pictures that do not comply with the guidelines. So, yes, spying on you is not the only way to use image recognition.
Summing up
While image recognition and machine learning technologies might sound like something too cutting-edge, these are actually widely applied now. And not only by huge corporations and innovative startups — small and medium-sized local businesses are actively benefiting from those too. We hope that the examples we listed today convinced you of that.
Perpetio’s iOS, Android, and Flutter teams are already actively exploring the potential of image recognition in various app types. This tutorial is an illustration of how to utilize this technology for the fitness industry, but as we described above, many domains can enjoy the convenience of AI.
Which industries can use machine learning and image recognition apps?
ML and AI can be beneficial for virtually any industry, including retail, fitness & wellbeing, e-commerce, manufacturing, gaming, and others.
How to build an image recognition app?
This tutorial explains step by step how to build an image recognition app for Android. You can create one by following the instructions or by collaborating with a development team.
Can I get an image recognition app for Android or for iPhone?
Yes, Perpetio’s mobile app developers can create an application in your domain using the AI technology for both Android and iOS.