We are sure you’ve heard about Clubhouse, right? This new app is booming! Everyone wants exclusive information, to chat to their favorite influencers, and find like-minded people.
The hype around Clubhouse is not limited to simply using it. There are many fascinating elements connected with the app, so it’s no wonder developers and business owners are exploring its functionality and want to learn how to build it. Well, guess what? We know how and want to share it with you!
Our Perpetio team was extremely curious about Clubhouse too and have already discussed its voice chat powered by Agora in one of our blog posts. But we decided to dive deeper into how it all works, going as far as actually recreating this app in a full cycle software development project using Flutter, Firebase, and Agora.
This tutorial is about us having fun with Flutter and exploring the possibilities of Firebase and Agora. We are not attempting to create a second Clubhouse or sneak an Android version. It's simply a way to learn something new and share it with others.
So buckle up, there will be quite a few things going on here! This tutorial comes in three parts, each focusing on a separate aspect of the process.
We will first discuss how to get started with an app in Flutter, make all the basic components, and create the UI. In the second part, we will discuss Firebase integration for authentication and back-end. Finally, in the third post, we will review how to embed Agora’s voice call functionality into our app.
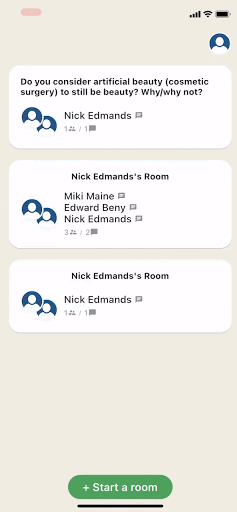
Take a look at our Clubhouse-inspired app to understand what kind of result you can have as well:
 |
 |
|---|
Let’s go through the process step-by-step, so you can see in detail how to recreate Clubhouse yourself!
Step 1: Creating a Flutter project
- Let’s begin with our Clubhouse clone app. First, we must open Visual Studio Code and install the extensions for Flutter. You can, of course, use Android Studio or IntelliJ IDEA if you prefer one of those. Flutter framework can be downloaded from this website where you will also find instructions for installing it on any operating system or tool.
- Next, we need to create the actual Flutter app. For this step, go to View => Command Palette, type “flutter”, and select Flutter: New Project.

3. Enter your project’s name. For instance, ours is called “clubhouse.” Then, create or select a parent directory for the new project folder.
4. You will now wait a bit for the project to be created. When the process is completed, a file main.dart will be automatically opened in your editor.
5. You should see a panel on your left in Visual Studio Code, which shows your project’s structure. Our app consists of several main structural parts:
- The "android / ios” folder is a specification of the code for each platform, including icons and program settings, where all the necessary app permissions are set.
- The "Assets" folder contains icons, fonts, and images for the app.
- The "lib" folder is the project’s main folder containing its structure, such as dart files. The Pubspec.yaml file includes the project’s general parameters: its name, description, versions, dependencies, and assets.
6. Now, simply replace the code in main.dart with the following:
void main() => runApp(MyApp());

class MyApp extends StatelessWidget {
 @override
 Widget build(BuildContext context) {
   return MaterialApp(
     title: 'Clubhouse',
     debugShowCheckedModeBanner: false,
     onGenerateRoute: router,
     theme: ThemeData(
       scaffoldBackgroundColor: AppColor.LightBrown,
       appBarTheme: AppBarTheme(
         color: AppColor.LightBrown,
         elevation: 0.0,
         brightness: Brightness.light,
         iconTheme: IconThemeData(
           color: Colors.black,
         ),
       ),
     ),
     home: AuthService().handleAuth(),
   );
 }
}
What’s going on here? The main() function uses the => operator for a single line function to run the app. You can see one class for the app named MyApp.
Our app is a StatelessWidget. You might have heard that Flutter is “all widgets.” Well, it’s true – most entities in any Flutter app are widgets; either stateless or stateful (they need to interact with a State object). We override the build() widget method to create the App widget, as well as the MaterialApp widget that provides numerous components needed for apps following Material Design.
7. Let’s add some color now! The app theme defines all the custom colors and fonts inside the ThemeData widget and can be used anywhere within your app via the Theme.of() function. App colors are always extracted to the app_color.dart file. Here are the colors we used:
class AppColor {
 static const LightBrown = Color(0xfff1efe5);
 static const LightGreen = Color(0xffE8FCD9);
 static const LightGrey = Color(0xfff2f2f2);
 static const AccentRed = Color(0xffDA6864);
 static const AccentGreen = Color(0xff55AB67);
 static const AccentBrown = Color(0xffE6E2D6);
 static const AccentBlue = Color(0xff5B75A6);
 static const AccentGrey = Color(0xff807970);
 static const DarkBrown = Color(0xff918E81);
 static const SelectedItemGrey = Color(0xffCCCFDC);
 static const SelectedItemBorderGrey = Color(0xffC5C5CF);
}
8. As for app navigation, we utilize onGenerateRoute – a generator callback navigating the app to a named route. Instead of extracting the arguments directly inside the widget, we extract the arguments inside the onGenerateRoute() function and pass them to the widget. We then put the route in one file (router.dart <project dir>/lib/utils). By doing this, we are able to organize all the elements in a class so that nothing gets mixed up. No one wants that, right?
class Routers {
 static const String home = '/home';
 static const String phone = '/phone';
 static const String sms = '/sms';
 static const String profile = '/profile';
}

// ignore: missing_return
Route<dynamic> router(routeSetting) {
 switch (routeSetting.name) {
   case Routers.home:
     return new MaterialPageRoute(
       builder: (context) => HomeScreen(),
       settings: routeSetting,
     );
     break;
   case Routers.phone:
     return new MaterialPageRoute(
       builder: (context) => PhoneScreen(),
       settings: routeSetting,
     );
     break;
   case Routers.sms:
     return new MaterialPageRoute(
         builder: (context) => SmsScreen(
               verificationId: routeSetting.arguments,
             ),
         settings: routeSetting);
     break;
   case Routers.profile:
     return new MaterialPageRoute(
         builder: (context) => ProfileScreen(
               profile: routeSetting.arguments,
             ),
         settings: routeSetting);
     break;
 }
}
9. In the main.dart file, we have a function called handleAuth() that returns to the initial screen depending on the authentication results. We will discuss the authentication process in more detail later on.
handleAuth() {
   return StreamBuilder(
     stream: FirebaseAuth.instance.onAuthStateChanged,
     builder: (BuildContext context, snapshot) {
       if (snapshot.hasData) {
         return HomeScreen();
       } else {
         return PhoneNumberScreen();
       }
     },
   );
 }
This content is only available to subscribers
Subscribe now and have access to all our stories, enjoy exclusive content and stay up to date with constant updates.
Sign up nowAlready have an account? Sign in