Adding ChatGPT or Claude to an existing mobile app can help users get answers, summarize information, write content, or complete tasks without leaving your app. The first step is ChatGPT or Claude API integration, but a working API call is only the beginning.
To integrate ChatGPT into a mobile app reliably, you also need to think about how responses appear on screen, how the AI remembers previous messages, and what happens when a request fails. API usage can also get expensive if you don’t keep track of tokens and limit unnecessary requests.
In this guide, we’ll show you how to add ChatGPT or Claude to an iOS, Android, or Flutter app, starting with a basic API request and moving on to streaming responses, conversation history, system prompts, error handling, and cost control. You’ll learn what it takes to move from a working prototype to an AI feature that’s ready for real users.
Step 1. Make your first API call with OpenAI or Anthropic
To integrate ChatGPT into a mobile app, you first need an OpenAI API key. To use Claude, you’ll need an Anthropic API key. Both providers let your app send a message and receive an AI-generated response, but their APIs use different request formats.
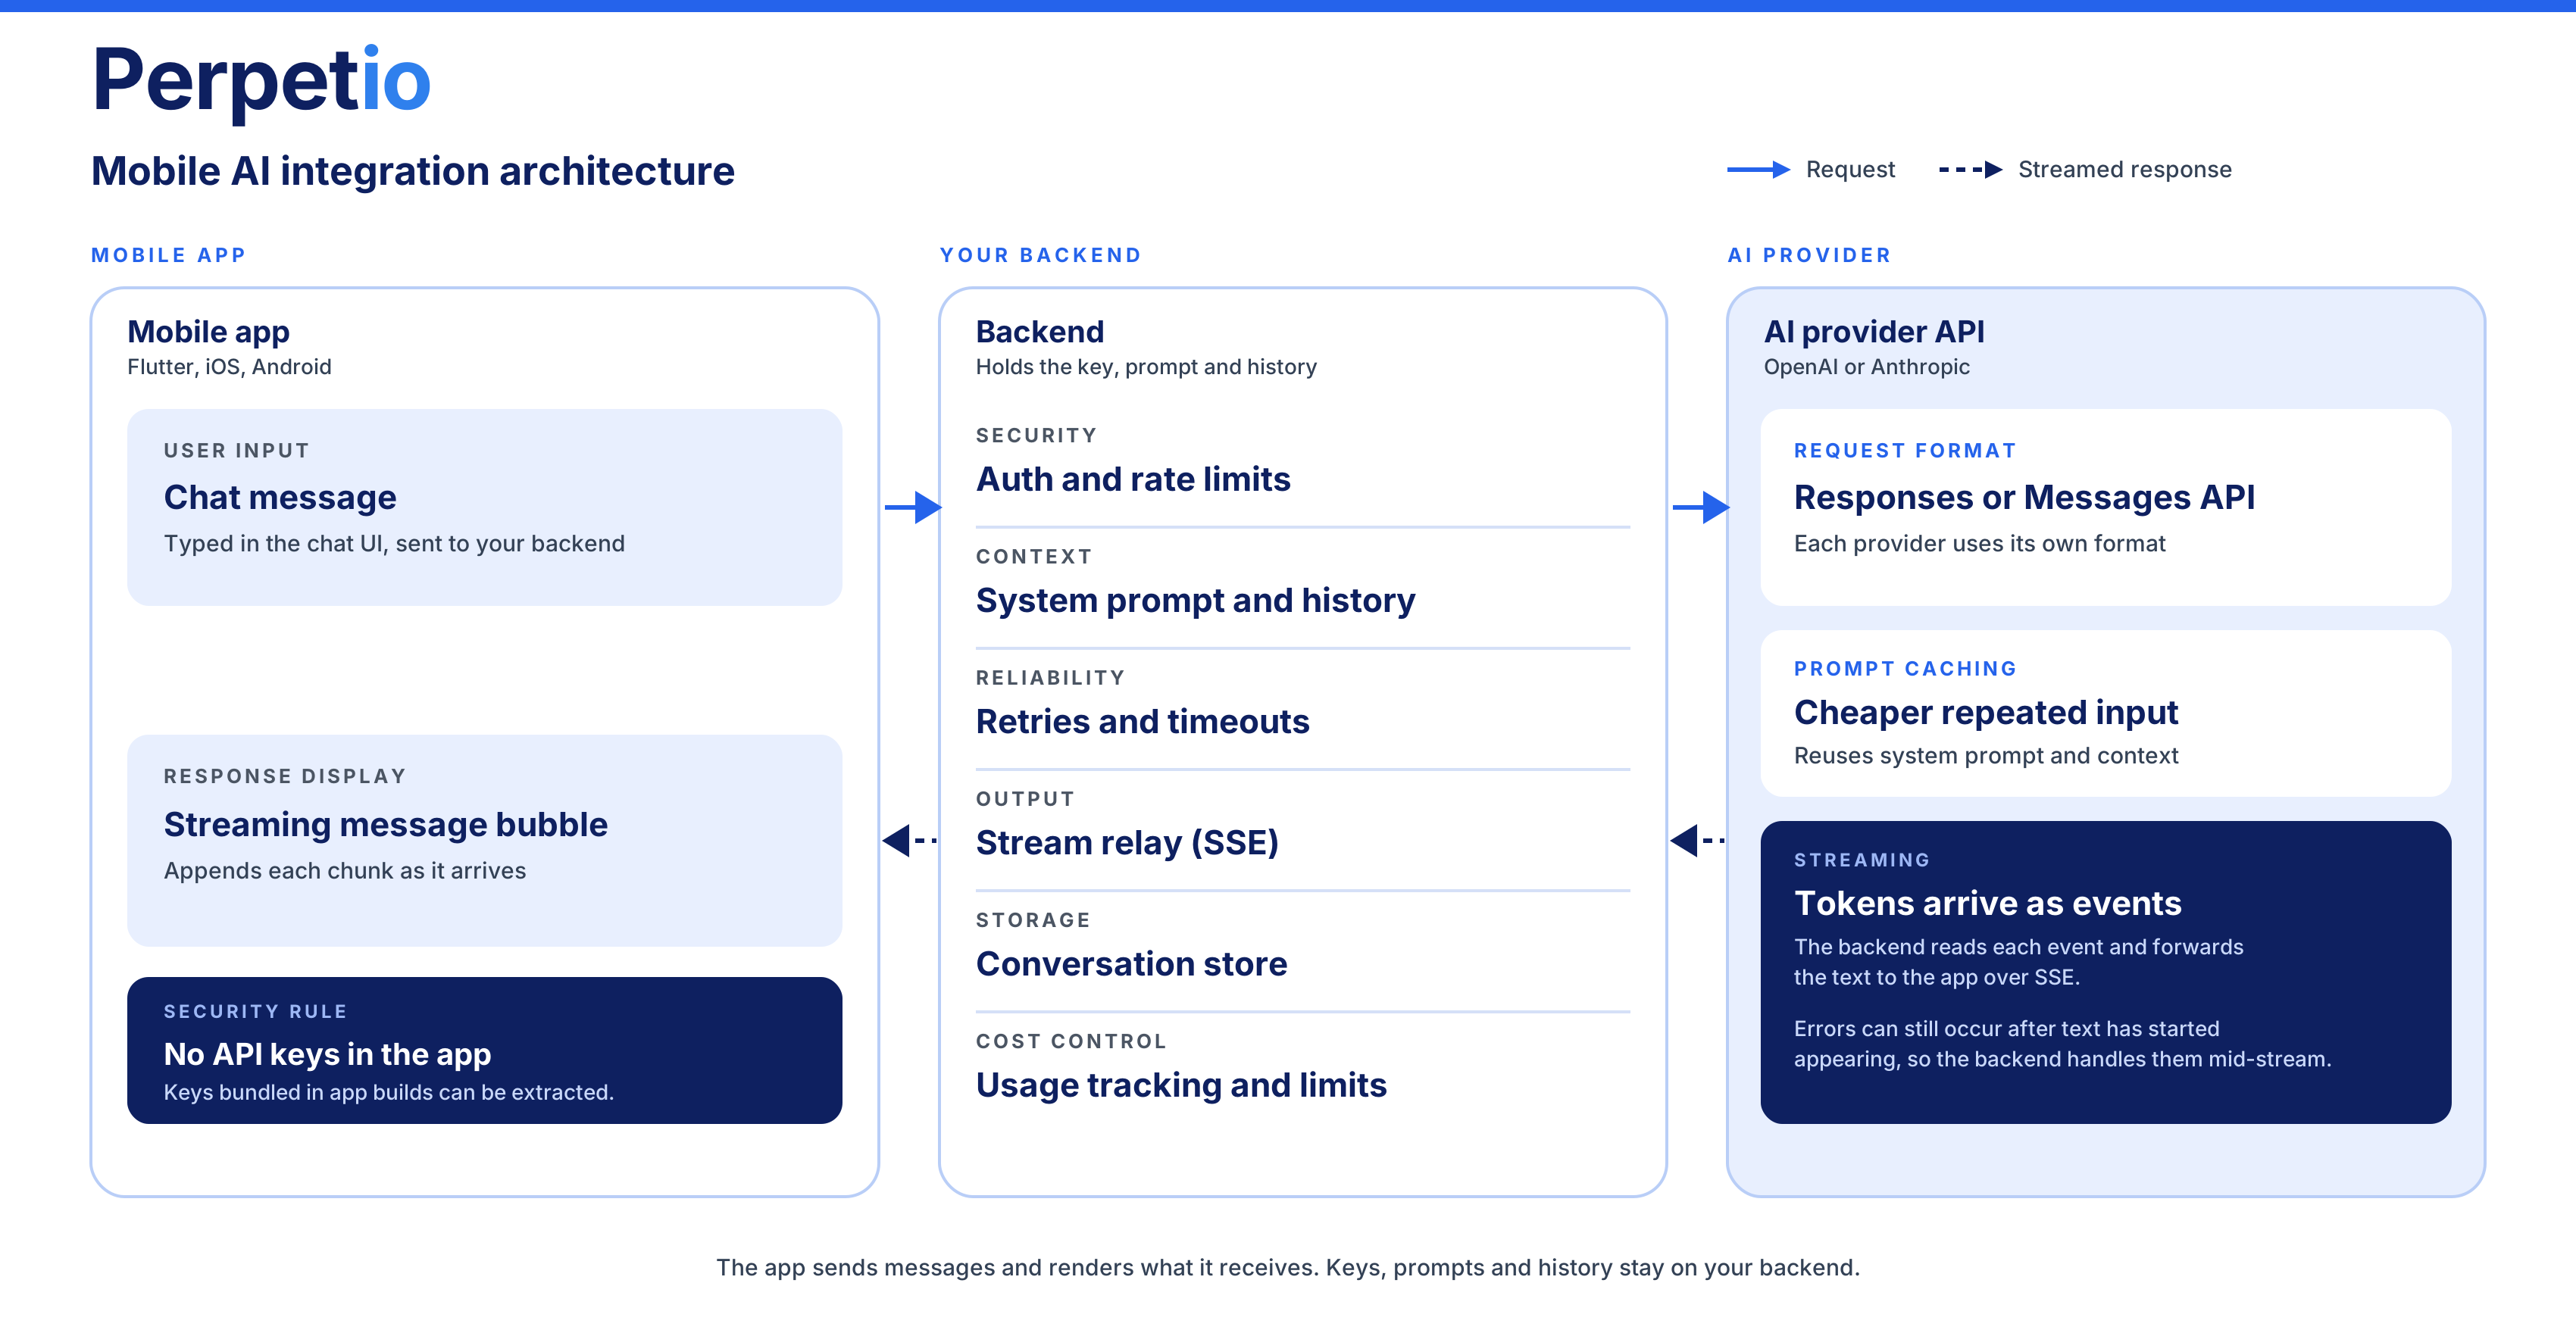
Keep your API key on your backend, never inside your mobile app. Keys bundled into an iOS, Android, or Flutter app can be extracted and misused.
1. Send a request to the AI provider
Create an API key through the OpenAI API documentation or Anthropic’s Messages API documentation.
Here’s a minimal example of a request to OpenAI:
curl https://api.openai.com/v1/responses \
  -H "Authorization: Bearer $OPENAI_API_KEY" \
  -H "Content-Type: application/json" \
  -d '{
    "model": "gpt-4.1-mini",
    "input": "Suggest three names for a fitness app."
  }'
For Claude, the request uses a different endpoint and message structure:
curl https://api.anthropic.com/v1/messages \
  -H "x-api-key: $ANTHROPIC_API_KEY" \
  -H "anthropic-version: 2023-06-01" \
  -H "content-type: application/json" \
  -d '{
    "model": "claude-sonnet-4-5",
    "max_tokens": 200,
    "messages": [
      {
        "role": "user",
        "content": "Suggest three names for a fitness app."
      }
    ]
  }'
These are minimal request examples, not complete integrations. Model availability can change, so check each provider’s current documentation before using a model in production.
2. Connect your mobile app
Your mobile app sends the user’s message to your backend, which calls the selected AI provider and returns the generated text. You can implement this connection in Flutter, Swift, or Kotlin using each platform’s standard networking tools.
Once the response reaches the app, display it in the UI. This gives you a basic working prototype, but a production-ready feature also needs conversation history, streaming responses, error handling, and cost controls.
Step 2. Stream AI responses for a better user experience
When an AI response takes four seconds to generate, users don’t need to stare at a loading indicator for all four seconds. With streaming, they can start reading the answer as it arrives. This makes an AI feature feel faster, especially when the app generates long explanations, summaries, or recommendations.
To implement an LLM streaming response in a mobile app, you need streaming support on both the backend and the client. OpenAI and Anthropic can stream their responses as events. Your backend reads those events, extracts the generated text, and forwards it to your app using Server-Sent Events (SSE).
How streaming works across mobile platforms
The general flow is the same for Flutter, iOS, and Android:
- The app sends the user’s message to your backend.
- The backend requests a streaming response from OpenAI or Anthropic.
- As text arrives, the backend forwards it to the app through an SSE connection.
- The app appends each text chunk to the current message bubble, so the response appears progressively.
The implementation depends on your platform. In Flutter, you can read the response stream using Dart’s HTTP libraries. On iOS, URLSession supports asynchronous streaming, while Android developers can use OkHttp to read incoming response data. In each case, the UI should update as new text arrives rather than waiting for the full answer.
Here’s a minimal Flutter example. It assumes your backend sends SSE events in the format data: {"text":"Hello"}, followed by data: [DONE]. The backend must handle the provider-specific events and convert them to this format.
import 'dart:convert';
import 'package:http/http.dart' as http;

Future<void> streamReply(
  String message,
  void Function(String) onText,
) async {
  final client = http.Client();

  try {
    final request = http.Request(
      'POST',
      Uri.parse('https://your-backend.com/chat/stream'),
    )
      ..headers['Content-Type'] = 'application/json'
      ..headers['Accept'] = 'text/event-stream'
      ..body = jsonEncode({'message': message});

    final response = await client.send(request);

    if (response.statusCode != 200) {
      throw Exception('Streaming request failed');
    }

    await for (final line in response.stream
        .transform(utf8.decoder)
        .transform(const LineSplitter())) {
      if (!line.startsWith('data: ')) continue;

      final data = line.substring(6);
      if (data == '[DONE]') break;

      final chunk = jsonDecode(data) as Map<String, dynamic>;
      onText(chunk['text'] as String);
    }
  } finally {
    client.close();
  }
}
The onText callback should append each chunk to the existing assistant message in the UI. This example is a minimal client-side pattern, not a complete integration. It assumes each SSE event fits on one line; production code should use a proper SSE parser and handle connection interruptions, timeouts, and cancellation.
One important detail: streaming improves perceived speed, but it doesn’t automatically reduce API costs or the time needed to generate the entire response. Its main benefit is that users can start reading while the model is still working.
Step 3. Manage sessions and conversation history
An AI chat feature needs context to follow a conversation. If a user asks, “Can you make it shorter?” the model needs the previous message to understand what they mean.
To support conversation history in a mobile app, your backend can either send relevant previous messages with each request or use a provider’s conversation-state features to maintain context. The approach depends on the API you choose and how much control you need over stored history.
Choose which messages to keep
There are three common ways to manage conversation history:
- Full history: Send every previous message. This is simple but becomes expensive as conversations grow.
- Sliding window: Keep recent messages and drop older ones when the conversation gets too long. This saves tokens but may lose important context.
- Conversation summaries: Summarize older messages and send the summary alongside recent exchanges. This preserves key details while using less space.
You can combine these methods by keeping a summary of the conversation and the last few messages in full.
Count tokens and persist conversations
Count or estimate tokens before sending a request, including the system prompt and conversation history. Leave room for the model’s response within its context window. Token counts vary by model, so don’t rely on a fixed number of messages to determine whether a request will fit.
Users should also be able to reopen the app and continue a conversation. Store messages or summaries in persistent storage, typically on your backend, linked to the authenticated user and conversation ID. When the user returns, retrieve the relevant history and send it with the next request. Protect stored conversation data and provide a way to delete it when needed.
Step 4. Design a system prompt for your use case
A system prompt sets the rules for how an AI feature should behave. It tells the model what role to take, what tasks it should handle, what to avoid, and how to format its answers. A well-designed ChatGPT system prompt helps keep responses relevant and consistent across your mobile app.
Start with four things:
- Role: Define what the AI does, such as helping users plan meals or answer questions about your product.
- Boundaries: Specify what it should and shouldn’t answer, and what to do when it lacks enough information.
- Output format: Request a specific structure, such as short paragraphs, bullet points, or JSON for data your app needs to process.
- Tone: Set the style and level of detail so responses feel consistent throughout the app.
Here are three examples you can adapt.
1. Fitness app assistant
You are a fitness assistant in a mobile app.
Provide practical workout suggestions based on the
user's stated goals and experience. Keep answers
concise and use clear steps. Don't diagnose injuries
or medical conditions. If a question requires medical
advice, recommend consulting a qualified professional.
2. Customer support assistant
You are a customer support assistant for [Product].
Answer using only the information in the provided
help documentation. If the answer isn't covered,
say you don't have enough information and offer to
connect the user with support. Keep replies friendly,
clear, and concise.
3. AI task planner
You are a task-planning assistant. Turn the user's
goals into realistic, actionable steps. Prioritize
tasks by urgency and importance, and keep each step
brief. If key details are missing, ask a clarifying
question instead of making assumptions.
Keep prompts specific and test them
A long system prompt isn’t necessarily a better one. Clear instructions and concrete examples usually help more than vague directions such as “be helpful.” Test your prompt with typical user requests, unexpected inputs, and edge cases, then adjust it when the model gives inconsistent or unsuitable answers.
If your app expects structured output, specify the required format and validate the response before using it. For example, asking for JSON doesn’t guarantee valid JSON every time; use structured-output features supported by your chosen API when possible.
Finally, keep system prompts on your backend rather than relying on instructions embedded in the mobile app. This makes them easier to update and helps prevent users from changing them directly. A prompt guides the model’s behavior, but it doesn’t guarantee that the model will always follow every instruction.
Step 5. Handle errors, rate limits, and fallbacks
AI requests can fail because of network issues, invalid requests, rate limits, or temporary provider outages. Handle these errors on your backend so the app doesn’t leave users staring at a loading indicator.
Handle common API errors
OpenAI and Anthropic use HTTP status codes to indicate errors, though some codes differ between providers.
- 400: The request is invalid. Check its parameters and format.
- 401 / 403: Authentication or permission issue. Check the API key and access rights.
- 429: Rate limit or usage limit reached. Check the error details before retrying.
- 500: Internal server error. Retry if the issue is temporary.
- 503 (OpenAI) / 529 (Anthropic): The service is temporarily unavailable or overloaded.
Add retries and fallbacks
Set request timeouts and use exponential backoff for temporary failures. Follow the provider’s Retry-After header when available, and limit retries. Don’t keep retrying invalid requests or billing and usage limit errors. See the OpenAI error-handling guide and Anthropic API error documentation for provider-specific guidance.
If a request fails, keep the user’s message and offer a retry. For streaming responses, also handle errors that occur after text has started appearing. If you plan to switch to another model or provider as a fallback, test that behavior before releasing the feature.
Step 6. Control AI API costs and token usage
AI API costs depend on the model, the amount of text you send, and the length of the response. A short in-app question can cost very little, but sending long conversation histories with every request can increase spending as usage grows.
If your app will make frequent AI requests, cloud API costs aren’t the only thing to consider. On-device AI can reduce per-request costs and latency for certain features, though it comes with its own development trade-offs.
Estimate costs for common use cases
Before choosing a model, estimate how many input and output tokens each feature will use. For example, a short FAQ answer may need around 500 input tokens and 150 output tokens, while a conversation with extensive context may use several thousand input tokens.
Multiply these estimates by the selected model’s current input and output rates. Check OpenAI’s API pricing and Anthropic’s pricing for current rates. These calculations give you a starting estimate, not a fixed cost per request.
Reduce costs with prompt caching
If your app repeatedly sends the same instructions or reference material, prompt caching can reduce the cost of processing repeated input and help you with the AI API cost control in a mobile app.
- OpenAI: Prompt caching is automatic for eligible requests. Keep reusable instructions and context at the beginning of the prompt to improve cache reuse. See the prompt caching guide.
- Anthropic: You can use
cache_controlto mark content for caching. This is useful for repeated system prompts, examples, and large context blocks. See the Claude prompt caching guide.
Caching mainly reduces input-processing costs. It doesn’t eliminate output token charges or guarantee savings on every request.
Set usage limits and monitor spending
Use your provider’s dashboard to track API usage, token consumption, and costs. Set budget alerts and configure available usage limits to help prevent unexpected spending. Keep in mind that a budget alert may notify you without automatically stopping requests, so check how your provider’s limits work.
You can also add application-level controls on your backend:
- Limit the number of requests each user can make within a given period.
- Set maximum input and output token counts.
- Avoid sending unnecessary conversation history.
- Track costs by feature or user to identify expensive workflows.
These controls help you keep AI features useful without letting API usage grow unchecked.
Step 7. Test your AI integration before shipping
An AI feature can work technically and still give users inaccurate, irrelevant, or inconsistent answers. Before releasing it, test both the integration itself and the quality of its responses.
Test the API connection
Start with unit tests that mock the AI API. This lets you check how your app handles successful responses, empty results, timeouts, malformed data, and errors without making real API calls.
Then run integration tests against the actual provider. Check authentication, response parsing, streaming, and conversation history. These tests may incur API charges, so use a small test dataset, limit token usage, and avoid running expensive requests unnecessarily.
Evaluate response quality
Create a set of representative test prompts based on what users will actually ask. Evaluate responses against clear criteria, such as accuracy, relevance, tone, instruction following, and correct output format. For features that rely on your own documentation, also check whether answers are supported by the provided sources.
Automated checks can catch issues such as missing fields or invalid JSON. For subjective qualities, combine human review with repeatable evaluation criteria.
Run regression tests after prompt changes
A small change to your system prompt can affect responses across many scenarios. Keep a set of test cases and run them whenever you update the prompt, switch models, or change how conversation history is handled. Compare the new results with previous ones to catch regressions before users encounter them.
Add AI to your existing mobile app with Perpetio
Adding an AI API call is only one part of building a reliable mobile feature. Security, conversation management, response quality, and cost control all need to be considered before launch.
Perpetio helps businesses add AI features to existing apps across Flutter, iOS, and Android. Explore our AI integration services to discuss your project and get a free tech consultation.
FAQs
How do I integrate the ChatGPT API into a Flutter mobile app?
Connect your Flutter app to a backend that sends requests to the OpenAI API and returns responses. Keep your API key on the backend rather than embedding it in the app.
What is the difference between the ChatGPT and Claude API for mobile integration?
Both APIs generate AI responses, but they differ in request formats, available models, and pricing. OpenAI uses the Responses API, while Claude uses the Messages API.
How do I implement streaming AI responses in a mobile app?
Configure your backend to stream text from the AI provider to your app as it arrives, using Server-Sent Events (SSE), for example. The app can display the response progressively instead of waiting for the entire answer.
How do I manage conversation history with a token limit in an AI chat app?
Store conversation history on your backend and send only the context needed for each request. Remove older messages or summarize them to stay within the model’s token limit and control costs.
How much does it cost to add a ChatGPT or Claude feature to a mobile app?
API costs depend on the model and the number of input and output tokens, while development costs depend on the feature’s complexity. Estimate expected usage and check current provider pricing before setting a budget.
How do I handle API errors and rate limits in a mobile AI integration?
Set timeouts and use limited retries with exponential backoff for temporary failures. Slow requests when rate limits are reached, and avoid repeatedly retrying invalid requests or exhausted usage limits.