Sharing is caring. Everyone knows this simple truth. In the work environment, we are caring not only for our clients but also for our coworkers. We can do so by exchanging experience, tips, and work cases.
The most popular ways to organize knowledge sharing are offline and online sessions, group chats, and regular letters with useful info from colleagues. While knowledge sharing sessions need preplanning and extra time, messages and emails can get lost in the constast flow of work communication.
We faced this very situation in our Perpetio team: Slack is overflowed with project updates and announcements; not everyone can attend knowledge-sharing sessions offline or join online. After all, there is always work to be done.

Why make a knowledge-sharing application?
That’s why we came up with an idea of a dedicated corporate knowledge-sharing app. We want to teach each other with the most convenience and use. So why an app instead of a Slack channel or, let’s say, monthly email?
- A mobile app can be accessed at any time. Whether a team member has some extra 20 minutes before the meeting with a client or wants to go through some valuable materials on the weekend, there is always an app at hand. Many of us prefer to mute Slack notifications and not check our emails on the weekend. Not to mention that you probably won’t remember all the content shared at a meeting four months ago.
- All the materials are organized in a knowledge-sharing app. Even with a dedicated channel or chat, messages with helpful materials will get lost. How do you find a link your coworker shared two months ago? Scrolling, search by keywords? It takes too much effort to find it. On the contrary, you can save posts in the app to view them later, and there are separate chats for discussion. No mess, no off-topic messages, no info you don’t need.
- Useful information and discussions can be separated. While some people just want to read an article, others might have questions or need to discuss the updates. If we take the example of a separate knowledge-sharing Slack channel, we would either create two or three different channels or have one channel with a constant flow of unrelated messages. In a dedicated app, a user can access the feed with all the recent posts as well as like, comment, and save them. There are private chats for one-to-one conversations and questions.
Thinking about these advantages, it is pretty clear why we decided to go on and create a separate app for knowledge sharing, isn’t it?
What’s inside the app? Let’s explore this in the next chapter.
Top features for a corporate knowledge-sharing app
Let us walk you through the features we found necessary for a successful corporate knowledge-sharing app. As our team is building the first MVP version of the applications, we included only the essential functionality.
You can download app on your Android phone from Google Play:

Feed with posts
The main feature of a knowledge-sharing app is access to the very content. Each user can create a post with the information they would like to share with their colleagues. It can be a text with some tips, links to the videos or articles, or any other form of content.
Feed is organized chronologically so that the users won’t miss out on anything. They can like and comment on posts — just to say thanks or add something to the discussion.
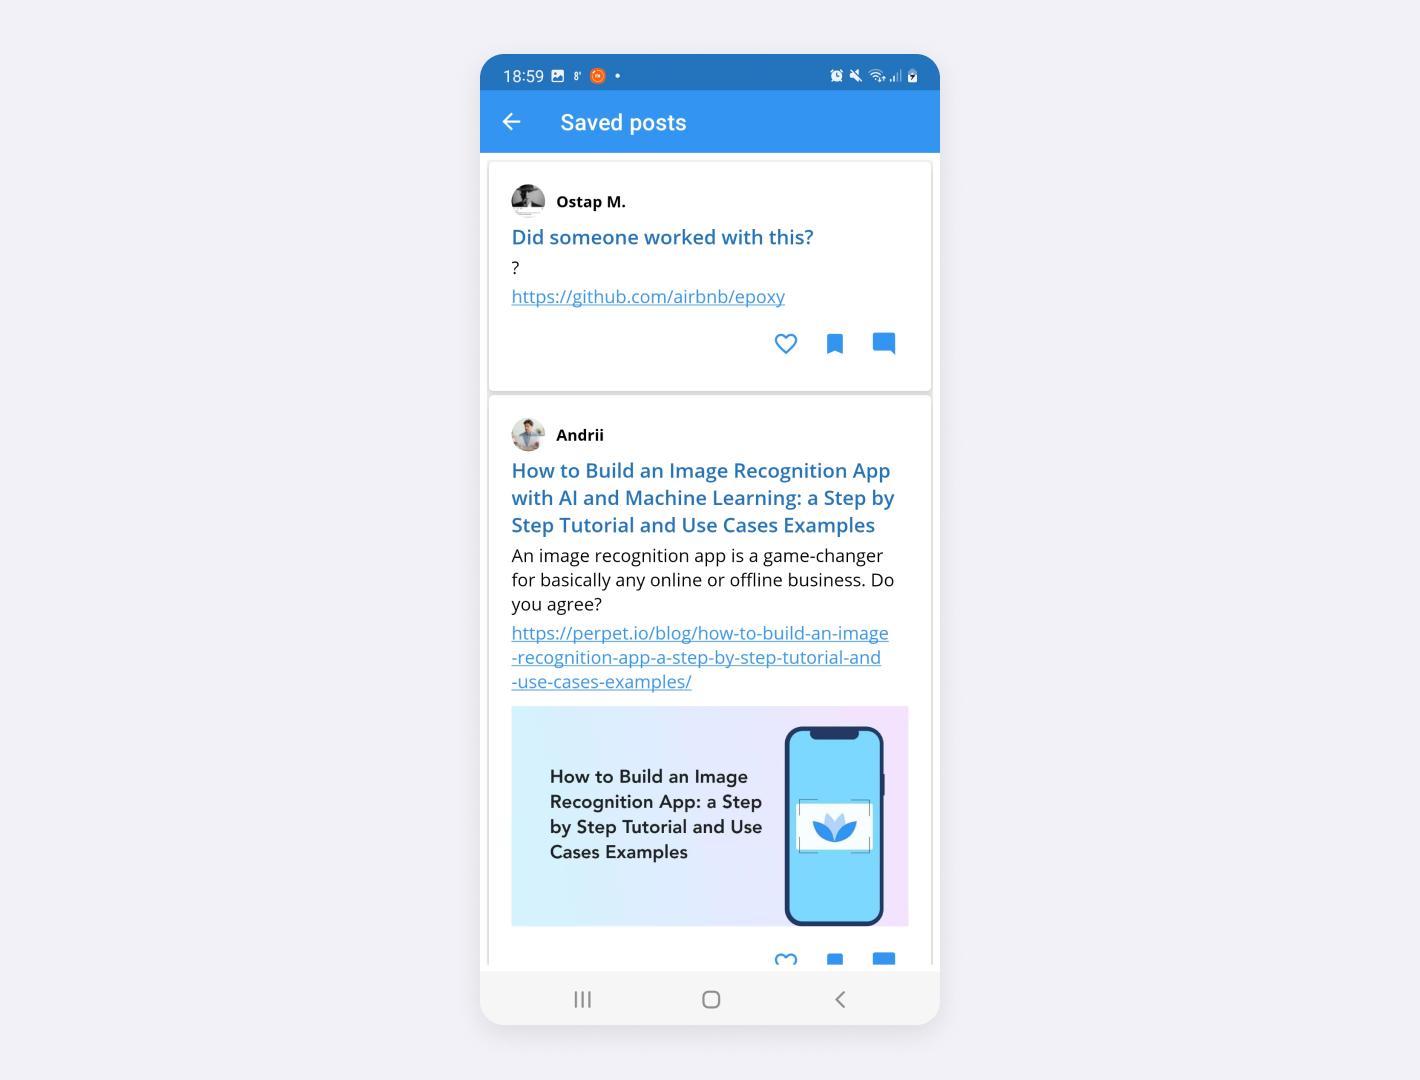
Saved posts
If a user finds some helpful post and wants to come back to it later, it is possible to save it. Thus, there are fewer chances to lose that one tutorial you saw two weeks ago and really need right now.
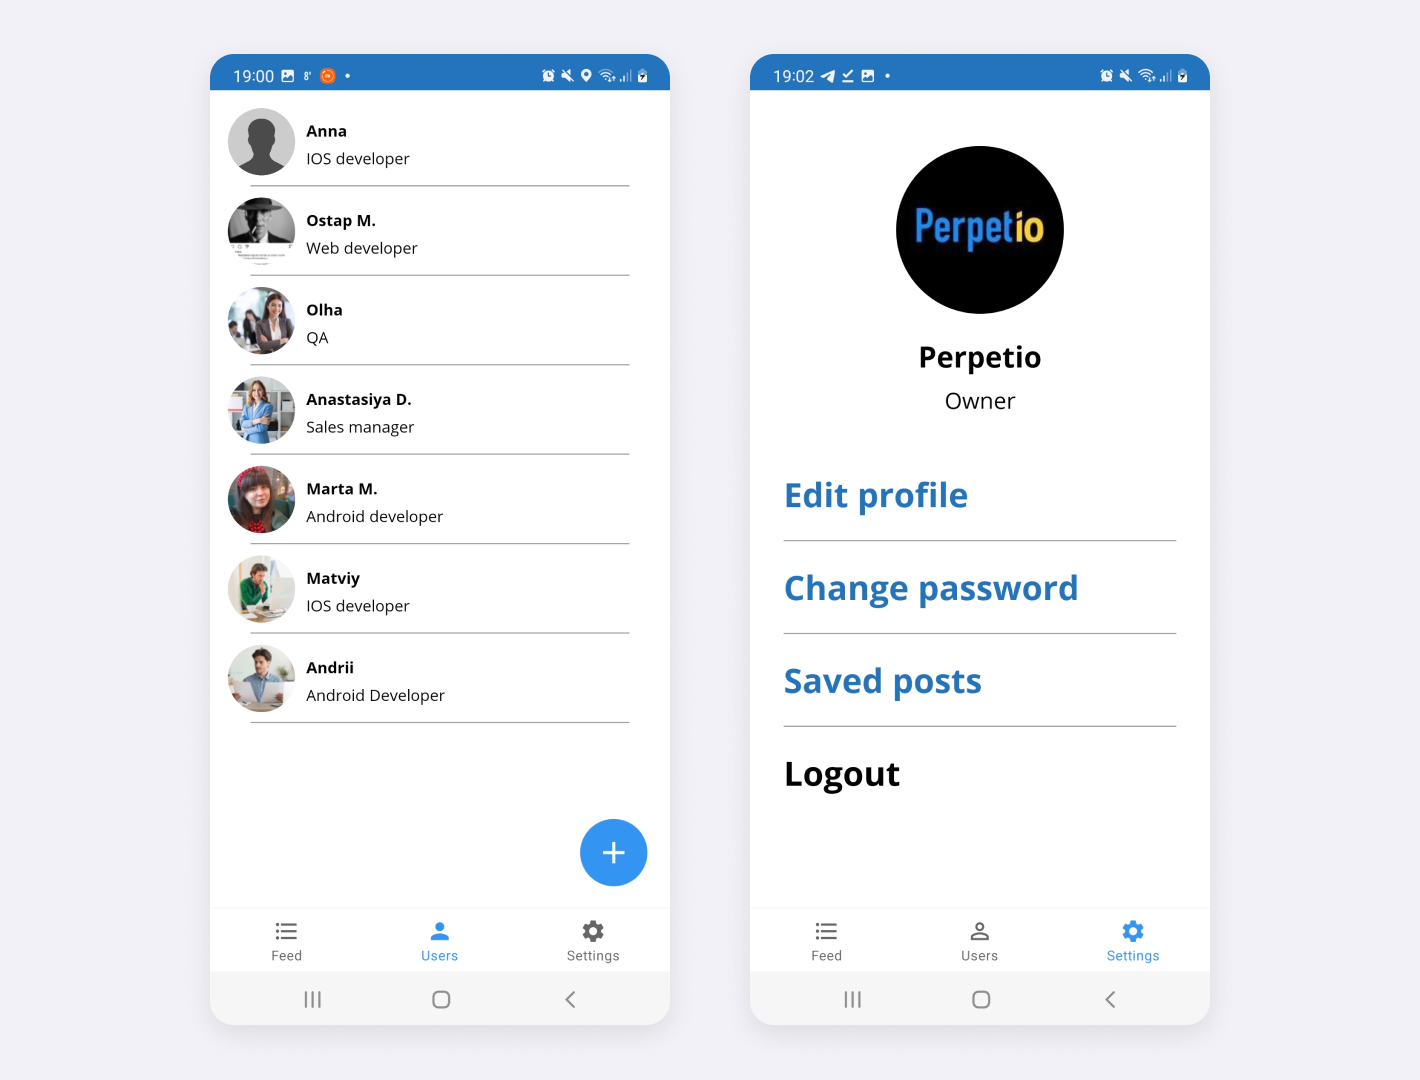
Personal profiles
To understand who’s who and who you can thank for the helpful information, each user can add their name, photo, and position in the company. After all, a knowledge-sharing app is a kind of social media too.
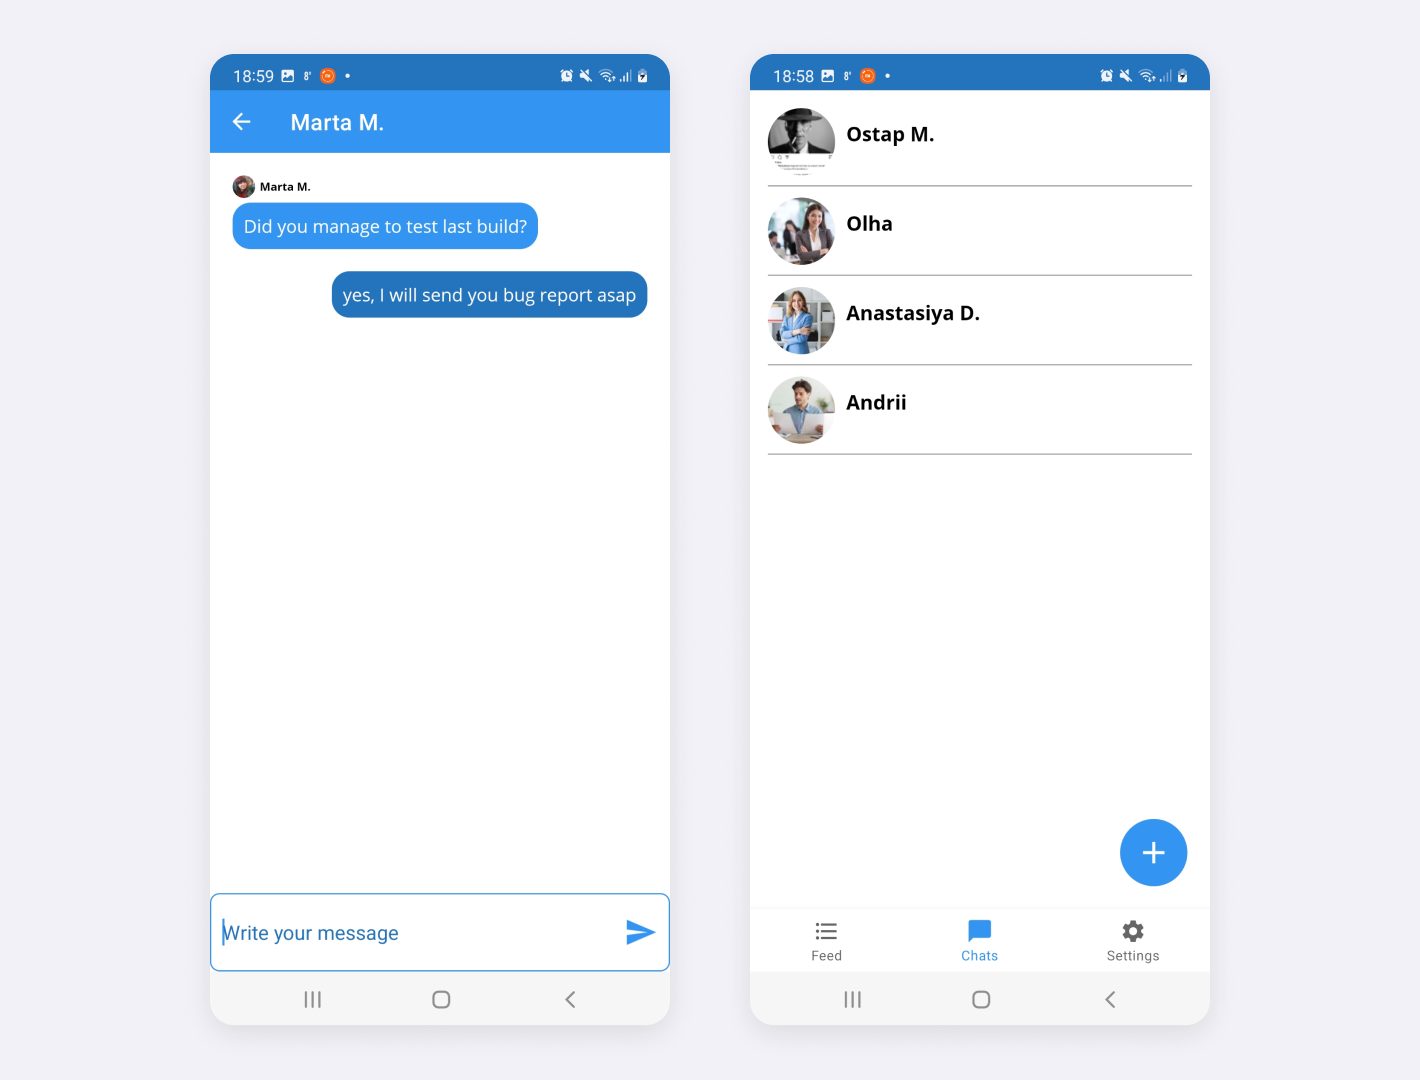
Chats
Have some questions for your colleague, need a mentoring session, or want to organize an event for your team? No need to distract them in Slack or other messengers; let all the things related to exchanging knowledge stay in a dedicated app.
Log in and registration
Of course, no app can exist without log-in and registration features. Because our solution is a corporate one, the company’s name, work email, and job title are a must for registering in the app.
How to build an Android knowledge-sharing app step by step
Time to move to the part of this article you are probably most curious about: how to make your very own Android knowledge-sharing app from scratch. Let’s not beat around the bush and begin right away.
Setting up the project
The first step of any project is the setup and preparation for building the app. We will be using Firebase API for our knowledge-sharing application, including Authentication, Firestore Database, Storage, and Crashlytics.
Firebase is a perfect choice because:
- It provides an easy implementation for login and registration
- Firestore supports offline data persistence
- It is easy to implement and maintain
If you need detailed instructions on adding Firebase to your project, you can find everything on the Firebase website. After declaring dependencies for each Firebase product we are using, that’s what you should see:
implementation platform('com.google.firebase:firebase-bom:29.1.0')
implementation 'com.google.firebase:firebase-analytics-ktx'
implementation 'com.google.firebase:firebase-crashlytics'
implementation 'com.google.firebase:firebase-auth-ktx'
implementation 'com.google.firebase:firebase-storage-ktx'
implementation 'com.google.firebase:firebase-firestore-ktx'
One more important note: we are using MVVM architecture for this project. The advantage of MVVM architecture is that the code layers do not depend on each other, and the user interface is separated from business logic.
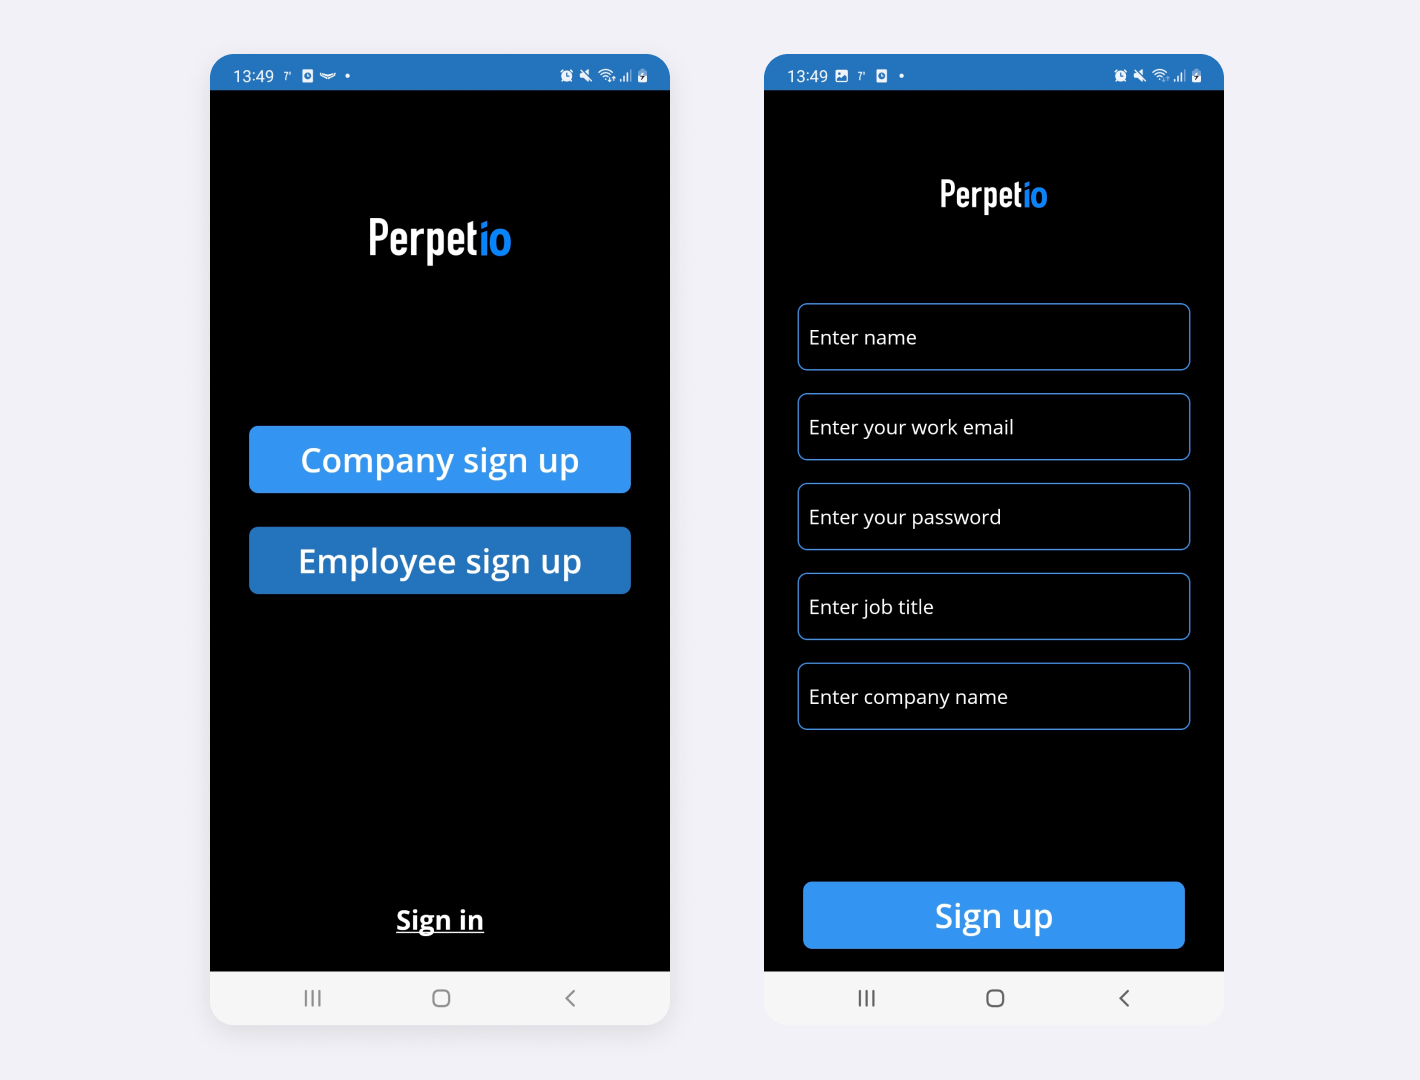
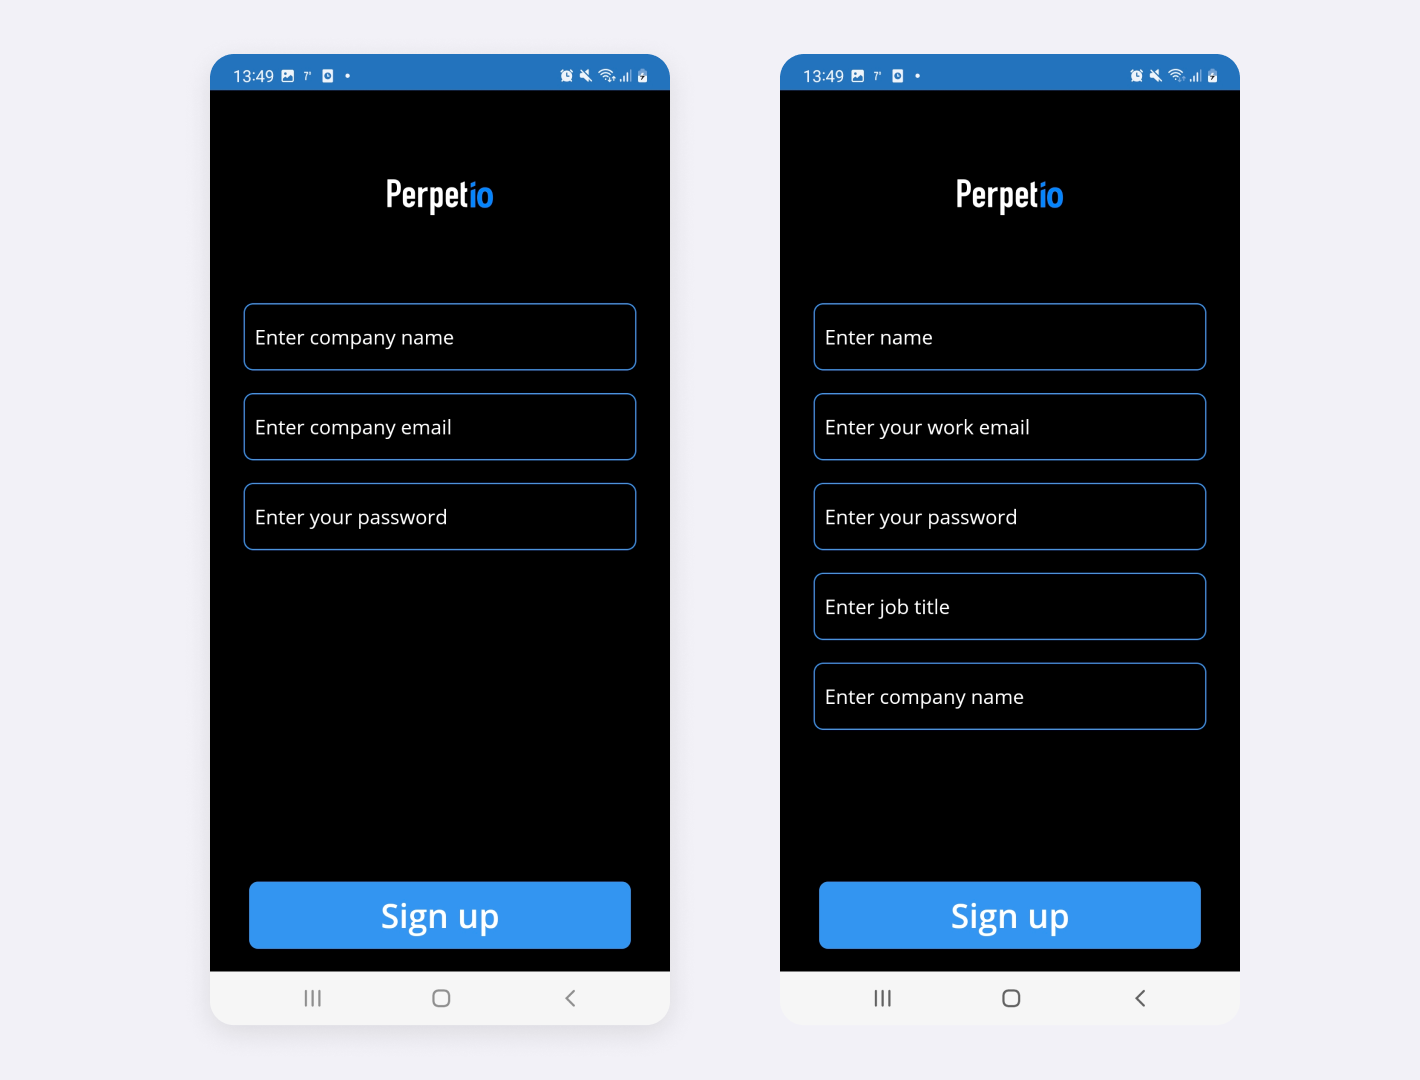
Log in and registration
The first screen we see in the app is a welcome page. Here, a user can sign up as a company, as an employee, and log in. Knowledge-sharing apps might be designed for a specific company only. If our app were one of those, we would only develop login and registration for employees. But we want to create an application that different companies can use, so the company registration feature is a must.
We need such info as company name, company email, and password for the new company registration.
For the employee registration, we ask for the name, email, and password. Because our app is a corporate solution, meaning that it is designed for workplace use only, users must enter the company’s name and their job title too.
fun login(email: String, password: String) {
   state.value = ViewModelState.Loading
   auth.signInWithEmailAndPassword(
       email,
       password
   ).addOnCompleteListener {
       if (it.isSuccessful) {
           val firebaseUser = auth.currentUser
           val uid = firebaseUser?.uid
           if (uid != null) {
               getUserInfo(uid)
           }
       } else {
           state.value = it.exception?.localizedMessage?.let { it1 ->
               ViewModelState.Error(
                   it1
               )
           }
       }
   }
}

fun registerUser(user: User, password: String) {
   state.value = ViewModelState.Loading
   user.email?.let {
       auth.createUserWithEmailAndPassword(
           it, password
       ).addOnSuccessListener {
           val firebaseUser = auth.currentUser
           val uid = firebaseUser?.uid
           if (uid != null) {
               user.id = uid
               createCustomUserModel(uid, user)
           } else {
               state.value =
                   ViewModelState.Error("Invalid user uid, cannot upload to Firebase Database")
           }

       }.addOnFailureListener {
           state.value = ViewModelState.Error(it.localizedMessage)
       }
   }
}
As a result, we will have two types of users in our app: company and employee. Depending on user type, the functionality will be a little bit different.
Home screen
To create our home page we used activity and a standard Android bottom navigation bar. For company user type, we have such tabs as
- Feed
- Users
- Settings
For employee user type:
- Feed
- Chats
- Settings
For the bottom navigation bar, we used Navigation Component and BottomNavigationView.
<androidx.fragment.app.FragmentContainerView
   android:id="@+id/nav_host_fragment"
   android:name="androidx.navigation.fragment.NavHostFragment"
   android:layout_width="match_parent"
   android:layout_height="0dp"
   android:layout_weight="1"
   app:defaultNavHost="true"
   app:layout_constraintBottom_toTopOf="@+id/bottom_navigation"
   app:layout_constraintLeft_toLeftOf="parent"
   app:layout_constraintRight_toRightOf="parent"
   app:layout_constraintTop_toTopOf="parent"
   app:navGraph="@navigation/nav_graph" />

<com.google.android.material.bottomnavigation.BottomNavigationView
   android:id="@+id/bottom_navigation"
   android:layout_width="match_parent"
   android:layout_height="wrap_content"
   app:defaultNavHost="false"
   app:labelVisibilityMode="labeled"
   app:layout_constraintBottom_toBottomOf="parent"
   app:menu="@menu/bottom_navigation" />


val navHostFragment =
   supportFragmentManager.findFragmentById(R.id.nav_host_fragment) as NavHostFragment?
val navController = navHostFragment?.navController
if (navController != null) {
   NavigationUI.setupWithNavController(
       binding.bottomNavigation,
       navController
   )
}
We created a navigation graph and a menu XML file to implement this logic. The IDs in these two files must be the same. In this way, the Navigation component can manage the navigation by itself.
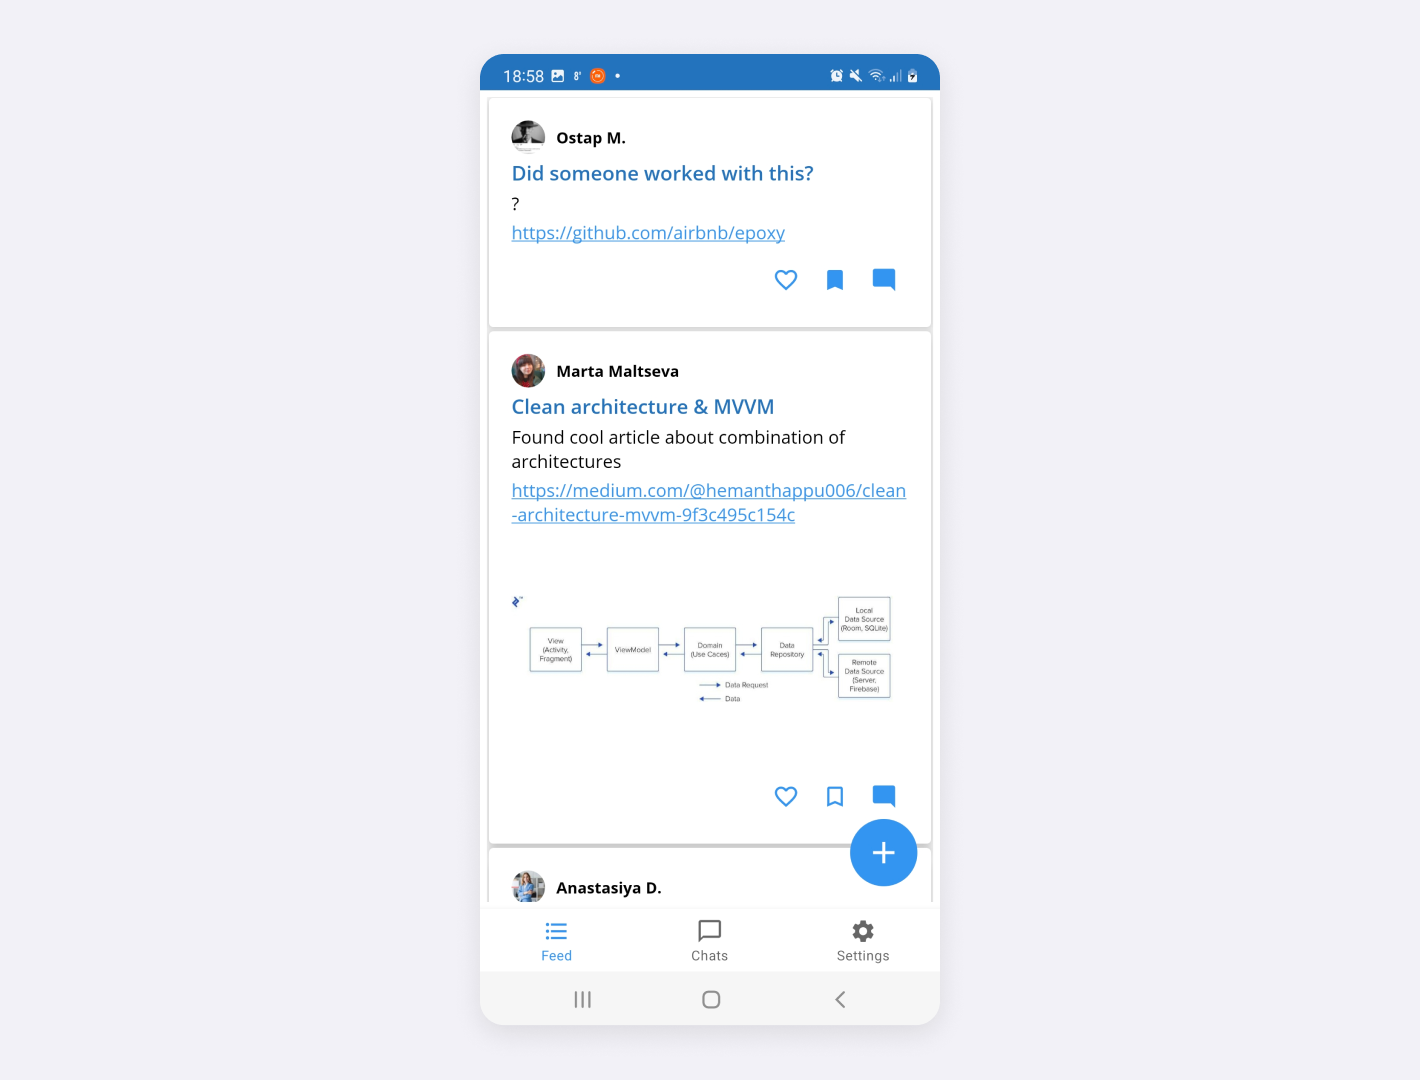
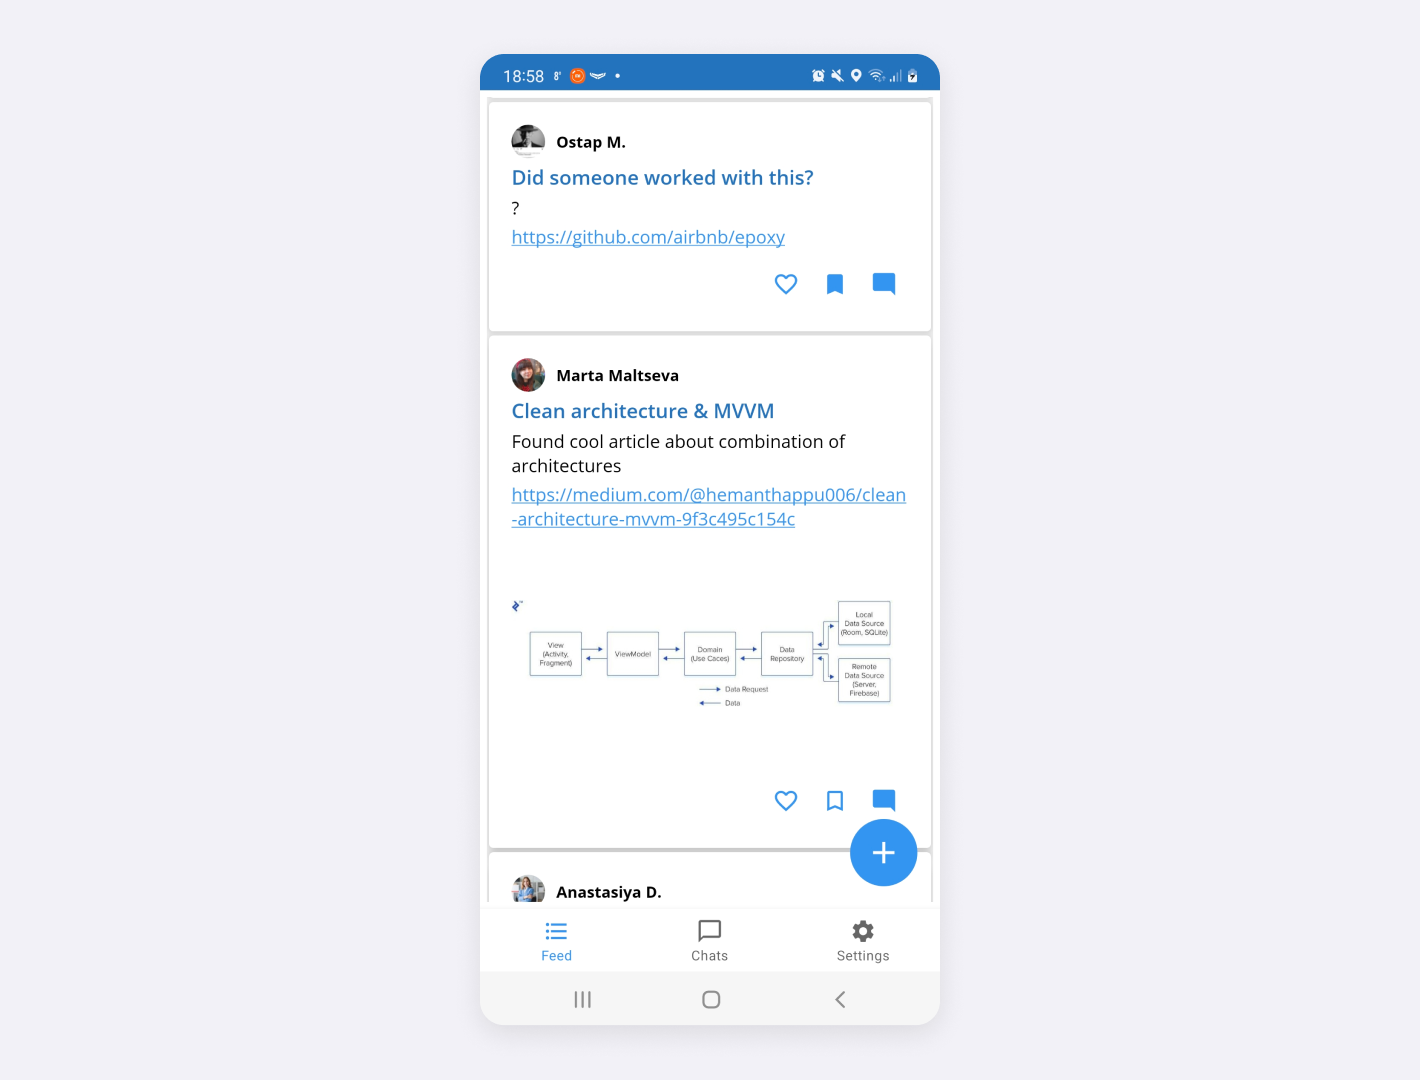
Feed
Feed is what our app is all about. After all, it is why users open the app in the first place. It is the main logic of the application — a feed list, where you can read company news, some interesting articles, find useful links, or other knowledge-sharing posts. What’s important, users can save the posts to take a look later. Of course, any user can create a post to share their experience or tips.
To create a post, a user needs to press a “+” button in the right lower corner of the main screen. Creating a post screen opens: the user has to add a title and text. It is also possible to upload a photo or add a link to an article or other resource.
fun getFeedList(company: String) {
   state.value = ViewModelState.Loading
   db.collection(Const.FOLDER_POSTS)
       .whereEqualTo(Const.KEY_COMPANY, company)
       .orderBy(Const.KEY_TIME, Query.Direction.DESCENDING)
       .get()
       .addOnSuccessListener {
           state.value =
               ViewModelState.LoadedList(ConverterUtils.convertSnapshotToFeedList(it))
       }
       .addOnFailureListener {
           state.value = ViewModelState.Error(it.localizedMessage)
       }
}


data class Feed(
   val id: String?,
   val title: String?,
   val description: String?,
   val userImage: String?,
   val userName: String?,
   val userId: String?,
   var image: String?,
   val company: String?,
   val time: Long,
   val link: String?,
   var usersThatSavedPost: MutableList<String>,
   var usersThatLikedPost: MutableList<String>
) : BaseModel()
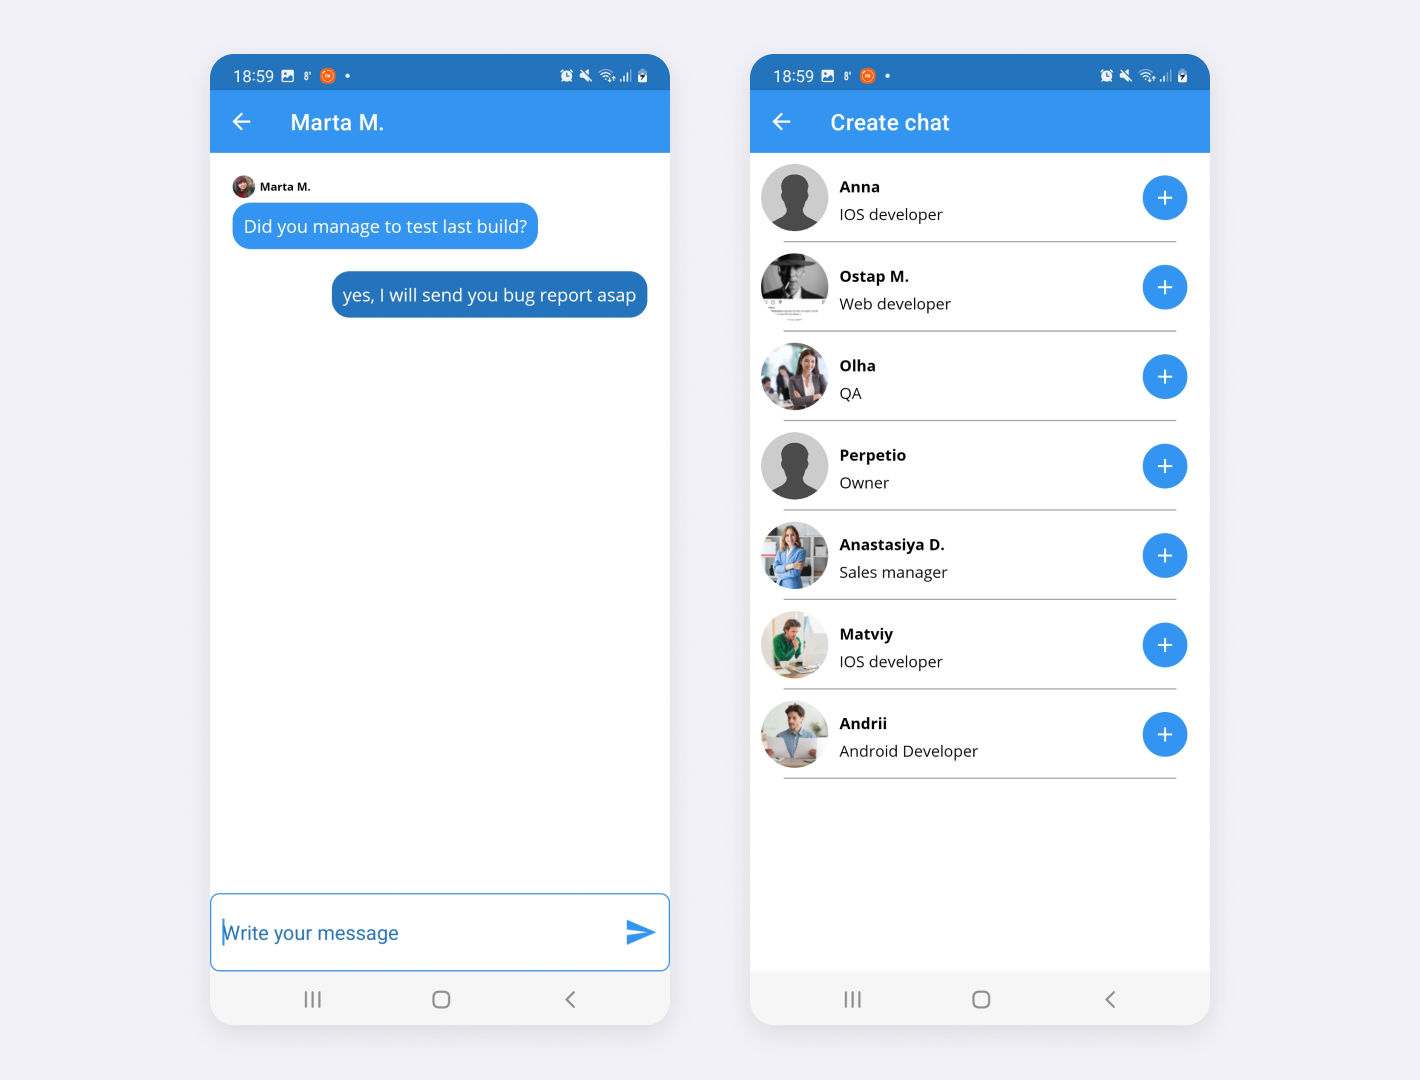
Chats
For personal communication, users can go to the chats screen. On the chats screen, you can see the list of your chats and create a new one with any of your colleagues.
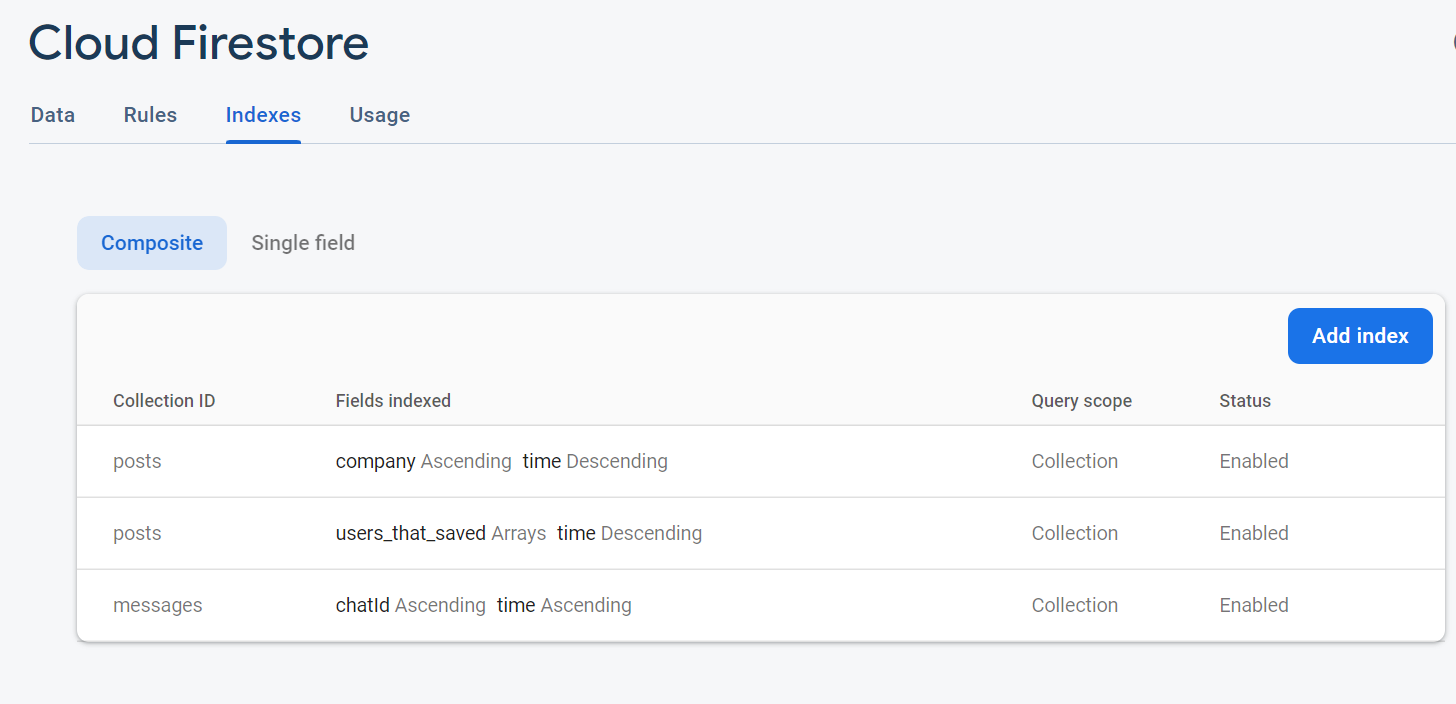
To create all instances, we used the Firestore database. It allows us to filter a list by fields and order by specific parameters. If you want to use two types of filters for queries, as we did here, you will need to create indexes in Firestore.
fun getMessages(chatId: String) {
   state.value = ViewModelState.Loading
   db.collection(Const.FOLDER_MESSAGES)
       .whereEqualTo(Const.KEY_CHAT_ID, chatId)
       .orderBy(Const.KEY_TIME)
       .get()
       .addOnSuccessListener {
           state.value =
               ViewModelState.LoadedList(
                   ConverterUtils.convertSnapshotToMessageList(
                       it
                   )
               )
       }
       .addOnFailureListener {
           state.value = ViewModelState.Error(it.localizedMessage)
       }

}
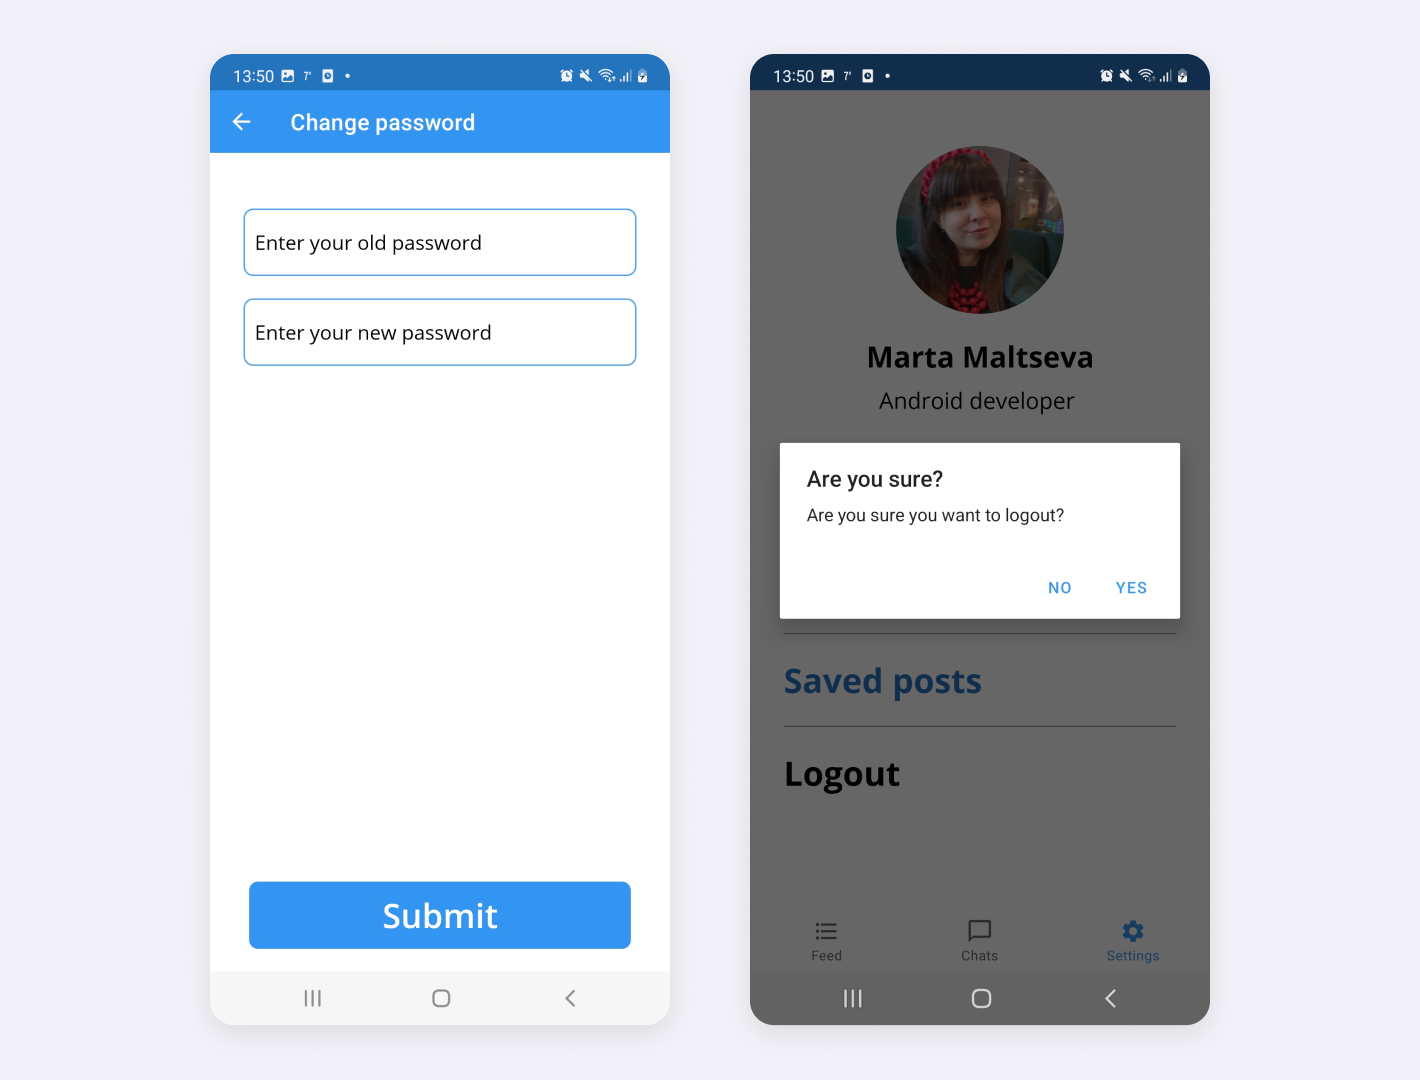
Settings
The last tab of our app is settings. Here, users can view and edit their profiles. That’s also where all the saved posts are stored. And, of course, users can log out from their accounts or change their password (for example, if the company created your account).

fun getSavedPosts(userId: String) {
   state.value = ViewModelState.Loading
   db.collection(Const.FOLDER_POSTS)
       .whereArrayContains(Const.KEY_SAVED_USERS_LIST, userId)
       .orderBy(Const.KEY_TIME, Query.Direction.DESCENDING)
       .get()
       .addOnSuccessListener {
           state.value =
               ViewModelState.LoadedList(ConverterUtils.convertSnapshotToFeedList(it))
       }
       .addOnFailureListener {
           state.value = ViewModelState.Error(it.localizedMessage)
       }
}
To store images, we are using Firebase Storage. First, you need to save a file in storage, then get an image URL and save it to the user model.
fun saveImage(user: User) {
   state.value = ViewModelState.Loading
   val storageReference: StorageReference = storage.reference
   user.id?.let { it1 ->
       user.avatarUrl?.let {
           storageReference.child(Const.FOLDER_USERS)
               .child(it1)
               .child(Const.AVATAR_FILENAME)
               .putFile(Uri.parse(it))
               .addOnFailureListener {
                   state.value = ViewModelState.Error(it.localizedMessage)
               }
               .addOnSuccessListener {
                   getImageURl(user, it)
               }


       }
   }
}

private fun getImageURl(user: User, it: UploadTask.TaskSnapshot?) {
   val downloadUri = it?.getStorage()?.getDownloadUrl()
   downloadUri
       ?.addOnSuccessListener {
           val generatedFilePath = downloadUri.getResult().toString()
           user.avatarUrl = generatedFilePath
           updateUserAvatar(user)
       }
       ?.addOnFailureListener {
           state.value = ViewModelState.Error(it.localizedMessage)
       }
}
Changing the password with Firebase authentication is a little bit tricky: first, we need to re-authenticate the user, and only then update the password.
fun updatePassword(password: String, newPassword: String) {
   state.value = ViewModelState.Loading
   val email = auth.currentUser?.email
   val credential: AuthCredential? =
       email?.let { EmailAuthProvider.getCredential(it, password) }
   if (credential != null) {
       auth.currentUser?.reauthenticate(credential)
           ?.addOnFailureListener {
               state.value = ViewModelState.Error(it.localizedMessage)
           }
           ?.addOnSuccessListener {
               auth.currentUser?.updatePassword(newPassword)
                   ?.addOnFailureListener {
                       state.value = ViewModelState.Error(it.localizedMessage)
                   }
                   ?.addOnSuccessListener {
                       state.value = ViewModelState.Loaded
                   }
           }
   } else {
       state.value = ViewModelState.Error("No email")
   }
}
Last but not least, don’t forget to call for a log-out.
Firebase.auth.signOut()
And that’s it — our Android knowledge-sharing app is all done and ready to use! If you need to take a look at the app’s code — welcome to the GitHub repository.

Final words
Obtaining new skills and knowledge at work should be convenient. Organizing a knowledge-sharing session or thinking about how to send helpful materials should not be a headache for the team. A dedicated app is one of the simplest yet most appropriate tools for workplace learning; at least, we at Perpetio think so. Our knowledge-sharing app turned out to be a well-organized, clear, and easy-to-use solution. The content shared by the users is the main point, so we kept our UI simple enough.
Thinking about getting an Android app? Let’s discuss your idea — the Perpetio team is open to new projects.